Are you ready to take your WooCommerce store to the next level? If you’re selling products online, understanding shipping can be one of the most crucial elements of your success. Enter shipping classes! If you’ve ever felt overwhelmed by the array of shipping options or confused about how to effectively manage shipping costs for different products, you’re not alone.Shipping classes in WooCommerce are here to simplify that process and help you tailor your shipping strategy to fit your unique business needs.In this beginner-kind guide, we’ll walk you through everything you need to know about setting up and using shipping classes in WooCommerce. by the end,you’ll feel confident in your ability to streamline shipping,enhance customer satisfaction,and ultimately boost your sales. So, let’s dive in and unlock the potential of your online store together!
Understanding Shipping classes and Their Importance in WooCommerce
Shipping classes in WooCommerce are essential for simplifying the shipping process and ensuring that customers receive accurate shipping costs based on the products they add to their cart. Utilizing shipping classes allows you to group similar products, making it easier to manage shipping rates and delivery times. this functionality not only enhances user experience but also helps you streamline your logistics.
By categorizing products into different shipping classes, you can:
- Define Unique Shipping Rates: Assign different shipping rates based on the class of the product. For instance, bulky items may require a higher shipping fee compared to lightweight products.
- Improve Shipping Accuracy: Prevent overcharging or undercharging customers by customizing rates that reflect the true cost of shipping each category of products.
- Optimize Delivery Options: Offer different delivery methods (e.g., standard, express) based on the shipping class. This can enhance customer satisfaction by giving them choices that fit their needs.
Creating and managing shipping classes in WooCommerce is straightforward. You can easily set them up by navigating to WooCommerce > Settings > Shipping > Shipping Classes. Here, you can add new shipping classes, assign them to specific products, and set the respective shipping rates. It’s vital to regularly review and adjust these classes as your product offerings evolve.
Here’s a simple table illustrating how different shipping classes can impact shipping rates:
| Shipping Class | Product Type | Shipping Rate |
|---|---|---|
| Standard | Lightweight Items | $5.00 |
| Bulky | Heavy Equipment | $20.00 |
| Express | Perishable Goods | $15.00 |
Moreover, utilizing shipping classes can lead to better inventory management. When you categorize products, it becomes easier to track which items are shipped together and identify patterns in shipping costs. This data can be invaluable for making informed decisions about pricing strategies and promotions.
understanding and implementing shipping classes in WooCommerce can significantly enhance your eCommerce operations. By offering precise shipping rates and improving customer experience, you’ll not only attract more buyers but also foster loyalty, ensuring they return for future purchases.
getting Started: Setting Up Your WooCommerce Store for Shipping Classes
Getting started with shipping classes in WooCommerce is a breeze, and it opens up a world of possibilities for managing your online store’s shipping operations. First things first, you’ll want to navigate to your WooCommerce settings. You can do this by going to woocommerce > Settings from your WordPress dashboard.
Once you’re in the settings menu, click on the Shipping tab. Here,you’ll see options for adding shipping zones and methods. Before you delve into shipping classes, it’s crucial to establish your shipping zones. Shipping classes allow you to categorize products based on their unique shipping requirements, which is essential for ensuring accurate shipping costs. To get started:
- Click on Add Shipping Zone.
- Enter the zone name and regions you want to cover.
- save your changes.
With your shipping zones set, it’s now time to create shipping classes. Go to the Shipping Classes section under the Shipping tab. Here you can define different classes based on product needs. You might create classes like Heavy Items, Fragile Items, or Free Shipping. To add a new shipping class, click on Add Shipping Class, and fill in the details:
| Shipping Class | Description |
|---|---|
| Heavy Items | For products weighing over 50kg. |
| Fragile Items | For products that require special handling. |
| Free Shipping | Eligible for free shipping on orders over $100. |
After creating your shipping classes, it’s important to assign them to your products. Navigate to the product edit page, scroll down to the Product Data section, and select the relevant shipping class from the dropdown menu under the Shipping tab. This small step is key to ensuring that your customers see the correct shipping costs at checkout.
Additionally,don’t forget to configure the shipping rates for each class. Click on the shipping zone you set up earlier and add a shipping method (like Flat Rate or Free Shipping). You can than customize the flat rate by selecting the shipping class and setting the price accordingly. This adaptability allows you to tailor your shipping strategy to fit your business model perfectly.
By understanding and implementing shipping classes in WooCommerce, you’re not just setting up logistics; you’re enhancing the user experience on your site. Customers appreciate transparency in shipping costs and options, and with shipping classes, you’re well on your way to achieving that. Get ready to watch your sales soar as you provide a seamless shopping experience!
Creating Your First Shipping Class: A Step-by-Step Guide
Creating a shipping class in WooCommerce is a straightforward process that can significantly enhance your online store’s shipping capabilities. It allows you to categorize your products based on shipping needs, ensuring that your customers get accurate shipping rates based on their purchases.
To begin, navigate to your woocommerce dashboard. From the left-hand menu,go to WooCommerce > Settings. Once there, select the Shipping tab. If you haven’t set up any zones yet, you’ll need to create at least one shipping zone before you can define a shipping class.
Next, click on Shipping Classes. Here, you can see any existing shipping classes or start fresh by adding a new one. Click on the Add Shipping Class button. You’ll be prompted to fill in some details:
- Shipping Class Name: give your class a recognizable name, like “Heavy items” or “Express Delivery.”
- Shipping Class Slug: This is a URL-friendly version of the class name, typically all lowercase with dashes.
- Description: Provide a brief explanation of when this shipping class should be used.
Once you’ve filled in the details, save your new shipping class. Now, it’s time to assign your products to this class.Go to Products and select the item you want to categorize. In the product data panel,find the Shipping tab and select your newly created shipping class from the dropdown menu.
you’ll want to set up your shipping rates for each class. Return to the Shipping Zones section, select the relevant zone, and add a shipping method like Flat Rate. In the method options, you’ll see an option to specify rates by shipping class. This lets you customize shipping costs depending on the class assigned to the product.
Here’s a quick reference table to help you visualize the process:
| Step | Action |
|---|---|
| 1 | Go to WooCommerce > Settings > shipping. |
| 2 | Click on Shipping Classes and then Add shipping Class. |
| 3 | Fill in class details and save. |
| 4 | Assign the shipping class to relevant products. |
| 5 | Set shipping rates according to the class. |
By following these steps, you can effectively create and manage shipping classes in WooCommerce, allowing you to provide a smoother and more tailored shopping experience for your customers. Remember, the right shipping class setup can lead to better customer satisfaction and possibly increased sales.
Assigning Products to Shipping Classes: Tips and Best Practices
When it comes to optimizing your WooCommerce store,effectively assigning products to shipping classes can make a world of difference. Shipping classes allow you to group your products based on shipping requirements, ensuring you charge the right amount for delivery and enhance the customer experience. Here are some tips to guide you through the process:
- Understand your products: Take a close look at the various products in your inventory. Consider their size, weight, and shipping costs. Such as,if you sell both lightweight items and heavy machinery,it’s essential to create distinct shipping classes for each to avoid overcharging or undercharging shipping fees.
- Create clear shipping classes: Don’t overload your shipping classes with too many options. Keep it simple by categorizing products into a few key classes,such as Standard Shipping,Heavy items,and Digital products. This not only simplifies management but also makes it easier for customers to understand their shipping options at checkout.
- Use consistent naming conventions: Ensure that the names of your shipping classes are descriptive and intuitive. This will help both you and your customers know what to expect. As a notable example, using descriptive names like Free Shipping or Express Delivery can clarify what services are available.
- Adjust shipping rates based on product classes: Each shipping class can have its own rate settings. Take advantage of this feature to align your shipping costs with the value and weight of your products. You can create a simple table to outline how different classes will affect shipping rates:
| Shipping Class | Rate |
|---|---|
| Standard Shipping | $5.00 |
| Heavy Items | $15.00 |
| Digital Products | Free |
Moreover, consider utilizing plugins or extensions that can enhance your shipping class capabilities. Some tools allow for advanced features like conditional shipping rules or regional shipping rates, giving you even more flexibility in how you assign products.
Lastly, don’t forget to monitor the performance of your shipping classes. Track your shipping costs against customer satisfaction and sales trends. make adjustments as necessary to ensure that your shipping strategy aligns with your business goals and provides a seamless experience for your customers.

Customizing Shipping Options: How to Maximize Your Shipping Classes
Customizing shipping options in WooCommerce can significantly enhance your customers’ experience and boost your sales. By utilizing shipping classes, you can easily group similar products and apply specific shipping rates tailored to those categories. This not only streamlines your operational processes but also offers your customers obvious and fair shipping costs.
To begin maximizing your shipping classes, it’s essential to identify your product types. Consider the following factors:
- Weight: Heavier items may require higher shipping rates.
- Size: Bulky products could necessitate special handling or additional costs.
- Shipping method: Evaluate whether you need standard, expedited, or freight shipping for certain products.
Next, you’ll want to create distinct shipping classes in WooCommerce. This can be done through the settings menu. Just navigate to WooCommerce > Settings > Shipping > Shipping Classes. Here, you can add new classes and give them clear, descriptive names like “Heavy Items,” “Fragile Goods,” or “Free Shipping.” This clarity will help not only you but also your customers in understanding the costs associated with their purchases.
Once your shipping classes are established, it’s time to assign them to your products. You can do this in the product editing screen under the Shipping tab. Assign the appropriate shipping class to each item so that the correct rates are automatically applied during checkout. for example:
| Product Name | Shipping Class | Shipping Cost |
|---|---|---|
| Large furniture Item | heavy Items | $49.99 |
| Glass vase | Fragile Goods | $9.99 |
| Books | Free Shipping | $0.00 |
don’t overlook the importance of testing your shipping options.place test orders to ensure that the correct shipping rates are applied. This step will help you catch any discrepancies and improve customer satisfaction.Remember, a seamless checkout experience can lead to higher conversion rates and lower cart abandonment.
Testing Your Shipping Classes: Ensuring a Seamless Checkout Experience
Testing your shipping classes is crucial in creating a smooth and efficient checkout experience for your customers. After you’ve set up your shipping classes in WooCommerce, it’s time to verify that everything is functioning as intended. Nothing can frustrate customers more than unexpected shipping fees or incorrect options during checkout.
Start by simulating various customer scenarios.This means:
- Adding products from different shipping classes: Ensure that products with different shipping classes interact correctly in the cart.
- Testing multiple shipping addresses: Verify that shipping classes work seamlessly for local and international addresses.
- Using discount codes: Observe how discounts might affect shipping costs and whether they apply correctly.
One effective way to assess your setup is through creating a checklist. This checklist will serve as a handy reference during testing:
| Test Scenario | Status |
|---|---|
| Standard shipping class applied correctly | ✔️ |
| Free shipping class functions as expected | ✔️ |
| Flat rate shipping shows accurate cost | ✔️ |
| Shipping fees update automatically in the cart | ✔️ |
If discrepancies arise during your tests, revisit your shipping class settings. It’s essential to double-check the configurations to ensure they align with your business model.Consider the following tips:
- clear your cache: Sometimes, cached data can cause errors in the display of shipping options.
- Review your shipping zones: Ensure they are correctly set up to include all necessary regions.
- Consult woocommerce documentation: the official resources can provide insights into common issues and their fixes.
Ultimately, diligent testing of your shipping classes not only enhances customer satisfaction but also reduces cart abandonment rates. By ensuring that everything works as it should, you’ll create a seamless experience that encourages repeat business and builds trust with your customers.
Troubleshooting Common Issues with Shipping Classes
When working with shipping classes in WooCommerce, it’s not uncommon to run into a few hiccups along the way. Here are some of the most frequently encountered issues and how to resolve them to ensure a smooth shipping experience for both you and your customers.
Class Not Applied to Products
If you find that the shipping classes you’ve set up are not being applied to specific products, double-check the following:
- Correct Assignment: ensure you have assigned the shipping class to each product in the product data section.
- Default Shipping Class: If your products are not showing the correct shipping rate, verify whether you’ve set a default shipping class for the products.
Unexpected Shipping Costs
Sometimes, the calculated shipping costs may seem off. Here’s how to troubleshoot this issue:
- check Rate Settings: Review your shipping zones and methods to ensure the rates are configured properly for each shipping class.
- Weight and Dimensions: Make sure the weight and dimensions of your products are accurately filled out, as these can affect shipping calculations.
- Shipping Class Pricing: If you have different rates for different shipping classes, confirm that they are set correctly in the shipping settings.
Class Visibility at Checkout
Sometimes, customers may not see the expected shipping classes during checkout.If this occurs:
- Customer Location: Ensure that the shipping classes are available for the customer’s shipping address.Different zones can restrict visibility.
- Cart Contents: Verify that the products in the customer’s cart belong to a shipping class that has a defined rate in the selected shipping zone.
Inconsistent Shipping Class Behavior
If your shipping classes seem to behave inconsistently,consider these factors:
- Plugin Conflicts: Sometimes,third-party plugins can interfere with shipping calculations. Temporarily disable them to identify any conflicts.
- Theme Compatibility: Ensure your theme supports the shipping class functionality. Check for updates or consider switching to a more WooCommerce-friendly theme.
Example Table of Common Issues and Solutions
| Issue | Possible Solution |
|---|---|
| Shipping class not applied | Check product assignment |
| Incorrect shipping costs | Review rate settings |
| Class not visible at checkout | Verify customer location |
| Inconsistent behavior | Check for plugin conflicts |
By following these troubleshooting tips, you can rectify common issues with shipping classes in WooCommerce, ensuring your customers enjoy a seamless shopping experience. Always remember to test your shipping settings regularly to catch any discrepancies before they affect your sales!

Advanced Strategies for Using Shipping Classes Effectively
Maximizing the Use of Shipping Classes
When it comes to shipping classes in WooCommerce, understanding how to leverage them effectively can significantly enhance your customer experience and ultimately drive sales. one advanced strategy is to create custom shipping classes tailored to specific products or categories. As an example, consider using distinct classes for fragile items, oversized products, or promotional items. This allows you to set more precise shipping rates that reflect the true cost of delivery.
Dynamic Shipping Classes Based on Customer Location
Implementing dynamic shipping classes based on a customer’s location can also be a game-changer.By analyzing shipping rates in different regions, you can:
- offer local delivery options that are faster and more cost-effective.
- Incorporate region-specific surcharges for areas that may have higher shipping costs.
- Provide free shipping thresholds that vary by location to encourage larger orders.
Combining Shipping Classes for Promotions
Another effective strategy is to combine shipping classes for promotional campaigns. Create a limited-time offer where certain shipping classes are discounted.This can be particularly appealing during holiday sales or product launches. By strategically marketing these promotions, you can:
- Increase urgency with time-sensitive discounts.
- Boost average order values by enticing customers to add more items to qualify for free or reduced shipping.
- Encourage customer loyalty by rewarding frequent buyers with special shipping rates.
Table of Common Shipping Class Scenarios
| Shipping class | Typical Products | Suggested Shipping Rate |
|---|---|---|
| Standard | Books, Clothing | $5.00 |
| Fragile | Glassware, Electronics | $10.00 |
| Overweight | Furniture, equipment | $20.00 |
| Free Shipping | orders over $100 | $0.00 |
Utilizing Plugins for Enhanced Functionality
to further enrich your shipping capabilities,consider using advanced WooCommerce plugins. these tools can automate the assignment of shipping classes based on specific product attributes or customer behavior, saving you time and reducing the risk of errors. Popular plugins like Table Rate Shipping or Advanced Shipping Manager offer features such as:
- Conditional shipping rates based on cart contents.
- Multiple shipping options at checkout to enhance customer choice.
- Rate calculations in real-time, providing transparency to your customers.
Regularly Reviewing and Updating Shipping Classes
make it a habit to regularly review and update your shipping classes.Consumer trends and shipping costs can fluctuate, so staying on top of these changes is essential. Regular audits of your shipping strategy can help ensure you:
- Remain competitive with your pricing.
- Adapt to customer feedback regarding shipping options.
- Optimize your shipping logistics for better efficiency.
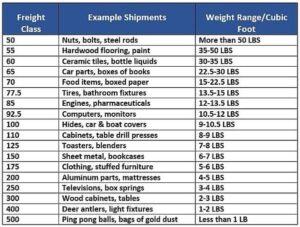
Leveraging Shipping Classes for Promotions and Discounts
shipping classes in WooCommerce do more than just categorize your products; they can be a powerful tool for enhancing your marketing strategies. By strategically leveraging shipping classes, you can create attractive promotions and discounts that entice customers to make a purchase. Here’s how you can turn shipping classes into a promotional asset.
one effective way to use shipping classes for promotions is by offering free shipping on certain products. By assigning these products to a specific shipping class, you can easily set rules that apply to them. For example, if you have a shipping class called Free Shipping, you can ensure that items in this category automatically qualify for free delivery, making them more appealing to customers who are price-sensitive.
Another innovative approach is to combine shipping classes with volume-based discounts. You can create classes that reflect different tiers of shipping costs based on the size and weight of the products. As an example, you could have a Standard, Large, and Oversized shipping class.By using these classes, you can offer discounts like:
| Shipping Class | Discount on Orders over $100 |
|---|---|
| standard | 10% off |
| large | 15% off |
| Oversized | 20% off |
This method not only encourages larger purchases but also makes it easier for customers to understand how shipping fees are structured. Additionally, you can promote seasonal discounts on specific shipping classes. For example, during the holiday season, offering a Holiday Shipping Class with reduced rates can drive up sales and clear out inventory.
To maximize the effectiveness of your promotions, consider using email marketing and social media to announce these shipping class-based deals. Craft messages that highlight your offers, such as “Get free shipping on all items in our holiday Shipping Class!” Use visuals and clear calls to action to grab attention and drive traffic to your store.
By creatively utilizing shipping classes, you can transform them into an integral part of your promotional strategy. Not only can you improve your sales, but you also enhance the overall shopping experience for your customers. After all, who doesn’t love a good deal combined with seamless shipping options?
Integrating Shipping Classes with Other WooCommerce Features
Integrating shipping classes with various WooCommerce features can significantly enhance your online store’s functionality and user experience. By carefully aligning shipping classes with other settings, you can create a seamless shopping experience that caters to your customers’ needs. Here are some effective ways to achieve this integration:
- Discounts and Promotions: Utilize shipping classes to tailor shipping costs for specific products during promotional campaigns. Such as,you can offer free shipping on certain classes of products while charging standard rates for others. This encourages customers to explore your offerings more widely.
- Shipping zones: Combine shipping classes with WooCommerce shipping zones to specify different rates based on geographic locations. by assigning shipping classes to products, you can control shipping costs effectively across various regions, ensuring profitability while remaining competitive.
- Product Bundles: When selling product bundles, shipping classes can help you manage shipping fees more efficiently. Assign a specific shipping class to the bundle, allowing you to set a flat rate or adjusted charges based on the bundled items, thus simplifying the checkout process for customers.
Moreover, leveraging shipping classes alongside inventory management can streamline your operations. For instance, if you have fragile items that require special handling, you can create a dedicated shipping class for these products. This allows you to set specific shipping methods and rates that ensure the preservation of those items during transit.
Consider this simple table to visualize how different integrations can affect shipping calculations:
| Product Type | Shipping Class | Shipping Rate |
|---|---|---|
| Standard Item | Standard Shipping | $5.00 |
| Fragile Item | Fragile handling | $10.00 |
| Heavy Item | Heavy Duty | $15.00 |
Additionally, integrating shipping classes with user roles can offer an enhanced experience for returning customers or wholesale buyers. By setting up different shipping classes that correspond to user roles, you can provide tailored shipping options or discounts, fostering brand loyalty and encouraging repeat purchases. This approach not only enhances customer satisfaction but also drives sales growth.
the power of shipping classes lies in their ability to integrate seamlessly with other WooCommerce features. By utilizing this integration effectively, you can refine your shipping strategy, improve customer experience, and ultimately boost your store’s performance.
Best Plugins to Enhance Your Shipping Class Management
Managing shipping classes effectively can take your WooCommerce store to the next level, ensuring that your customers enjoy a smooth and efficient checkout experience. The right plugins can significantly enhance your shipping class management, making it easier to tailor shipping options based on various criteria. Here are some top plugins you should consider:
- WooCommerce Advanced Shipping: This plugin allows you to create advanced shipping rules based on various conditions such as weight, quantity, and shipping class. With its user-friendly interface, you can set up rules that cater specifically to your business needs.
- Table Rate Shipping for WooCommerce: With this powerful plugin, you can define multiple shipping rates based on the shipping class, destination, and more. This flexibility means you can offer competitive rates that appeal to different customer segments.
- Flexible Shipping: Designed to offer flexibility, this plugin helps you set shipping costs based on weight, cart total, and shipping class combinations. It’s ideal for stores with diverse product ranges.
- WooCommerce Shipping Calculator on Product Page: Enhance the shopping experience by allowing customers to calculate shipping costs directly on the product page. This can reduce cart abandonment and increase conversions, especially for higher shipping costs.
When it comes to visualizing your shipping options, consider using plugins that provide clear tables for your shipping classes. The following table summarizes some essential features of notable plugins:
| Plugin Name | Key Features | Best For |
|---|---|---|
| WooCommerce Advanced Shipping | Custom shipping rules, user-friendly interface | Stores with specific shipping needs |
| Table Rate shipping | Multiple shipping rates, versatile conditions | Businesses with varying product sizes |
| Flexible Shipping | Weight-based and cart total calculations | Diverse product range |
| Shipping Calculator on Product Page | Real-time shipping cost calculator | Reducing cart abandonment |
Integrating these plugins into your WooCommerce store not only saves you time but also enhances the customer experience. With features tailored to your shipping needs, you can increase customer satisfaction and boost sales. By automating and streamlining your shipping class management, you’ll have more time to focus on growing your business.
Wrapping Up: Mastering Shipping Classes for a Better Customer Experience
Understanding and effectively utilizing shipping classes in WooCommerce can transform your eCommerce business and significantly enhance the customer experience. By categorizing products according to their shipping requirements, you can provide more accurate shipping options, which leads to improved customer satisfaction and potentially higher conversion rates.
Here are some key benefits of mastering shipping classes:
- Flexibility: Create tailored shipping methods for different products. This means you can specify items that require special handling or shipping costs.
- Cost Efficiency: Set realistic shipping rates based on weight, dimensions, or destination, ensuring that both you and your customers benefit.
- Improved Customer trust: Transparent shipping costs can reduce cart abandonment,as customers appreciate knowing exactly what they’ll pay.
- Streamlined operations: Automating shipping rates based on classes saves time and reduces manual errors, making your business operations smoother.
to get started, consider the following steps:
- Navigate to the woocommerce Settings and find the Shipping tab.
- Click on Shipping Classes and add new classes based on your product categories.
- Assign these classes to individual products in the product editing screen.
- Configure your shipping methods to utilize the classes for more accurate calculations.
As you set up your shipping classes, remember that interaction is key. Make sure your customers are well-informed about shipping options during checkout. You can achieve this with clear labels and descriptions that highlight the benefits of each shipping class you offer.
| Shipping class | Typical Products | Recommended Shipping Method |
|---|---|---|
| Standard Shipping | Books, Clothing | Flat rate |
| Heavy Items | Furniture, Appliances | Freight Shipping |
| Fragile Items | Glassware, Electronics | Special Handling |
Investing time to refine your shipping classes not only streamlines your operations but also builds customer loyalty. When customers feel valued through clear, fair, and efficient shipping practices, they are much more likely to return to your store for their future purchases. so take the plunge, explore the various shipping classes available, and watch your customer satisfaction soar!
Frequently Asked Questions (FAQ)
Q&A: How to Use Shipping Classes in WooCommerce: For Beginners
Q1: What are shipping classes in woocommerce?
A1: Great question! Shipping classes in WooCommerce are a way to group products that share similar shipping characteristics. This means you can apply specific shipping rates to different types of products,like bulky items,fragile goods,or digital downloads.By using shipping classes, you can make sure your customers are charged accurately based on what they’re purchasing.
Q2: Why should I use shipping classes for my online store?
A2: Using shipping classes is a game-changer! It helps you provide a more customized shopping experience for your customers. Not only does it allow you to charge fair shipping prices, but it also helps reduce cart abandonment. When customers see accurate shipping rates, they feel more confident checking out. Ultimately, it boosts your sales and enhances customer satisfaction!
Q3: How do I set up shipping classes in WooCommerce?
A3: Setting up shipping classes is super easy! First, go to your WordPress dashboard and navigate to WooCommerce > Settings > Shipping. From there, you can select the shipping zone you want to work with. Click on “Shipping Classes” and add the classes that suit your products, like “Fragile,” “Bulky,” or “Free Shipping.” After you’ve created your classes, you can assign them to individual products in the product data section. it’s a simple way to streamline your shipping process!
Q4: Can I customize shipping rates for different shipping classes?
A4: Absolutely! once you’ve created your shipping classes, you can set specific rates for each one. Just go back to the shipping zone settings, and you’ll see an option to add shipping methods. Here, you can choose the flat rate, free shipping, or even more complex methods, and specify different rates for each shipping class. This means you have full control over how much you charge for shipping based on the class!
Q5: what if I want to offer free shipping on certain products?
A5: You can easily do that! Just create a shipping class specifically for free shipping. Then, when you add products to your store, assign them to this class. In the shipping settings, you can set a free shipping method for that class. It’s a fantastic way to incentivize purchases on specific items or to encourage customers to buy more!
Q6: Is there anything I should keep in mind when using shipping classes?
A6: Definitely! It’s important to ensure that your shipping classes are clearly defined and easy to understand. make sure you communicate shipping costs effectively on your product pages to avoid confusion. Additionally, keep an eye on how your customers react to your shipping rates. You might need to adjust your classes based on customer feedback or changes in shipping costs.
Q7: What’s the bottom line? Is it worth the effort to set up shipping classes?
A7: Oh, absolutely! Taking the time to set up shipping classes in WooCommerce is worth every second. Not only does it streamline your shipping process, but it also enhances customer experience, potentially leading to increased sales. By offering accurate and fair shipping options, you build trust with your customers. So,dive in and start using shipping classes today—you won’t regret it!
Insights and Conclusions
As we wrap up our journey through the ins and outs of shipping classes in WooCommerce,it’s clear that mastering this feature can provide a meaningful boost to your online store. By effectively categorizing your products, you not only simplify the shipping process but also enhance your customers’ experience, making it easier for them to understand costs and delivery options.
Remember, shipping isn’t just an afterthought; it’s an integral part of your customer’s shopping experience. Now that you have the knowledge to set up and optimize shipping classes, it’s time to put this newfound wisdom into action. Experiment with different configurations,analyze your results,and watch your sales soar!
So,what are you waiting for? Dive into your WooCommerce settings and get started on creating a seamless shipping experience that keeps your customers coming back for more. If you have any questions or need further guidance, feel free to drop a comment or reach out. Happy selling!

