Are you ready to take your online learning platform to the next level? If you’re using Eduma, a powerful WordPress theme designed specifically for educational websites, you’re already on the right track. But what if we told you that you could enhance your site’s design and functionality even further with Elementor? This dynamic page builder is a game-changer, allowing you to create stunning, fully customized pages without needing to touch a single line of code. In this step-by-step guide, we’ll walk you through how to harness the full potential of Elementor with your Eduma theme. Whether you’re a seasoned web designer or a complete newbie, you’ll discover how easy it is to create engaging, user-friendly layouts that captivate your audience and elevate your educational offerings. Let’s dive in and unlock the creative possibilities!
Getting Started with Elementor and Eduma is Easier Than You Think
Getting started with Elementor in conjunction with the Eduma theme is a breeze, especially with its user-friendly interface and powerful features. To unlock the full potential of your educational website, follow these simple steps:
Setting Up Your Environment
Before diving into design, ensure you have both Elementor and Eduma installed. Here’s how to do it:
Install WordPress: Make sure you have a running WordPress site.
Install Eduma: Upload the Eduma theme through the WordPress dashboard.
activate Elementor: Search for Elementor in the plugins section and activate it.
Creating Your First page
Once your environment is set, it’s time to create a page. Follow these steps:
Navigate to Pages > Add New in your WordPress dashboard.
Click on the Edit with Elementor button to open the Elementor editor.
Select a pre-designed template from the Elementor library or start from scratch.
Customizing Elements
Elementor offers a range of widgets to enhance your page. Here’s how to customize them:
Drag and drop widgets onto your canvas.
Edit each widget’s content by clicking on it and modifying settings in the left panel.
Use the advanced tab to adjust margins, padding, and responsive settings for mobile devices.
Using Eduma Features
Eduma comes with its own set of educational-specific features that you can leverage:
Feature
Description
Course Builder
Create and manage courses seamlessly.
Quiz management
Design quizzes to assess student learning.
Student Dashboard
Provide students with a personal learning dashboard.
Preview and Publish
After customizing, it’s crucial to view your changes:
Click the Preview Changes button to see how your page looks.
Once satisfied, don’t forget to hit the Publish button!
By following these steps, you’ll find that designing with Elementor and Eduma is not only simple but also incredibly rewarding. Your educational site will not only look polished but also function beautifully for your users!
Understanding the Power of elementor in Your Eduma Theme
Elementor is a powerful page builder that transforms the way you create and design your Eduma theme-based website. With its drag-and-drop functionality, you can easily customize your site without any coding knowledge. This intuitive tool offers a plethora of features to enhance your online education platform.
One of the standout aspects of Elementor is its visual editing interface. You can see changes in real-time, which allows for a smoother design process. Whether it’s adjusting typography, colors, or layout, you can achieve the perfect look for your educational content.the ability to customize each section ensures that your site reflects your brand identity clearly.
Moreover,Elementor integrates seamlessly with Eduma,enabling you to utilize various pre-designed templates specifically tailored for educational websites. This means you can kickstart your site with professionally designed layouts, which can be further customized to fit your needs. Not only does this save time, but it also enhances the overall aesthetic of your pages.
Here are some key features of Elementor that can elevate your Eduma site:
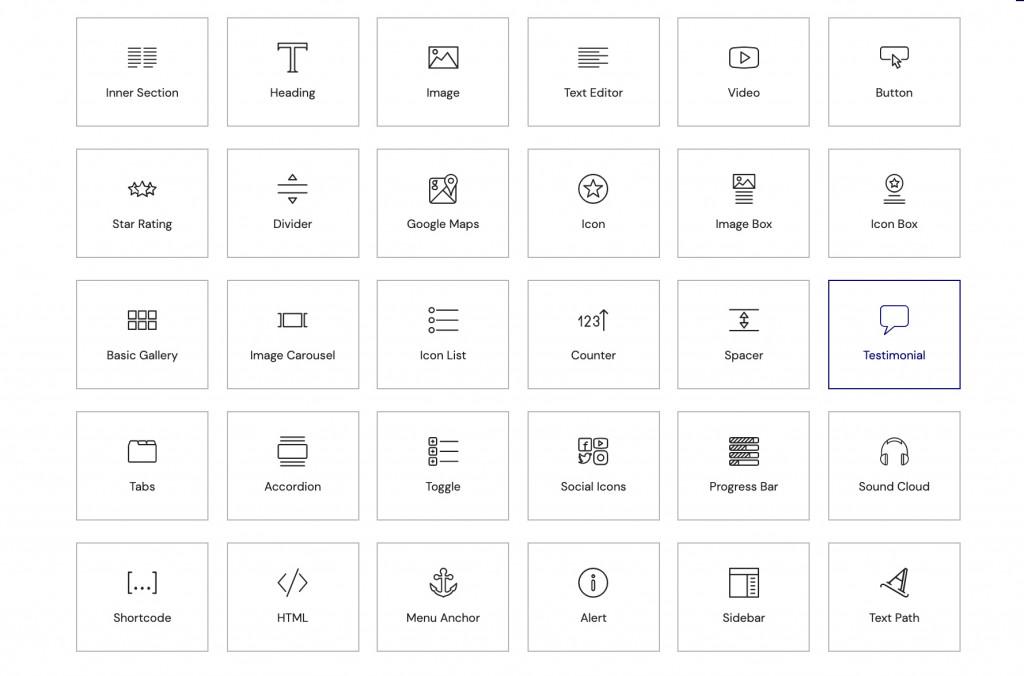
Widgets Galore: Access a variety of widgets like forms, sliders, and testimonials to enrich your content.
Responsive Design: Ensure your site looks great on all devices with built-in responsive editing tools.
Global Settings: define global colors and typography that apply across your entire site, ensuring consistency.
Theme Builder: Customize headers, footers, and other theme elements without hassle.
To better illustrate how Elementor can enhance your Eduma theme,consider the following table that compares conventional website building with using Elementor:
Aspect
Traditional Building
Using Elementor
learning Curve
Steep; requires coding knowledge
User-friendly; no coding needed
Customization
Limited and time-consuming
Versatile and quick
Design Versatility
Fixed layouts
Drag-and-drop freedom
Support
Varies by theme
Extensive community resources
Incorporating Elementor into your Eduma theme not only simplifies the design process but also empowers you to create a unique educational experience for your users. With a blend of creativity and functionality, you can build a website that stands out while providing valuable content to your audience.
Setting Up Your First Page: A Simple Walkthrough
Getting started with Elementor on your eduma theme is an exciting journey. Follow this simple walkthrough to set up your first page effortlessly. with Elementor’s intuitive drag-and-drop interface, you’ll be creating stunning layouts in no time!
First things first, navigate to your WordPress dashboard and select Pages. Click on Add new. This will take you to the page editor, where you can give your new page a title and select Edit with Elementor.This step opens up the powerful Elementor editor where the magic happens.
Now, let’s get familiar with the Elementor interface. you’ll notice panels on the left side filled with various widgets you can use to build your page. Here are some key elements to explore:
Sections: These are the building blocks of your page layout.
Columns: Organize sections into multiple columns for a structured design.
Widgets: Add content like text, images, buttons, and more!
To add a section, click on the “+” icon.You’ll be prompted to choose a structure for your section. As a notable example, select a single column if you want a full-width section or opt for multiple columns for a varied layout.Once you select your structure, you can drag and drop widgets from the left panel into your new section.
After placing your widgets, it’s time to customize them.Click on any widget to bring up its settings. Here, you can:
Edit content: Change text, images, or links.
Style: Adjust colors, typography, and spacing.
Advanced: Add custom CSS or motion effects if desired.
To get a preview of your work, simply click on the eye icon at the bottom of the Elementor panel. This allows you to see how your page will look live. Once you’re satisfied with the design, don’t forget to hit the Publish button. Your first page will now be live for everyone to see!
Element
Function
Sections
Define the layout structure
Columns
Organize content into multiple areas
Widgets
Add interactive elements
And that’s it! you’ve set up your first page using Elementor with Eduma. Embrace the creativity, experiment with different layouts, and remember, the only limit is your imagination!
Mastering the Elementor Interface for Seamless Design
Getting cozy with the Elementor interface is crucial for creating stunning websites effortlessly. When you first launch Elementor, you’ll be greeted with a user-friendly and intuitive interface that offers you various tools and options at your fingertips. On the left sidebar, you’ll find a plethora of widgets, each designed to help you enhance your site’s functionality and aesthetics.
To start, familiarize yourself with the structure of the interface. The central canvas is where the magic happens—this is where you will drag and drop elements to create your layout. On the left, the widget panel allows you to choose between various content blocks such as headings, images, text, and buttons. It’s easy to explore and experiment with different combinations until you find something that resonates with your vision.
Utilizing Sections, Inner Sections, and Columns is key to mastering layout in Elementor. Sections are the largest building blocks,helping you segment your page into distinct areas. Within each section, you can add columns to create multi-column layouts. Inner sections allow for even more flexibility, enabling you to nest columns within columns. This hierarchical structure is essential for creating complex designs without sacrificing performance or loading speed.
Another essential aspect is the style and advanced settings.Once you’ve added your elements, click on any widget to reveal the style tab. Here you can modify typography, colour schemes, spacing, and more. Pay attention to responsive settings, ensuring that your site looks just as good on mobile devices as it does on desktop. The Advanced Tab provides options for margins, paddings, and custom CSS, empowering you to customize every element to match your brand seamlessly.
Here’s a quick reference for the main elements you’ll be working with:
Element
Description
Section
Main container for content.
Column
Divides sections into vertical areas.
Widget
Content elements like text, images, buttons.
template
Pre-designed layouts for quick setup.
don’t forget to leverage the preview mode! As you build, toggling the preview option allows you to see how your changes will appear on the live site. This feature can save you time and ensure everything looks just right before you hit publish.Mastering the Elementor interface takes practice, but with these tips, you’ll be well on your way to creating visually stunning pages with ease!
When it comes to giving your Eduma layout a unique flair, Elementor is your ultimate ally.This powerful page builder allows you to craft stunning, one-of-a-kind designs without needing to dive into any coding. You can easily manipulate sections, columns, and widgets to create an educational site that truly reflects your brand’s personality.
First off, understand the basics of Elementor. Familiarize yourself with the drag-and-drop interface, which lets you see changes in real-time.Start by selecting a page to edit, and then click on the “Edit with Elementor” button. This simple step opens up a world of customization options.
Next, consider your site’s color scheme and typography. You want your website to be cohesive and visually appealing.Elementor allows you to set global colors and fonts that apply across your site, ensuring consistency. Here’s how to customize:
Click on the hamburger menu (three horizontal lines) in the top left corner.
Select Site Settings.
Adjust your primary and secondary colors and also font styles.
Now, let’s talk about your layout. Don’t just stick with the default templates. Use the section and column settings to create unique structures. Want a two-column layout for your course descriptions? Or perhaps a full-width section for your testimonials? Just drag a new section into place and adjust your columns as needed.
To really stand out, incorporate dynamic content. With Elementor’s Theme Builder,you can assign custom headers,footers,and archive pages. This means your homepage can have a entirely different look compared to your course pages, giving your users a tailored experience. here’s a simple table to illustrate different layout ideas:
section Type
Suggested Layout
Element to Include
Homepage
Full-width hero image
welcome text, CTA button
Course Page
Two columns
Course outline, Reviews
Testimonials
Slider
User quotes, Ratings
don’t forget about responsiveness. Your layout should look great on all devices. Elementor has built-in tools that let you preview how your site will appear on tablets and smartphones. Adjust margins, paddings, and font sizes as necessary to ensure a fantastic user experience across the board.
By harnessing the full potential of Elementor, you can transform your eduma layout into something truly distinctive and engaging.Dive in, experiment, and watch your educational platform come to life!
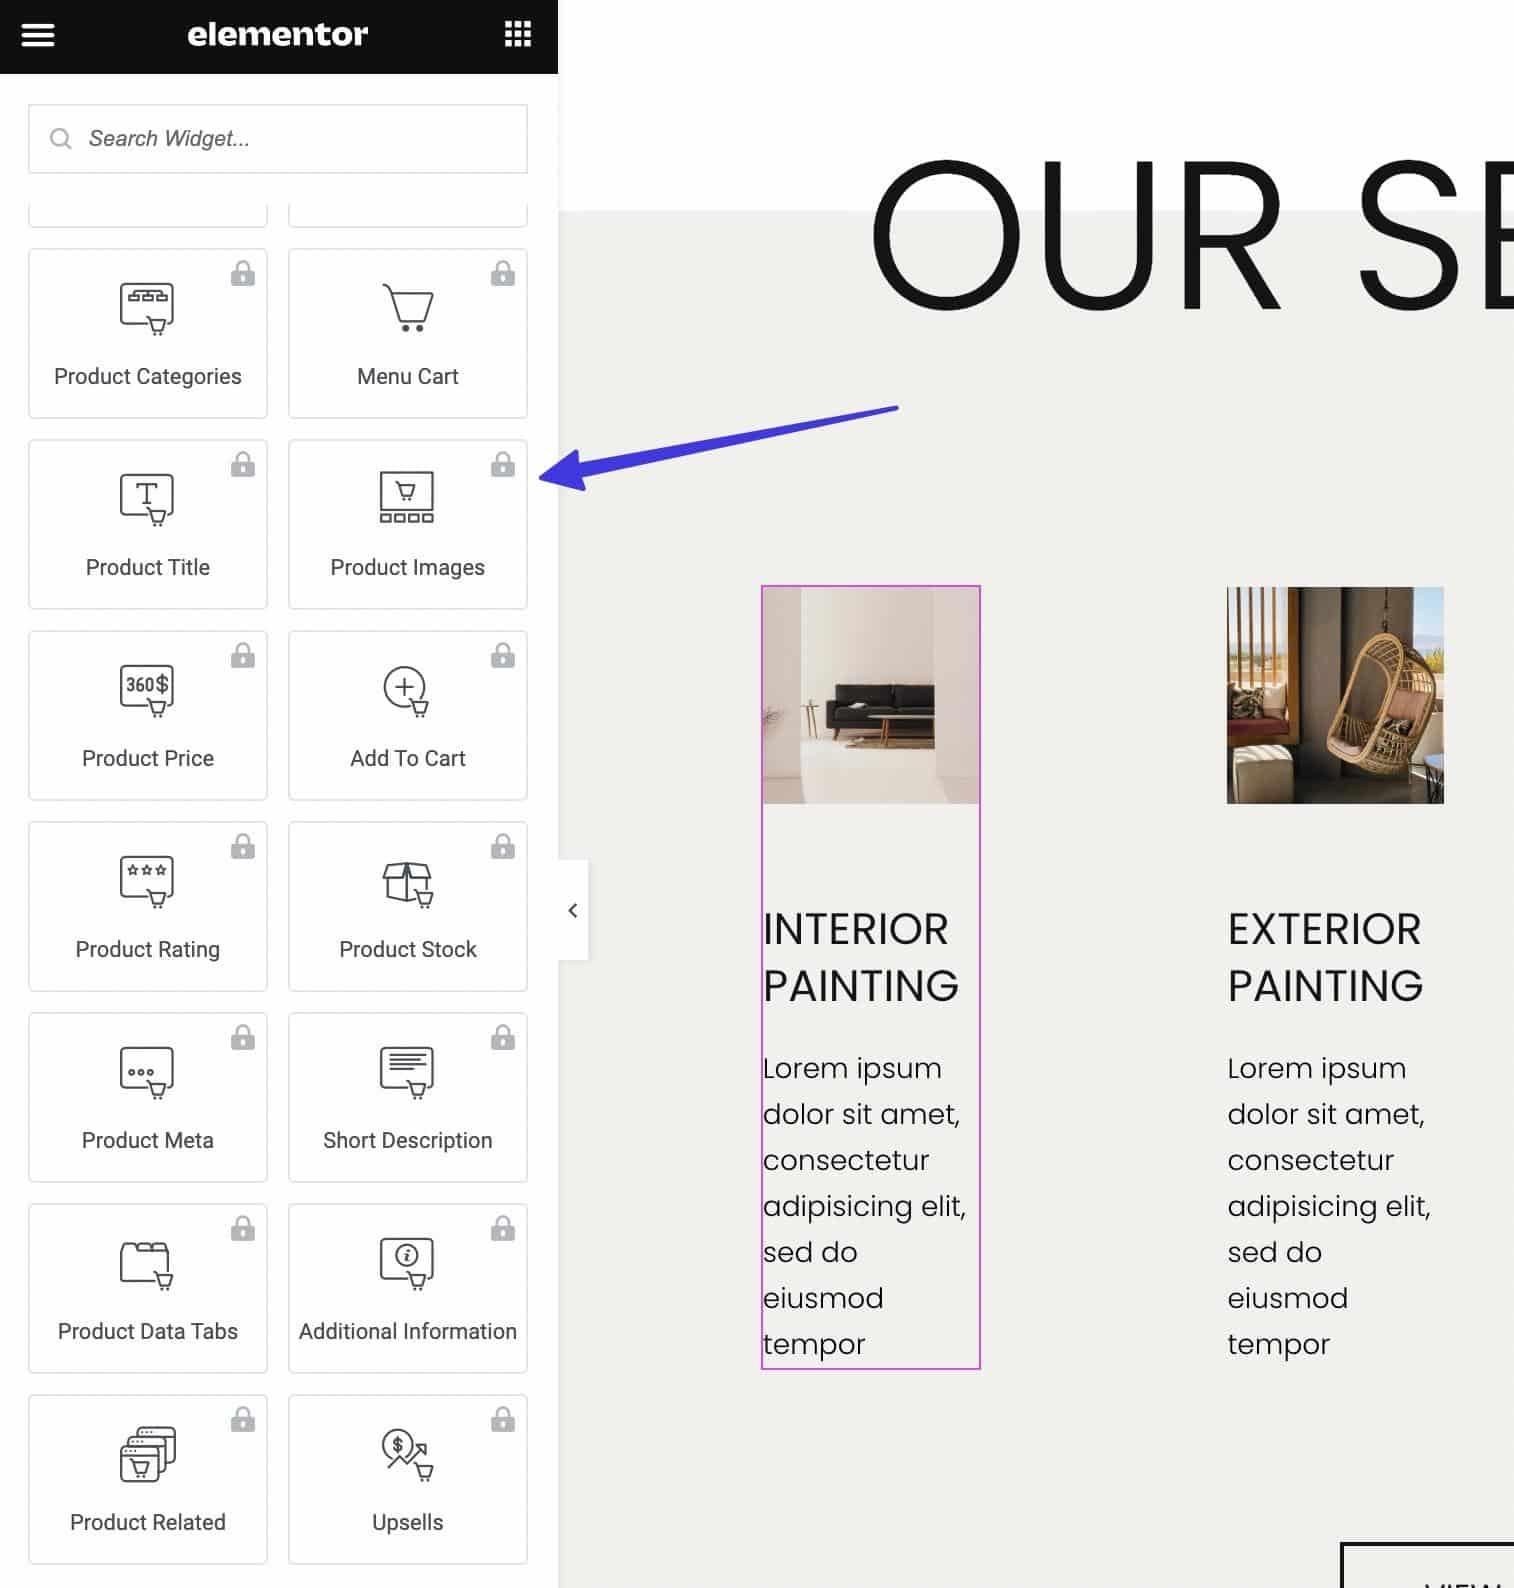
Adding Engaging Course Content with Elementor Widgets
When it comes to creating an engaging online course, the content you present is just as vital as the structure. With Elementor’s versatile widgets,you can transform your course materials into visually appealing and interactive experiences. Here’s how to effectively utilize these widgets to captivate your learners.
using Multimedia Elements: One of the most powerful ways to enhance your course content is by incorporating multimedia. Elementor offers a variety of widgets that allow you to add:
Videos: Embed instructional videos directly on your course pages to provide visual explanations.
Image Galleries: Showcase course highlights or student projects using lovely galleries.
Audio Clips: Include supplementary audio files for students to listen to as they learn.
Interactive Features: Boost learner engagement by adding interactive elements. Here are some widgets to consider:
Toggle and Accordion: Use these to present course modules or FAQs,allowing students to expand and collapse sections as needed.
Progress Bar: Visual indicators of course progression can motivate students to complete their lessons.
Quizzes and Forms: Integrate quizzes directly into your course layout to test knowledge and gather feedback.
Creating Dynamic Layouts: Elementor’s drag-and-drop editor makes it easy to create custom layouts that suit your course content.Some layout options include:
Layout Type
Description
Grid Layout
organize content in a visually appealing grid for easy navigation.
Full-width Sections
Utilize the full width of the page for immersive content delivery.
Two-Column Layout
Display text alongside images or videos for balanced information delivery.
Custom Styling Options: Don’t forget to personalize your course content to align with your branding. Elementor allows you to easily adjust:
Fonts: Choose from a wide selection to maintain a professional look.
Colors: Use your brand colors to create a cohesive and recognizable course identity.
Spacing and Margins: Ensure your content is well-spaced for better readability.
By leveraging these Elementor widgets and features, you can create a course that not only informs but also engages and retains your students. Remember, the key to successful online education lies in how you present your content!
When designing your Eduma-based website with Elementor, the visuals you choose can significantly enhance your site’s appeal and functionality. Incorporating stunning visuals isn’t just about aesthetics; it’s about creating an engaging experience that captivates your audience. Here are some effective strategies to integrate eye-catching elements into your design.
High-Quality Images: Use crisp,high-resolution images relevant to your content. Whether it’s photographs of happy students or dynamic classroom settings, quality visuals can evoke emotions and establish a connection with visitors.
Custom Icons: Replace generic icons with custom ones that align with your branding.Unique icons can enhance navigation and add a personal touch to the user experience.
Hero Sections: Create impactful hero sections at the top of your pages. A captivating background image or video can immediately grab attention and set the tone for your site.
Another effective way to capture attention is through the use of infographics. these visually appealing graphics can simplify complex information, making it easier for your audience to digest content. Consider incorporating them to highlight key statistics or course offerings. Using Elementor’s image and text widgets, you can effortlessly create engaging layouts that promote readability.
Don’t forget about video backgrounds. They can add a dynamic element to your pages, drawing visitors in and encouraging them to stay longer. With Elementor, you can easily embed videos that play automatically or on hover, making your site feel modern and interactive.
Visual Element
Benefit
High-Quality Images
Build trust and engage users
Custom Icons
Enhance navigation and brand identity
Hero Sections
Establish strong first impressions
Infographics
Simplify complex information
Video Backgrounds
Create an interactive experience
Lastly, remember to utilize responsive design techniques when incorporating visuals. Ensure that images and videos are optimized for all devices. Elementor allows you to adjust settings for different screen sizes, so your stunning visuals look great on desktops, tablets, and smartphones alike. A cohesive and visually appealing design will keep users engaged and encourage them to explore your offerings further.
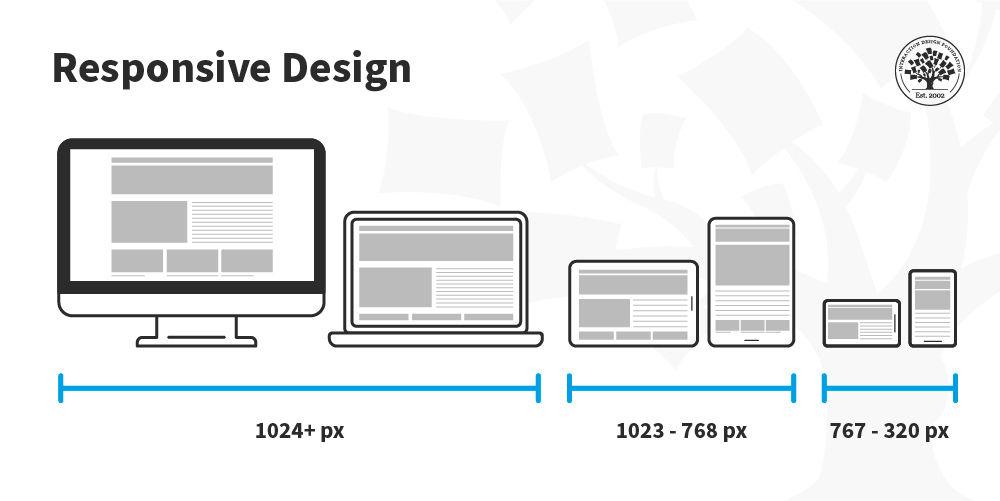
Optimizing your Site for Mobile Users with Responsive Design
In today’s digital landscape, having a mobile-friendly site is no longer optional; it’s a necessity. With the rise of mobile users, ensuring that your site looks and functions beautifully on all devices is essential for keeping your audience engaged. Using Elementor with Eduma provides an easy pathway to achieve this through seamless responsive design.
Elementor’s intuitive drag-and-drop interface allows you to effortlessly create layouts that adjust to various screen sizes.Here are a few key considerations to keep in mind:
Flexible Grid Layouts: Use Elementor’s column settings to create flexible grid layouts that adapt to different devices. As an example, you can set columns to stack on mobile while displaying side-by-side on desktop.
Custom Breakpoints: Take advantage of custom breakpoints in Elementor to tweak your designs specifically for tablets and smartphones, ensuring a tailored experience for every user.
Hide/Show Elements: Use the ‘Responsive’ settings to hide or show specific elements based on device type. This feature helps in decluttering the mobile view while keeping desktop viewers engaged.
Another critically important aspect of optimizing for mobile users is the use of touch-friendly elements. Ensure that buttons and links are easy to click on mobile devices by:
Increasing Button Size: Make sure buttons are at least 44px by 44px, which is the recommended size for touch targets.
Adding Padding: Use ample padding around clickable elements to prevent accidental clicks.
Using Clear Labels: Keep button text clear and concise, making it easy for users to understand the action they are taking.
Testing and Refining Your Design
After setting up your mobile-responsive designs, it’s crucial to test how they perform across various devices. Tools like Google’s Mobile-Friendly Test can help identify areas for enhancement. Monitor your site’s analytics to understand user behavior and refine your designs based on real data.
By prioritizing mobile responsiveness and utilizing the powerful tools offered by Elementor and Eduma, you can significantly enhance the user experience on your site.A well-optimized mobile site not only improves user satisfaction but can also boost your search engine rankings, leading to increased traffic and conversions.
Integrating Essential plugins for Enhanced Functionality
To truly unlock the power of Elementor when using Eduma, integrating essential plugins is a game-changer. These plugins can enhance the functionality of your website, providing users with a more intuitive and engaging experience.Here are some must-have plugins that can elevate your educational website:
Elementor Addons: Enhance your design capabilities with addons like Essential Addons or Elementor Pro. These provide a suite of additional widgets and elements, making your layouts more dynamic.
WPForms: Create custom forms effortlessly. Whether it’s for course registration or feedback collection, integrating wpforms can streamline communication with your users.
Yoast SEO: optimize your content for search engines. With Yoast, you can ensure your courses and articles are easily discoverable, driving more traffic to your site.
LearnDash: If you’re looking to manage courses effectively, LearnDash is perfect for integrating online course management features seamlessly with your Elementor design.
When selecting plugins,it’s important to assess their compatibility with your current setup. Here’s a quick comparison of the top plugins to consider:
Plugin Name
Key features
Best For
Elementor Pro
Advanced widgets, Theme builder
Extending design capabilities
WPForms
Drag & drop form builder
Custom forms & user engagement
Yoast SEO
SEO analysis, sitemap generation
Improving search visibility
LearnDash
Course management, quizzes
Online education platforms
Remember, while plugins can enhance functionality, too many can slow down your website. It’s essential to choose the ones that align with your educational goals and user needs. Once you’ve selected your plugins, don’t forget to configure their settings to suit your specific requirements. This ensures you’re getting the most out of each integration, creating a cohesive and efficient learning environment for your users.
Lastly, keep your plugins updated. This not only enhances security but also ensures compatibility with the latest version of Elementor and Eduma. Regular maintenance will keep your website functioning smoothly and looking its best, providing users with a seamless learning experience.
Testing and Publishing Your Eduma Site with Confidence
Once you’ve crafted your Eduma site using Elementor,it’s crucial to ensure everything works seamlessly before going live. This phase, while often overlooked, is essential for delivering a polished user experience. Here’s how to test and publish your site with confidence.
Testing Your eduma Site
Before you hit that publish button, thorough testing is your best ally.Here are some key areas to focus on:
Responsive Design: check how your site appears on various devices—phones, tablets, and desktops—to ensure a consistent look and feel.
Functionality: Test all forms, buttons, and interactive elements to confirm they work as intended.
Performance: Use tools like Google PageSpeed Insights or GTmetrix to analyse loading speeds and optimize where necessary.
Browser Compatibility: Browse through different browsers—Chrome,Firefox,Safari—to catch any discrepancies in appearance or performance.
Gathering Feedback
Involving others can provide valuable insights. Consider these methods:
User Testing: Invite friends or colleagues to navigate your site and provide feedback.
Surveys: Create a quick survey to gather opinions about the site’s usability and content clarity.
Community Input: Engage with online forums or social media groups for constructive criticism.
Final Checks
After testing and gathering feedback,run through a final checklist:
Check
Status
SEO Optimization
✅
Content Proofreading
✅
Image Optimization
✅
Backup Site
✅
Ensure that each item on this checklist is marked complete,as these elements significantly affect your site’s success.
Publishing Your Site
Once the testing phase is complete and the checklist is clear, it’s time to publish! But remember, launching is just the beginning.Monitor your site’s performance post-launch and be ready to implement updates based on user feedback. by maintaining a commitment to quality, your Eduma site will not only attract visitors but keep them coming back for more.
Troubleshooting Common Issues: Tips for Smooth Sailing
Troubleshooting Common Issues
If you’re facing hiccups while using Elementor with Eduma, fear not! here are some handy tips to fix common issues and ensure a seamless building experience:
Check Plugin Compatibility: Ensure that all your plugins are up-to-date and compatible with Elementor. Sometimes outdated plugins can cause conflicts.
Clear Cache: If you’re not seeing changes reflected on the front end, try clearing your browser cache or any caching plugins you’re using.
WordPress Memory Limit: Increase your PHP memory limit. A low memory limit can hinder Elementor’s performance. You can do this by adding the following line to your wp-config.php file:
define('WP_MEMORY_LIMIT', '256M');
After making these adjustments, refresh your page and see if the issues persist.
If you’re still encountering problems, consider the following troubleshooting steps:
Conflict Assessment: Temporarily deactivate all other plugins except Elementor and see if the problem resolves. If it does, reactivate them one at a time to identify the culprit.
Theme Compatibility: Switch to a default WordPress theme (like Twenty Twenty-One) to check if your current theme is causing issues.
Browser Console Errors: Inspect your browser’s console for error messages. This can provide insights into what’s going wrong.
In some cases, you may need to revert to a previous version of Elementor or Eduma if a recent update has created instability. If that’s the case, here’s a simple table outlining how to roll back:
Step
Action
1
Go to Plugins in your WordPress Dashboard
2
Find Elementor or Eduma and click on ‘Advanced’
3
Select ‘Rollback’ and choose the desired version
if all else fails, don’t hesitate to reach out to the Elementor or Eduma support teams. Their resources and forums can provide further guidance and troubleshooting assistance tailored to your specific issues.
Elevating User Experience: Best Practices for Eduma and Elementor
Creating an extraordinary user experience is crucial when using Elementor with Eduma. By implementing best practices, you can ensure that your educational platform is not only visually appealing but also functional and user-friendly. Here are some essential strategies to elevate your user experience:
Optimize Loading Speed: Users often abandon websites that take too long to load. Use Elementor’s built-in optimization tools, such as lazy loading for images and minimizing JavaScript and CSS files.
Mobile Responsiveness: With more users accessing content via mobile devices, ensure all your Elementor sections are responsive. Utilize Elementor’s responsive editing features to adjust layouts for various screen sizes.
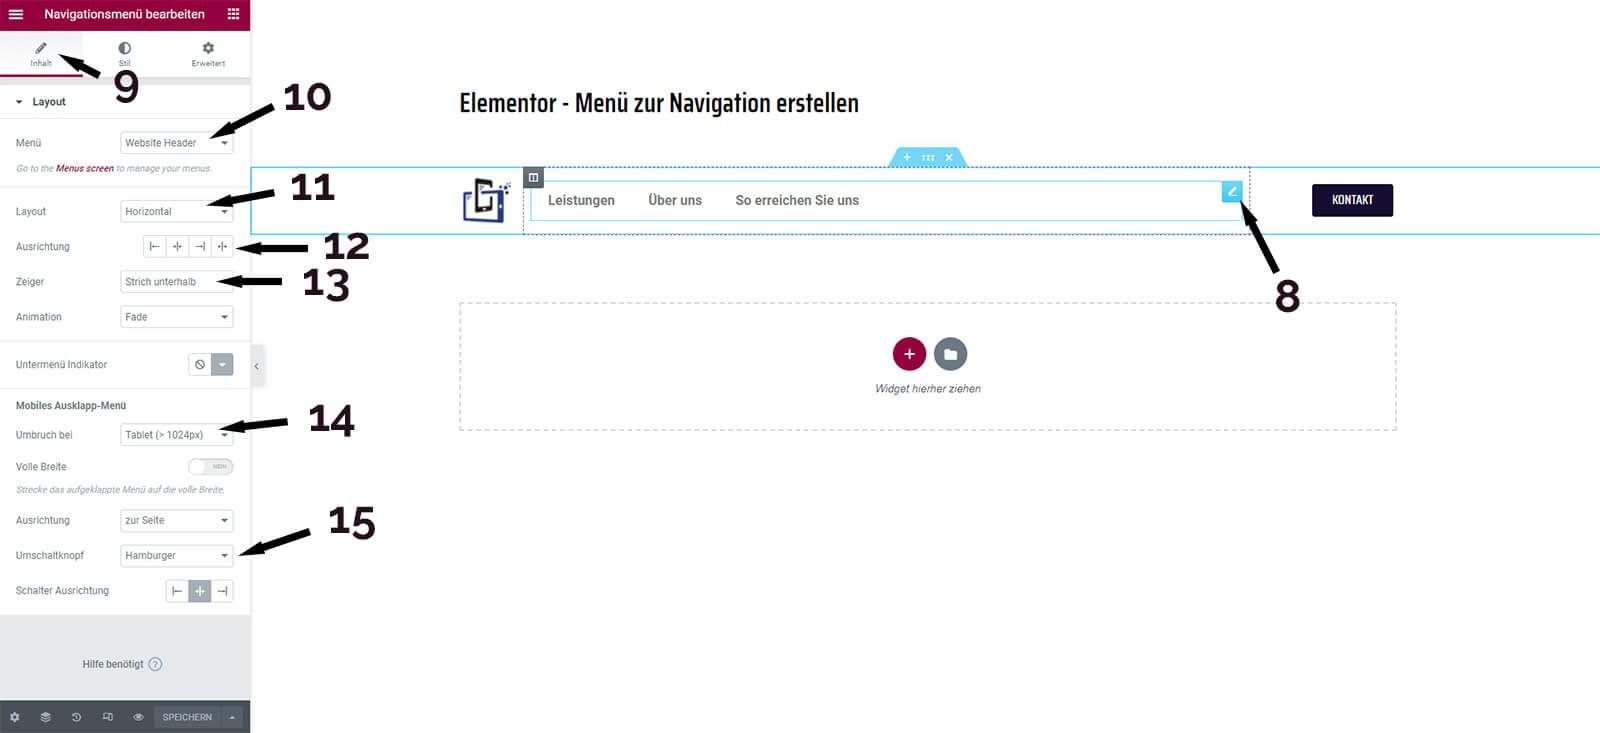
Intuitive Navigation: Simplify your menu structure. A well-organized navigation bar helps users find content without frustration. Use Elementor’s Nav Menu widget to create a clean and accessible menu.
Consistent Branding: Maintain a cohesive design throughout your site. Use consistent colors, fonts, and styles that reflect your brand identity. Elementor allows you to save global styles for easy request across pages.
Engaging Content Layouts: utilize Elementor’s various widgets and templates to create engaging content layouts. Mix text, images, and videos to capture user interest and enhance learning experiences.
Another key aspect is understanding user behavior through analytics. By integrating Google Analytics with your site, you can track user interactions. This data can inform adjustments and improvements:
User Action
Potential Improvement
High Bounce Rate
Revise content layout and improve loading speed
Low time on Page
Enhance content engagement with multimedia
Low Conversion Rate
Optimize call-to-action buttons and clear messaging
always gather feedback from your users. Utilize surveys, comment sections, or feedback forms to understand their needs and preferences.Elementor’s forms can easily be integrated into your pages, allowing you to collect valuable insights:
Anonymous Surveys: Keep it simple and offer quick surveys to gauge user satisfaction.
Feature Requests: Encourage users to suggest features they would like to see.
Support Tickets: Provide a seamless way for users to report issues or ask for help.
By following these best practices, you can significantly enhance the user experience on your Eduma site using Elementor. The key is to remain adaptable, continuously test, and refine your approach based on user feedback and analytics.
Frequently Asked Questions (FAQ)
Q: What is Elementor, and why should I use it for Eduma?
A: Great question! Elementor is a powerful drag-and-drop page builder for WordPress that allows you to create stunning websites without needing to know any coding. when paired with Eduma, a popular educational WordPress theme, you can customize your online courses and educational content to look exactly how you want. It’s user-friendly, flexible, and packed with features that make your site stand out, enhancing the learning experience for your students.
Q: Is elementor easy to use for beginners?
A: Absolutely! one of the best things about Elementor is its intuitive interface. Even if you’re a complete novice,you’ll find that you can create beautiful pages in no time. With its visual editor, you can see changes in real-time as you design. Plus,there are tons of tutorials and resources available to guide you along the way. So, don’t worry—you’re in good hands!
Q: Can I customize my Eduma theme using Elementor?
A: Yes! That’s one of the main advantages of using Elementor with the Eduma theme. While Eduma comes with its own layout options, Elementor allows you to take customization a step further. You can edit headers, footers, course layouts, and more—tailoring your site to perfectly fit your brand and your audience’s needs.
Q: Do I need any coding skills to use Elementor with Eduma?
A: Not at all! One of the main reasons Elementor is so popular is that it eliminates the need for coding. You can drag and drop elements, adjust settings, and customize styles without writing a single line of code. If you can use a mouse and click buttons, you’re well-equipped to use Elementor!
Q: What kind of features does Elementor offer that I can use for my Eduma site?
A: Elementor comes loaded with fantastic features! You can choose from a variety of widgets like image galleries, testimonials, buttons, and countdown timers—perfect for promoting your courses. You also have access to pre-designed templates and blocks that you can easily insert into your pages.Plus, with advanced features like responsive design controls and custom CSS, you can ensure that your site looks great on all devices.
Q: How do I integrate Elementor with my Eduma theme?
A: Integrating Elementor with Eduma is a breeze! First, ensure you have both the Eduma theme and the Elementor plugin installed and activated on your WordPress site. Once that’s done, you can start creating or editing pages by selecting the “Edit with Elementor” option. From there, you can start dragging your desired elements onto the page and customizing them to your heart’s content!
Q: Can I use elementor for specific components of my Eduma site, like course pages or landing pages?
A: Definitely! Elementor is versatile enough to be used for any part of your Eduma site. Whether you want to design unique course pages, create attractive landing pages, or even customize your blog layout, Elementor gives you the tools to make it happen. You can create a consistent look across your site or experiment with different designs for different sections.
Q: What if I run into issues while using Elementor with eduma?
A: If you encounter any bumps along the way, don’t worry! Both Elementor and Eduma have extensive documentation and support forums where you can find solutions to common issues. Additionally, there are countless tutorials and videos available online that cover everything from basic setup to advanced techniques. You’re not alone in this journey!
Q: Is it worth investing time in learning Elementor for my Eduma site?
A: Absolutely! Investing time in learning Elementor will undoubtedly pay off. Not only will it enhance the visual appeal of your Eduma site, but it will also improve user engagement, making it easier for your students to navigate and interact with your courses. Plus, the skills you gain will benefit you for any future projects you undertake in the world of web design. Trust us; you won’t regret it!
Insights and Conclusions
And there you have it! You’ve just unlocked the secrets of using Elementor with Eduma to create stunning, interactive online courses. By following this step-by-step guide, you’re not just building a website; you’re crafting an engaging learning experience that can leave a lasting impression on your students.
Whether you’re a seasoned web designer or just starting out, Elementor’s user-friendly interface paired with the robust features of Eduma can help you bring your creative vision to life. Now, it’s time to roll up your sleeves and dive in! Don’t hesitate to experiment with different layouts, colors, and functionalities—you have the power to transform your educational platform into something truly special.
Remember, the more you play around with Elementor, the more intuitive it will become, and soon enough, you’ll be designing like a pro. So go ahead,unleash your creativity,and watch as your online courses not only attract students but also keep them engaged and excited to learn!
If you have any questions or need further guidance,feel free to drop a comment below. Happy designing, and here’s to your success in the world of online education!