Are you ready to take your WordPress site to teh next level? Installing a plugin can be a game-changer,unlocking a world of possibilities to enhance functionality and improve user experience. Whether you want to boost your site’s SEO,add an incredible contact form,or integrate social media,plugins are your best friend. But if you’re new to the wordpress realm, the thought of installing one might seem a bit daunting. Don’t worry! In this beginner’s guide, we’ll walk you through the simple steps to install a WordPress plugin, making the process smooth and hassle-free. By the end of this article, you’ll be equipped with the know-how to transform your site with just a few clicks. So,let’s dive in and unlock the full potential of your WordPress website!
Understanding What a WordPress Plugin Is and Why You Need One
WordPress plugins are essential tools that enhance the functionality and capabilities of your website. They are like apps for your WordPress site, enabling you to add features and improve user experience without needing to write a single line of code. Whether you’re a blogger, a small business owner, or a developer, understanding plugins can definitely help you take full advantage of what WordPress has to offer.
When you install a plugin, you are essentially adding a new set of functionalities to your website. Here are some reasons why you might need one:
- Enhanced Functionality: Plugins can add complex features like SEO optimization, social media integration, or e-commerce capabilities.
- Improved Security: Many plugins offer security enhancements to protect your site from threats and vulnerabilities.
- Customization: They allow for unique designs and features tailored to your specific needs.
- Time-saving: Automate tasks such as backups or spam filtering, freeing up your time for more creative pursuits.
WordPress boasts a vast repository of plugins, with thousands available at your fingertips. You can find everything from simple contact forms to complex analytics tools. Though, it’s essential to choose wisely; not all plugins are created equal. Some may slow down your site, while others can conflict with your theme or other plugins.Always look for well-reviewed and regularly updated plugins to ensure compatibility and performance.
To give you a clearer picture,here’s a quick overview of popular types of plugins:
| Plugin Type | Purpose |
|---|---|
| SEO Plugins | Optimize your site for search engines (e.g., Yoast SEO). |
| Security Plugins | Protect your site from malware and hacking attempts (e.g.,Wordfence). |
| Backup Plugins | Automatically backup your website data (e.g., UpdraftPlus). |
| E-commerce Plugins | Transform your site into an online store (e.g., WooCommerce). |
plugins are a gateway to unleashing your website’s potential. They allow you to customize,secure,and enhance your site in ways you might not have thought possible. Understanding the importance of plugins will help you make informed choices and ensure your WordPress site serves its purpose effectively.
Choosing the Right Plugin for Your Website Goals
When it comes to enhancing your website,selecting the right plugin is crucial to achieving your specific goals. Not all plugins are created equal, and making the right choice can significantly impact your site’s performance and user experience. Here are some essential considerations to guide you in making an informed decision.
Identify Your Needs
Before diving into the plugin repository,take a moment to clearly define what you need. Are you looking to improve SEO, add contact forms, enhance security, or perhaps integrate social media? Identify your primary objectives:
- Boosting site performance
- Improving user engagement
- Enhancing security features
- Optimizing for search engines
Check Compatibility
once you’ve outlined your goals, ensure that the plugin you’re considering is compatible with your current WordPress version and theme. An incompatible plugin can lead to glitches or even crash your website. Look for:
- Regular updates from the developer
- Positive user reviews
- Active support forums
Evaluate User Experience
The best plugins not only meet functional needs but also provide an intuitive user experience. A complicated interface can waste your time and hinder effectiveness. Pay attention to:
- Ease of installation and setup
- Customizability options
- Documentation and tutorials available
Consider Performance Impact
Every plugin you add can affect your website’s speed. It’s essential to weigh the benefits of a plugin against its potential impact on performance. Look for options that:
- Are lightweight and efficient
- Have minimal dependencies on other plugins
- Offer caching and optimization features
Budget Wisely
While many plugins are available for free, premium plugins frequently enough offer more robust features and support. Consider your budget and assess whether the investment aligns with your website goals. Here’s a simple breakdown:
| plugin Type | Cost | Typical Features |
|---|---|---|
| Free | $0 | Basic functionalities, limited support |
| Premium | $50 – $300/year | Advanced features, priority support, regular updates |
by following these tips, you’ll be better prepared to choose plugins that not only meet your website’s goals but also provide a seamless experience for your visitors. Remember, the right plugins can elevate your site and help you achieve the online presence you desire.
How to Find and Explore Plugins in the WordPress Repository
Finding and exploring plugins in the wordpress repository can be an exciting journey. With thousands of options available, it’s essential to know how to navigate this treasure trove effectively. Here’s how you can make the most of your search for the perfect plugins to enhance your website.
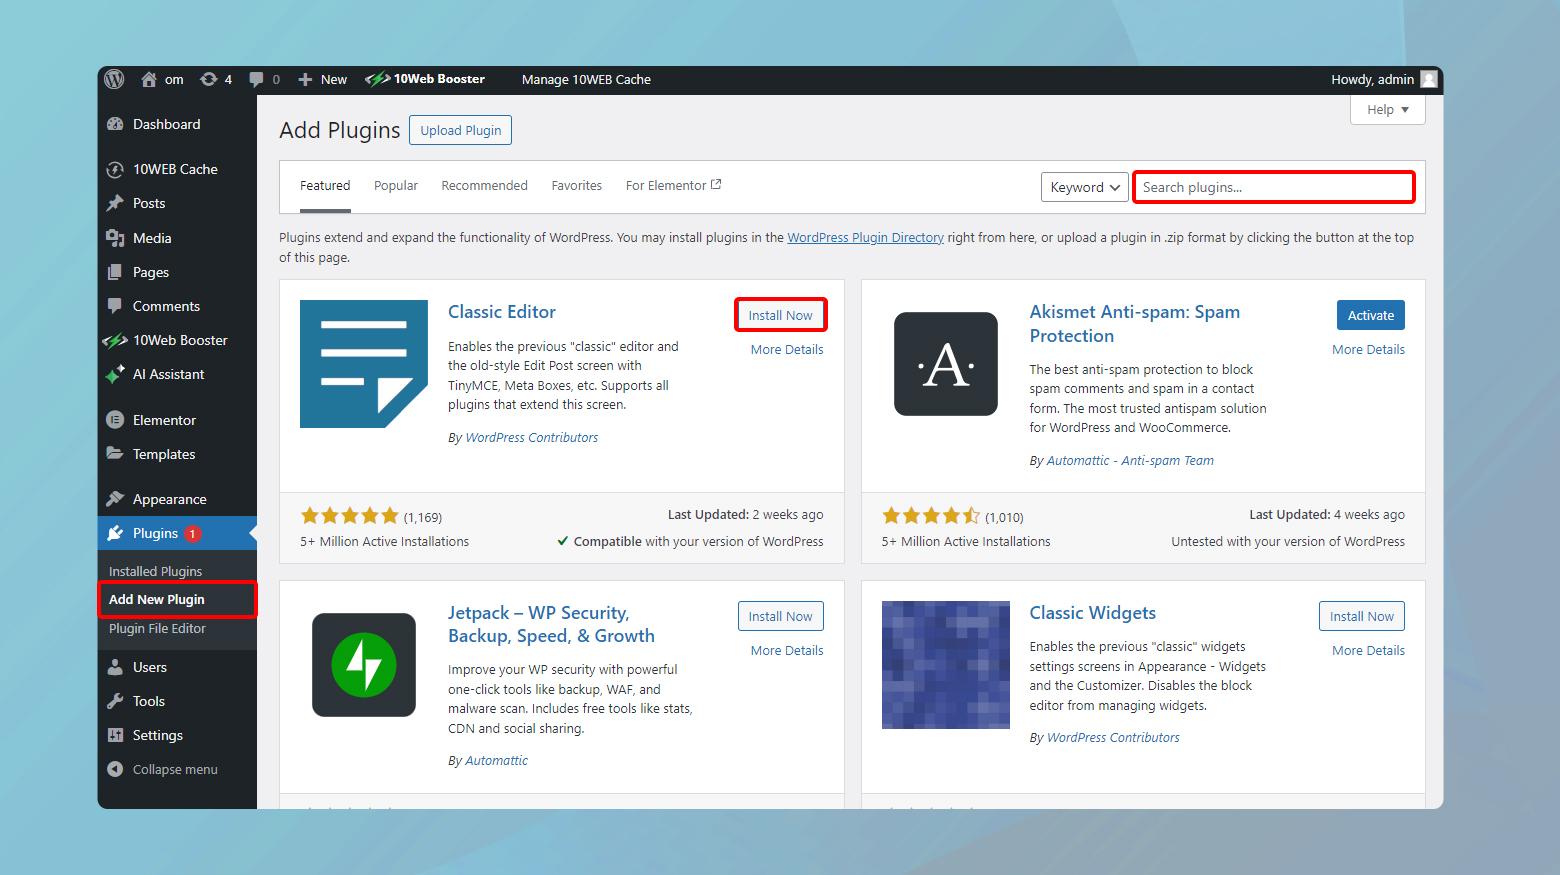
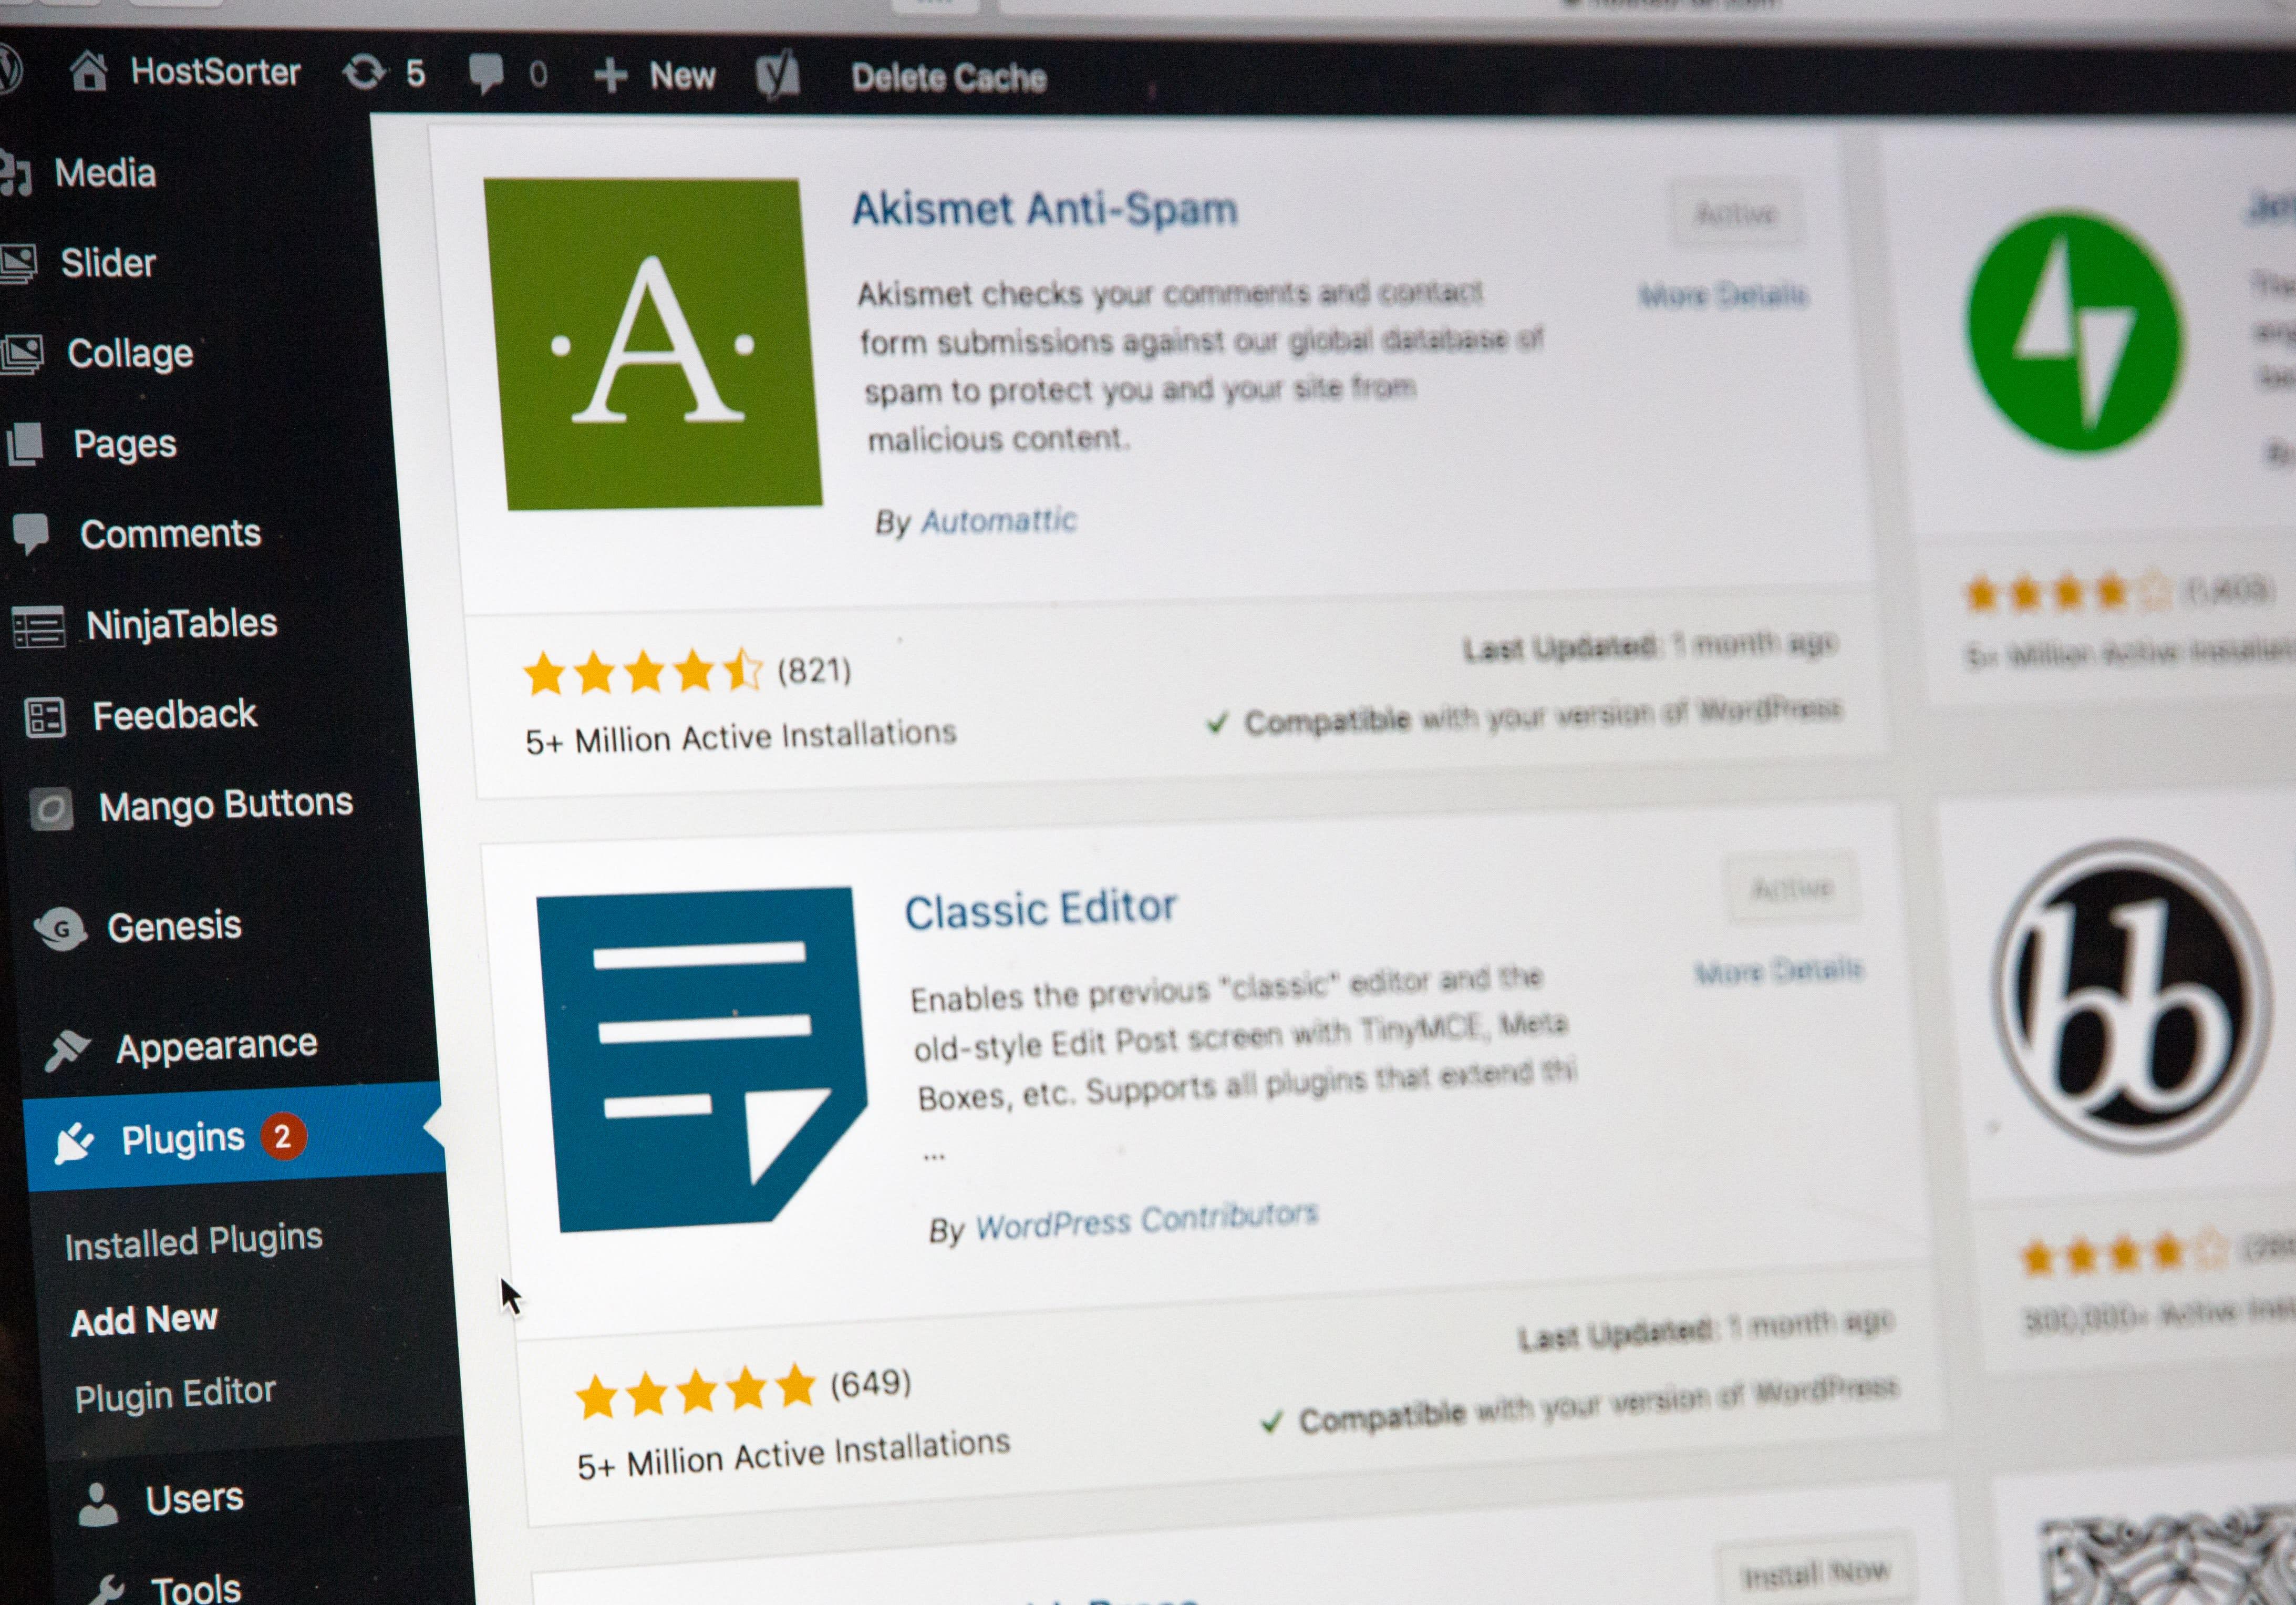
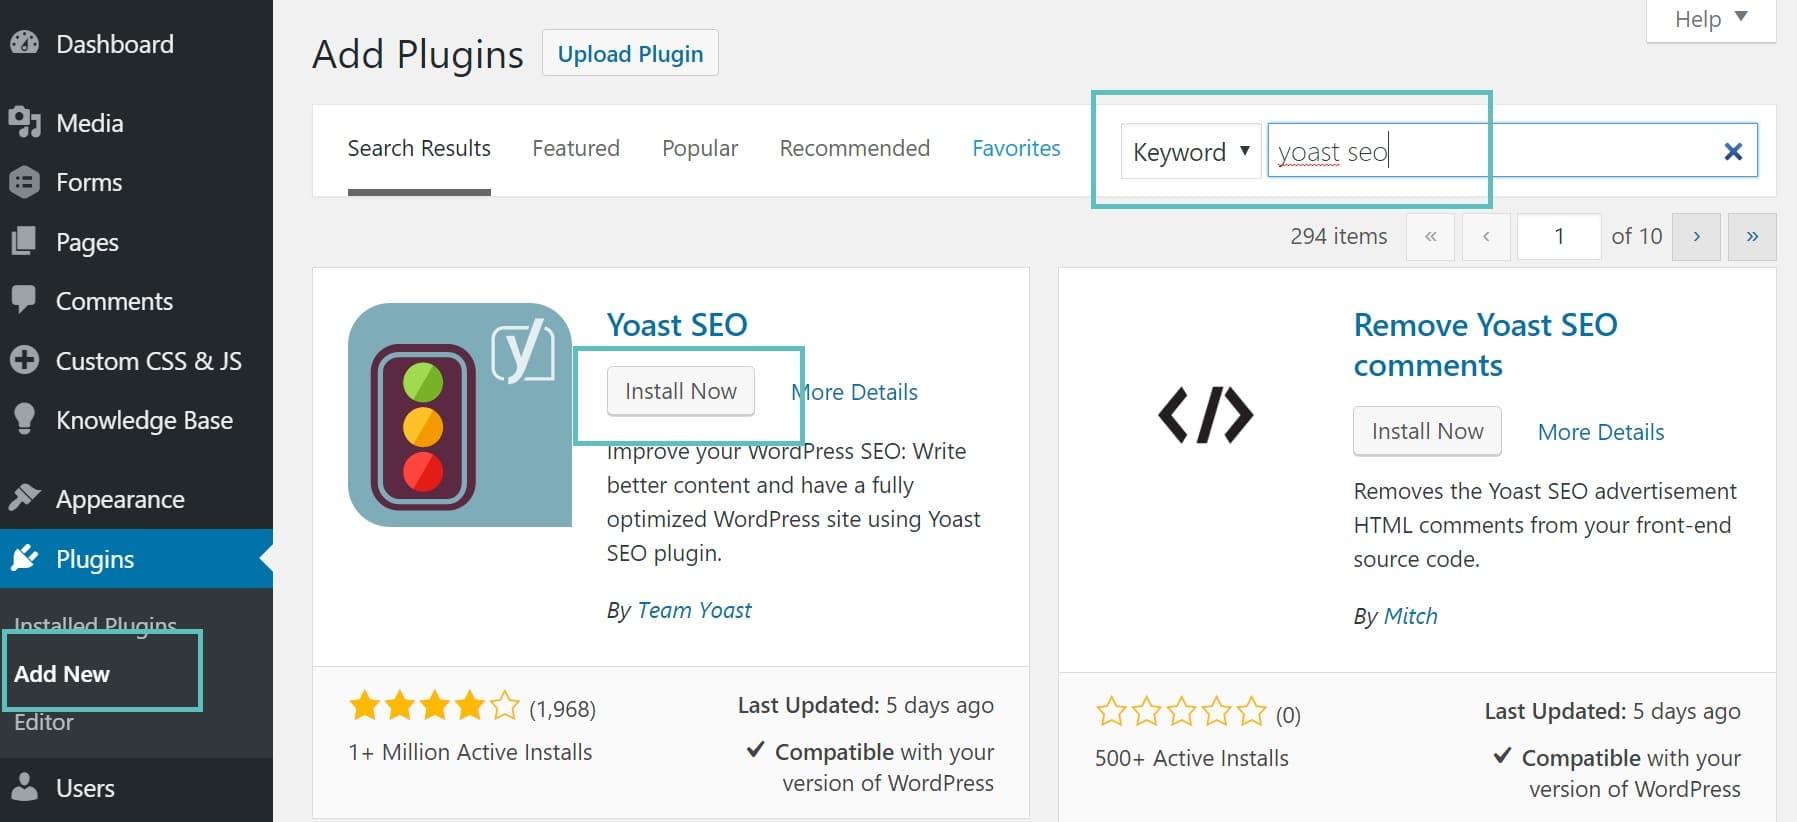
first things first, head over to the WordPress Plugin Repository, which you can easily access from your WordPress dashboard. Simply go to Plugins > Add New. This is your gateway to discovering new functionalities that can elevate your site’s performance.
Once you’re in the repository, you’ll notice a search bar at the top. You can use this to find specific plugins by typing in keywords related to functionality, such as “SEO,” “contact form,” or “e-commerce.” But don’t overlook the featured, Popular, and Recommended tabs. These sections showcase plugins that are widely used and highly rated by the WordPress community. Here’s what to consider:
- Reviews: Check out user ratings and read the feedback. This will give you insight into the reliability and functionality of the plugin.
- Active Installations: A higher number of installations often indicates that a plugin is trusted and regularly updated.
- Last Updated: Ensure that the plugin is regularly maintained. Outdated plugins can pose security risks.
If you find a plugin that piques your interest, click on its name to dive deeper. You’ll be taken to a dedicated page where you can find more information, including detailed descriptions, screenshots, and frequently asked questions. This is a great chance to assess whether the plugin meets your needs.
Another useful tool is the Plugin Comparison Table. If you’re torn between a few options, creating a simple table can definitely help you visualize their features side by side:
| Plugin Name | Rating | Active Installations | Last Updated |
|---|---|---|---|
| Yoast SEO | 4.9 | 5+ million | 2 weeks ago |
| Contact Form 7 | 4.5 | 5+ million | 1 month ago |
| WooCommerce | 4.6 | 5+ million | 1 week ago |
Remember, exploring plugins should be an ongoing process. New plugins are added regularly, and features are constantly updated.Make it a habit to check back frequently enough and stay informed about the latest offerings. Happy exploring!
Step-by-Step Guide to Installing a Plugin from Your Dashboard
Exploring the Upload Method for Premium Plugins
When it comes to installing premium plugins on your wordpress site, the upload method is a straightforward and efficient approach. This is especially useful when you have purchased a premium plugin from a third-party vendor.The process allows you to manually upload the plugin file, giving you complete control over the installation. Here’s how you can easily do it.
First,you need to ensure that you have the premium plugin file on your computer,typically in a .zip format. Once you have that, follow these steps:
- Log into your WordPress Dashboard: Use your credentials to access the backend of your site.
- Navigate to Plugins: In the left sidebar, hover over the “Plugins” menu and click on “Add New.”
- Upload Plugin: At the top of the page, you will see an “Upload Plugin” button.Click on this to proceed.
- Select the File: Click “Choose File” and locate the .zip file of the premium plugin you downloaded.
- Install Now: Once you have selected the file, click the “Install Now” button to start the installation.
After the installation completes, you will see a success message. This is your cue to activate the plugin. Simply click on the “Activate Plugin” link to enable its features on your site.
To give you a clearer picture of the process, here’s a quick reference table:
| Step | Action |
|---|---|
| 1 | Log into your WordPress Dashboard |
| 2 | Go to Plugins > Add New |
| 3 | Click on Upload Plugin |
| 4 | Select your .zip file |
| 5 | Click Install Now |
| 6 | Activate the plugin |
This method not only simplifies the installation of premium plugins but also ensures that you can easily manage updates and configurations later on.Always remember to check for compatibility with your current WordPress version and other installed plugins to avoid conflicts.
Using the upload method gives you the versatility to install plugins that may not be available in the WordPress Plugin directory. This means you can enhance your website with unique functionalities tailored to your needs. So, dive into the world of premium plugins and transform your site today!
Activating Your Plugin and Navigating the Settings
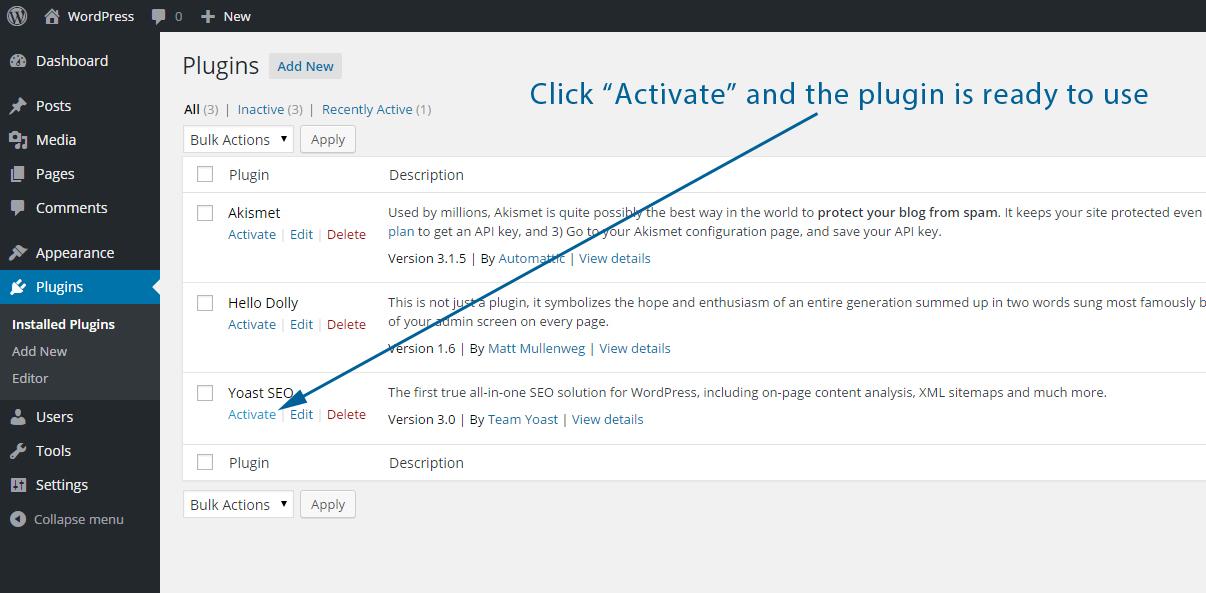
Once you’ve successfully installed your plugin, the next step is to activate it. Typically, this can be done directly from the Plugins menu in your WordPress dashboard. Simply follow these steps:
- Navigate to the Plugins section on the left-hand menu.
- Locate the plugin you want to activate in the list of installed plugins.
- Click on the Activate link directly below the plugin name.
Activation is quick and easy. Once activated, your plugin may redirect you to its settings page, or you may need to find it under the Settings menu or a dedicated section created by the plugin itself.
After activation, it’s essential to familiarize yourself with the plugin settings to tailor it to your needs. Depending on the plugin, you might encounter several options, such as:
- General Settings: Adjust basic configurations like enabling/disabling features.
- Advanced Options: Control more complex functionalities for seasoned users.
- Integration Settings: Connect with other plugins or tools you may be using.
To help you navigate the settings more effectively, here’s a simple breakdown of common plugin settings types:
| Setting type | Description |
|---|---|
| Basic | Simple settings for users new to the plugin. |
| Customization | Options to tweak the appearance and functionality. |
| Performance | Settings that enhance speed and efficiency. |
| Security | Options to protect your site and user data. |
As you delve into the settings, remember to save your changes before exiting the page. Most plugins will have a Save Settings button at the bottom. If you ever feel stuck, don’t hesitate to check the plugin’s documentation or support forums, as they often contain valuable tips and troubleshooting advice.
Ultimately,taking the time to explore and configure your plugin settings will ensure you maximize its potential and enhance your website’s functionality.Happy customizing!

Troubleshooting Common Plugin Installation Issues
encountering issues during plugin installation can be frustrating, but don’t worry—most problems can be resolved with a few simple steps. Here are some common hurdles you might face and tips on how to overcome them.
- Plugin Compatibility: Always check if the plugin is compatible with your current WordPress version. outdated plugins can cause conflicts. Before installation, confirm the plugin’s details in the WordPress Plugin Directory.
- File Permissions: Improper file permissions can prevent installations. Ensure that your WordPress files have the correct permissions. Generally, directories should be set to
755and files to644. - Memory Limit: If you receive a “memory tired” error, your site might need a memory boost. You can increase the memory limit by adding the following line to your
wp-config.phpfile:define('WP_MEMORY_LIMIT', '256M'); - Server Configuration: Sometimes, your server settings can hinder installations.If you suspect this is the case, check with your hosting provider for any restrictions that might block installations.
If you’ve tried the above tips and still face issues, reviewing the error messages can provide clues on what’s wrong. Here’s a quick reference table for common error messages and their meanings:
| Error message | Possible Cause | Solution |
|---|---|---|
| Installation failed | Server connection issue | Check your internet connection or try reinstalling. |
| Plugin not found | incorrect plugin URL | Verify the URL and try again. |
| Access denied | File permissions | Adjust file permissions as mentioned above. |
Additionally, clearing your browser cache or trying a different browser can sometimes resolve unexpected issues. If you’re still having trouble, consider reaching out to the plugin’s support forum or your hosting provider for further assistance. They can provide insights that might save you time and effort.
remember to back up your website before making any changes or installations. This way, you can restore your site to its previous state if something goes awry.

Keeping Your Plugins Updated for Security and Performance
When it comes to maintaining a WordPress site, one of the most crucial tasks is ensuring your plugins are consistently updated. Outdated plugins can pose significant security risks, making your website vulnerable to attacks. Hackers often exploit weaknesses in older versions of plugins, which is why regular updates are essential.
Updating plugins not only enhances security but also improves performance. developers regularly fix bugs, optimize features, and incorporate new functionalities to keep the plugin running smoothly. By keeping your plugins current, you can:
- Minimize security vulnerabilities: Ensure that your website is protected against the latest threats.
- Enhance site performance: Experience faster load times and improved user experience.
- Access new features: Take advantage of the latest functionalities that can definitely help you achieve your site goals.
To check for updates, navigate to your WordPress dashboard and look for the “Updates” section. You’ll see a list of all plugins that require updating. It’s wise to make a habit of checking this regularly, ideally on a weekly basis, to stay ahead of potential issues.
Before performing updates, it’s a good practice to back up your site. This way, if anything goes wrong during the update process, you can easily restore your site to its previous state. Here’s a quick checklist to follow:
| Backup Task | Status |
|---|---|
| Create a full site backup | ✅ Done |
| Check for plugin compatibility | ❌ Not done |
| Update plugins | ❌ Not Done |
| Test site functionality | ❌ Not Done |
After updating, make sure to test your website thoroughly.Check for any broken links, layout issues, or functionality problems that may arise from the new plugin version. If you encounter any issues, you can revert to your backup while you troubleshoot the problem.
Ultimately, keeping your plugins updated is a small yet vital step toward maintaining a secure and efficient WordPress site. Your diligence in this area will pay off in the form of a smoother user experience and enhanced site security, allowing you to focus on creating great content for your visitors.
Best Practices for Managing Your WordPress Plugins
Managing your WordPress plugins effectively is crucial for maintaining a healthy website. here are some best practices to ensure that your site runs smoothly and securely.
Regularly update Your Plugins
Outdated plugins can pose security risks and compatibility issues. Make it a habit to check for plugin updates regularly. WordPress provides notifications for updates, so don’t ignore them! Keeping your plugins up to date helps:
- Enhance security by patching vulnerabilities.
- Ensure compatibility with the latest WordPress version.
- access new features and improvements.
Limit the Number of Plugins
While it’s tempting to install numerous plugins to add functions, too many can slow down your site and cause conflicts. Aim to:
- Identify essential plugins that meet your site’s needs.
- Remove any plugins that are redundant or underused.
- Check reviews and ratings before installation.
Backup Your Site Regularly
Before making updates or installing new plugins, always back up your WordPress site.this will ensure you can easily restore your site if anything goes wrong. Use reliable backup plugins or services that create automatic backups.
Test Plugins on a Staging Site
If possible, set up a staging site where you can test new plugins before deploying them to your live site. This practice allows you to:
- Evaluate compatibility with your theme and other plugins.
- Prevent potential downtimes or crashes on your live site.
- Fine-tune plugin settings without affecting users.
Monitor Plugin Performance
After installing or updating plugins, monitor your website’s performance. Keep an eye on load speeds and functionality. Use tools like Google PageSpeed Insights to:
- Identify performance bottlenecks.
- Ensure that your site remains user-pleasant.
- Make data-driven decisions on which plugins to keep.
Consider Premium plugins
While many free plugins offer great features,premium plugins often come with dedicated support and regular updates.Weigh the benefits and consider investing in plugins that can provide:
- enhanced security features.
- Better customer support.
- Frequent updates and improvements.
How to Safely Deactivate or Uninstall Plugins You No Longer Need
Managing your WordPress site effectively means knowing when to deactivate or uninstall plugins that no longer serve your needs. It’s essential to approach this process with care to avoid disrupting your website’s functionality. Here’s how to do it safely.
First and foremost, always back up your website before making any changes. This ensures that if anything goes wrong, you can easily restore your site to its previous state. Many backup plugins are available that can simplify this process. Once you have your backup in place, you can proceed with deactivating or uninstalling plugins with confidence.
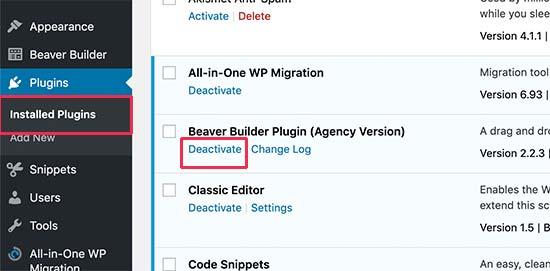
To deactivate a plugin, navigate to your WordPress dashboard and go to the plugins section. Here, you will see a list of all your installed plugins. Find the plugin you wish to deactivate, and click on the Deactivate link. This action will disable the plugin without removing it from your site, allowing you to reactivate it later if needed.
If you’re certain that you no longer need a plugin and want to remove it entirely, you can uninstall it. After deactivating, the option to Delete will appear.click on this option, and the plugin will be removed from your WordPress installation. Keep in mind that some plugins might leave behind residual data, which can clutter your database.
To clean up any leftover data, consider using a database optimization plugin. This can help you remove unnecessary tables or options created by plugins that are no longer active. Additionally,regularly reviewing and cleaning up your plugins can improve your site’s performance and security.
Here’s a quick reference table summarizing the steps:
| Action | Steps |
|---|---|
| Back Up Your Site | Use a backup plugin to create a full backup. |
| Deactivate Plugin | Go to Plugins > Installed Plugins, find the plugin, and click Deactivate. |
| Delete Plugin | Click on Delete after deactivation to remove it completely. |
| Optimize Database | Use a database optimization plugin to clean up leftover data. |
By following these simple steps, you can keep your WordPress site running smoothly while ensuring that it remains secure and efficient. Remember, a well-managed plugin habitat is key to a successful website!
Enhancing Your website with the Right Combination of Plugins
When it comes to building a successful website, the right combination of plugins can make all the difference. Plugins enhance functionality, improve user experience, and even boost your SEO. However, choosing the right ones can be a bit overwhelming, especially for beginners. But don’t worry! With a few considerations,you can select plugins that not only add value but also work harmoniously together.
First,it’s essential to identify your website’s core needs.Are you looking to improve your site’s speed, enhance security, or perhaps add contact forms? Here are some key categories to consider:
- Performance: Plugins that optimize loading times, like caching plugins.
- SEO: Tools that help you optimize your site for search engines.
- Security: Plugins that protect your site from vulnerabilities.
- User Engagement: Options like social sharing buttons or comment plugins.
Next, ensure the plugins you choose are compatible with each other. Not all plugins play well together. Using conflicting plugins can lead to performance issues or even crash your site. A great way to check compatibility is by:
- Reading user reviews and ratings.
- Checking the last update date to ensure ongoing support.
- Testing plugins on a staging site before going live.
Another crucial aspect is to avoid plugin overload. While it might be tempting to install every plugin that seems useful, too many can slow down your site and create security risks. Aim for a streamlined approach—focus on quality over quantity. A well-curated selection can enhance functionality without bogging down performance.
To give you an idea of effective combinations, here’s a simple table outlining some essential plugins and their primary functions:
| Plugin Name | Primary Function |
|---|---|
| Yoast SEO | SEO Optimization |
| WP Super cache | Performance Improvement |
| Wordfence | Security Enhancement |
| Contact Form 7 | User Engagement |
Incorporating the right plugins is not just about functionality; it’s also about creating a seamless experience for your users. With the right tools, you can ensure that your website not only meets your needs but also exceeds your visitors’ expectations. So take your time, do your research, and remember: a well-optimized site is a successful site.
Final Thoughts on WordPress Plugins and Your Website Success
When it comes to enhancing your WordPress website, plugins can make all the difference. They are not just add-ons; they are essential tools that can significantly influence your site’s performance, security, and overall user experience. By selecting the right plugins, you empower your website to offer visitors engaging content, seamless navigation, and robust functionality.
Understanding how to effectively leverage these tools is crucial for your online success. With thousands of plugins available, choosing the right ones can feel overwhelming. here’s a quick list of characteristics to consider when evaluating plugins:
- Functionality: Does the plugin address a specific need or problem on your site?
- User Reviews: What are other users saying about the plugin? Are there common issues?
- Regular Updates: Is the plugin actively maintained and updated to align with the latest WordPress version?
- Support: Is there adequate documentation and support available if you encounter issues?
Once you’ve installed your chosen plugins, remember to monitor their performance closely. Too many plugins can slow down your website, which can negatively impact user experience and SEO. Consider utilizing a performance optimization plugin to keep everything in check. A balanced approach to plugin usage ensures that you reap the benefits without compromising site speed or security.
It might also be beneficial to periodically audit your plugins. Every now and then, take stock of which plugins you’re using and evaluate their necessity. Removing outdated or unused plugins can definitely help keep your site lean and efficient. Here’s a simple checklist to help you with your plugin audit:
- Review: Go through your installed plugins and assess their usefulness.
- Update: Ensure all active plugins are updated to their latest versions.
- Delete: Remove any plugins that are no longer needed or supported.
remember that the success of your WordPress website is a continuous journey. The right plugins can help you adapt and grow as your needs evolve. By staying informed about new releases, trends, and best practices, you can ensure your website remains functional, user-friendly, and a step ahead of the competition.
Frequently Asked questions (FAQ)
Certainly! Here’s a Q&A format for an article titled “How to Install a WordPress Plugin? (Beginner’s Guide),” designed to be conversational and persuasive.
Q&A: How to Install a WordPress Plugin? (Beginner’s Guide)
Q: What is a WordPress plugin, and why should I care about it?
A: Great question! A WordPress plugin is like an app for your website. It adds new features and functionalities without needing to know how to code. Whether you want to improve your site’s SEO,add contact forms,or enhance security,plugins can make all the difference. Trust me, once you start using them, you’ll wonder how you ever managed without them!
Q: How do I find the right plugin for my needs?
A: The WordPress Plugin Directory is your best friend! You can search directly from your WordPress dashboard or on the WordPress website. Just think about what you want to achieve—like speeding up your site or adding social media buttons—and type that into the search bar. Take a look at the ratings and reviews; they’ll give you a sense of how well it works for others.
Q: Is it easy to install a plugin? I’m not very tech-savvy.
A: Absolutely! Installing a plugin is one of the easiest things you can do on WordPress. If you can click a few buttons,you can install a plugin. I promise, it’s way simpler than you think!
Q: Can you walk me through the installation process?
A: Of course! Here’s a simple step-by-step guide:
- Log in to your WordPress Dashboard.
- Navigate to the “Plugins” menu on the left sidebar.
- Click “Add New.”
- Search for the plugin you want using the search bar.
- Once you find it, click “Install Now.”
- After it’s installed, click “activate” to start using it.
And just like that, you’re all set!
Q: do I need to pay for plugins? Are there really good free ones?
A: While some plugins come with a price tag, many great plugins are completely free! Just remember, free doesn’t meen low quality. You can find robust and feature-rich options that suit your needs without spending a dime. Always check the reviews and the number of active installations to gauge their reliability.
Q: What if I run into problems after installing a plugin?
A: It happens! If you notice any issues—like your site slowing down or conflicting with other plugins—don’t panic. You can easily deactivate the plugin by going back to the “Plugins” menu,finding the problematic one,and clicking “Deactivate.” If you’re unsure, the WordPress support forums are full of friendly folks ready to help!
Q: Any tips for managing my plugins?
A: Yes! Keep your plugins updated to ensure they work properly and securely. Regularly review your installed plugins and deactivate/delete any that you’re not using. This will keep your site running smoothly and make it easier to manage. Plus, fewer plugins mean fewer potential conflicts.
Q: Why should I start using plugins today?
A: As they open up a world of possibilities for your website! Plugins can save you time, enhance functionality, and even boost your site’s performance. It’s a small effort for a big return. So why wait? Dive in and start exploring the amazing features plugins can bring to your WordPress experience!
Feel free to adjust any part of this Q&A to better fit your article’s style or to add more specific details!
The Way Forward
Wrapping It Up
And there you have it! Installing a WordPress plugin is not just a technical task; it’s a ticket to transforming your website into a powerhouse that serves your unique needs. Whether you want to enhance your site’s functionality, improve SEO, or simply add a fun feature, plugins are the way to go.
If you followed along and installed your first plugin, congratulations! You’re already on your way to mastering WordPress. Remember, the right plugins can significantly elevate your website, making it more user-friendly and engaging. so don’t hesitate to explore and experiment—there are thousands of plugins out there waiting to be discovered!
Feel free to share your experiences or ask any questions you might have in the comments below. We love hearing from fellow WordPress enthusiasts! And if you found this guide helpful, why not share it with a friend who’s also looking to enhance their website? Happy blogging, and may your WordPress journey be filled with creativity and innovation!


