Introduction
Hey there,fellow educators and online entrepreneurs! Are you ready to take your online learning platform to the next level? If you’re using the Eduma theme for your WordPress site,you’re already on the right track. But did you know that organizing your courses into categories can significantly enhance the user experience and make navigation a breeze for your students? That’s right! Creating a courses category not only helps your learners find what they’re looking for faster, but it also showcases your expertise and keeps your content neatly organized. in this simple guide, we’ll walk you through the step-by-step process of setting up courses categories in Eduma, ensuring that your online classroom shines and stands out in the crowded digital landscape. Let’s dive in and make your course offerings as effective and engaging as possible!
Understanding the Eduma theme and its Features
The Eduma theme is a powerful, feature-rich WordPress theme specifically designed for educational platforms and online course sites. Its versatility allows users to create engaging, well-structured courses while also providing a visually appealing interface that is easy to navigate.One of the standout features of Eduma is its intuitive course management system, which simplifies the process of organizing and categorizing your course offerings.
When creating courses, one essential aspect is the ability to categorize them effectively. This helps learners find the content relevant to their interests quickly. Here’s how you can leverage the Eduma theme to create course categories:
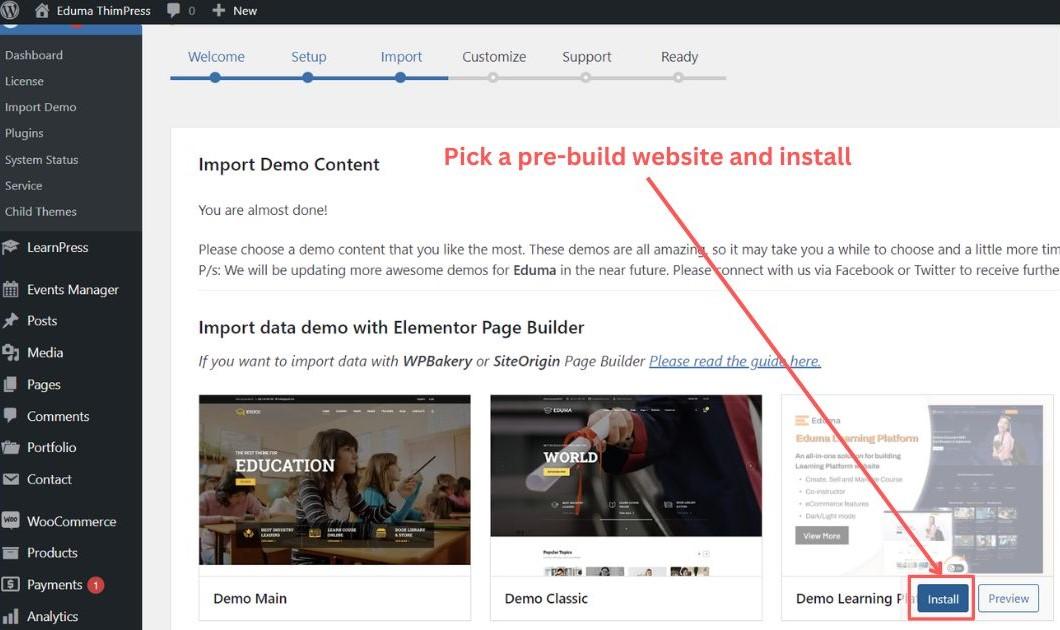
- access the Course Categories: Navigate to the Courses section within your WordPress dashboard and select Categories. Here, you can add, edit, or delete course categories.
- Add New Category: Click on the Add New Category button. Fill in the details such as Name, Slug, and a brief Description to help your users understand what the category encompasses.
- Organize categories: Use the Parent Category option if you want to create a hierarchy. this is especially useful for large course catalogs.
Once your categories are set up, you can easily assign them to your courses. This not only enhances the user experience but also boosts SEO by making your content more discoverable. In Eduma, when creating or editing a course, simply check the appropriate categories to associate them with the course. this two-step process—setting up categories and assigning them—ensures that your educational content is organized in a user-friendly manner.
To visualize how your courses are categorized,consider using a table to highlight the different categories and the number of courses under each. Here’s a quick look:
| Course Category | Number of Courses |
|---|---|
| Programming | 15 |
| design | 10 |
| Marketing | 8 |
| Business | 12 |
in addition to course categorization, the Eduma theme also offers features such as customizable layouts, drag-and-drop course builders, and integrated payment options. These features, combined with an effective categorization system, allow you to create a robust online learning platform that meets the needs of both educators and learners. With Eduma, you’re not just building courses; you’re creating an engaging educational experience.

Why Organizing Courses into Categories Matters
Organizing your courses into categories is not just about aesthetics; it’s about creating a more effective learning surroundings for your users. When learners can easily navigate through well-defined categories, they are more likely to find courses that suit their interests and needs, leading to higher engagement and completion rates.
Consider the following benefits of categorizing your courses:
- Improved User Experience: A structured layout allows users to find relevant courses quickly,enhancing their overall experience on your site.
- Targeted Marketing: By knowing which categories are popular, you can tailor your marketing efforts and promotions to highlight in-demand courses.
- Better SEO: well-organized content can help improve your site’s SEO. Search engines favor structured data, making it easier for potential learners to find you.
- Increased Engagement: When users can easily browse through categories that interest them, they are more likely to explore multiple courses, increasing the chances of enrollment.
Moreover, effective categorization allows for easier tracking and analytics. You can gather insights on which categories attract the most learners, helping you refine your course offerings to better meet market demands. This data-driven approach ensures that your curriculum evolves with your audience’s changing interests.
In addition, having clear categories aids in content management.As your course library expands, it becomes crucial to maintain association. A well-categorized system will simplify updates, revisions, and the addition of new courses, saving you time in the long run.
Ultimately, investing time in organizing your courses into meaningful categories is an investment in your platform’s success. it signals professionalism and thoughtfulness, helping to build trust with your users and encouraging them to return for more learning opportunities.
Getting Started with Your Eduma Installation
Setting up your Eduma installation to create course categories is a straightforward process that can significantly enhance the organization of your educational content. With well-defined categories, your users will find it easier to navigate through the courses you offer. Here’s how you can easily create course categories in your Eduma theme.
First, you need to access your WordPress dashboard. From there, follow these simple steps:
- Navigate to Courses: In your dashboard menu, find the “Courses” section.
- Select Categories: Click on “Categories” under the Courses submenu.
- Add New Category: You’ll see an option to add a new category.Fill in the necessary fields.
When creating a new category, consider including:
- Category Name: A clear and descriptive name for the category.
- Slug: A URL-friendly version of the category name, which is automatically generated but can be customized.
- Description: A brief overview of what courses in this category will cover.
once you have filled in the details, don’t forget to click on the “Add New Course Category” button to save your changes. To keep your course layout user-friendly, you might want to categorize them based on:
| Category Name | Description |
|---|---|
| Web Advancement | Courses on HTML, CSS, JavaScript, and more. |
| Graphic Design | Learn to create stunning visuals and designs. |
| Business Management | Skills and knowledge to manage businesses effectively. |
After successfully creating your categories,it’s an excellent idea to assign existing courses to these categories. This can be done by editing each course and selecting the appropriate category from the list. This step is crucial for ensuring that your content is organized and accessible.
Lastly, regularly review your course categories.As you expand your offerings, you may find the need to add new categories or adjust existing ones to better reflect your course content. Keeping your categories updated not only enhances user experience but also contributes to better SEO for your site.

Navigating to the Course Categories Section
To efficiently manage your courses in the Eduma theme, it’s important to locate the Course Categories section. This part of the interface is designed to help you organize your educational offerings,making it easier for your students to navigate through your site.
start by logging into your WordPress dashboard. Once you’re in, look to the menu on the left-hand side of the screen. Here,you will find various options,but your focus should be on Courses.Hover over it, and a dropdown menu will appear. This is where the magic starts!
Click on categories from the dropdown. This will take you directly to the Course Categories page, where you can add, edit, or delete categories as needed. The interface is user-friendly, presenting you with clear options to manage your categories. You’ll see a section that displays all existing categories, along with a form to create new ones. Here’s a quick overview of what you can do:
- Add a New Category: Simply fill in the name and description fields, and click Add New Category.
- Edit an Existing Category: Hover over the category name and click Edit to make changes.
- Delete a Category: If a category is no longer needed, hover over it and click Delete.
For a more structured approach, you might want to consider assigning parent categories to create a hierarchy.This can help in organizing your courses into broader subjects. In the same Add New Category section, you’ll find an option to select a parent category from a dropdown menu. This is especially useful if you offer a wide range of courses that fall under different subjects.
To visualize how your categories will appear on the front end, you can create a simple table showing the relationships between parent and child categories:
| Parent Category | Child Category |
|---|---|
| Technology | Web Development |
| Technology | Data Science |
| Health | Nutrition |
| Health | Fitness |
Once you have set up your categories, remember to assign them to your courses. This will not only enhance the user experience but will also improve the searchability of your courses, making it easier for students to find what they’re looking for.

Creating Your First Course Category with Ease
Creating a course category in the Eduma theme is a straightforward process that can significantly enhance the organization and navigation of your online courses. Follow these simple steps to get started:
- Log into Your Dashboard: Begin by accessing your WordPress dashboard. This is your control center for all things related to your website.
- Navigate to Courses: On the left-hand side, find the ‘Courses’ option and click on it. This will take you to the courses management area.
- Select Categories: In this section, look for the ‘Categories’ link. Clicking on this will bring up the category management interface.
Once you’re in the category management area, you can start adding new categories. here’s how:
- Add New Category: You’ll see a field to enter your new category name. Choose a name that clearly represents the types of courses that will fall under this category.
- Description: Don’t forget to write a brief description. This helps users understand what to expect from the courses in this category.
- Slug: The slug is the URL-friendly version of your category name.Keep it simple and relevant.
- parent Category: If you want to create a hierarchy, you can select a parent category from the dropdown menu. This is optional but useful for organizing more complex course structures.
After filling out the necessary fields, hit the Add New Category button. Voila! Your new category is now live. But wait, there’s more! You might want to style your categories for better visibility.
| Category Name | Description | Courses Count |
|---|---|---|
| Web Development | Learn to build websites from scratch. | 15 |
| Graphic Design | Master design principles and tools. | 10 |
| Digital Marketing | Strategies for online success. | 8 |
Now you can easily assign courses to the newly created category. Just edit a course and look for the ‘Categories’ section. Check the box next to the relevant category to include it. This not only helps with organization but also improves your course finding for potential students.
Incorporating categories into your Eduma theme is a game-changer for both you and your learners. It ensures that your offerings are well-structured and easily accessible, making the learning journey more enjoyable for everyone involved.
Customizing Category settings for Optimal visibility
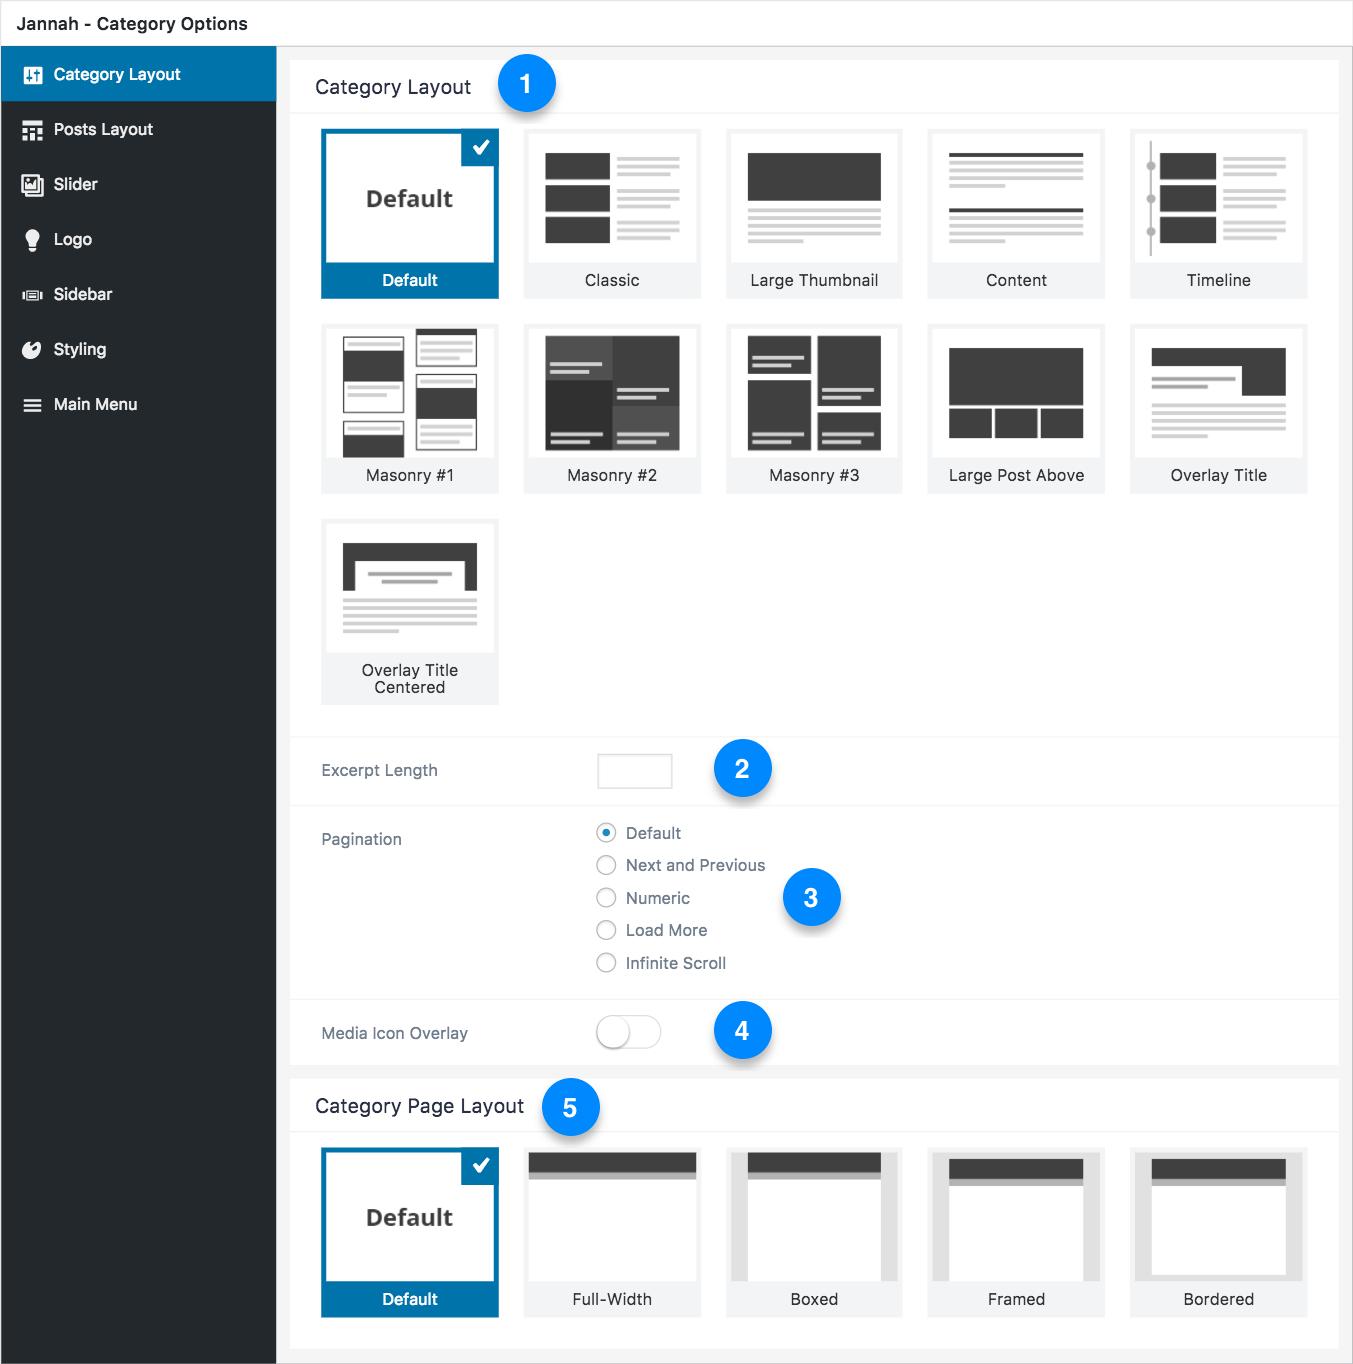
When it comes to enhancing the visibility of your course categories in the Eduma theme, it’s all about the fine-tuning of settings that align with your audience’s needs and preferences. Start by organizing your categories in a way that makes sense for your users. Think about the most common search queries or interests that your potential students may have.
Here are some tips for customizing your category settings:
- Descriptive Names: Use clear and catchy names for your categories. This not only helps in SEO but also makes it easier for users to find what they’re looking for.
- SEO Optimization: Incorporate relevant keywords in your category descriptions. This will improve your chances of appearing in search results and attract more visitors.
- Custom Icons: Consider adding custom icons for each category.Visual elements can enhance recognition and make navigation more intuitive.
- Featured Images: Use eye-catching featured images for your categories. these images can create a strong first impression and draw in potential students.
Additionally, leveraging the power of category hierarchy can significantly improve user experience. Create parent and child categories where necessary. This way, users can easily browse through broader topics before diving into specific courses. A well-structured hierarchy not only aids navigation but also allows for better content management.
Consider the following table to visualize an effective category structure:
| Parent Category | Child Categories |
|---|---|
| Web Development |
|
| Graphic Design |
|
| Marketing |
|
don’t forget to engage with your audience through your category pages. adding testimonials,course previews,or even a short introductory video can create a connection with potential students. This is your chance to showcase what makes your courses special and why they should choose you over competitors.
adding Courses to Your New Categories
Once you’ve set up your new categories in the Eduma theme, it’s time to enrich them with courses that align with your educational goals. Adding courses to your categories not only organizes your content but also enhances the user experience on your site. Let’s dive into the simple steps to get this done effectively!
First, navigate to your WordPress Dashboard and go to the Courses section. Here, you can either create a new course or edit an existing one. When creating or editing a course, make sure to look for the Categories box, usually located on the right side of the screen. This is where the magic happens!
To assign a course to its respective category,simply check the box next to the relevant category name. If you want to add multiple categories, feel free to check more than one! This flexibility ensures that your courses can be easily found by users interested in different subjects.
If you need to create a new category while adding a course, you can do so right from the Categories box. Just click on Add New Category, enter the category name, and hit Add New Category again. It’s that easy! Your new category will appear in the list, ready to be selected.
Here’s a quick summary of the steps:
- Go to the Courses section in your Dashboard.
- Create or edit a course.
- Locate the Categories box.
- Select existing categories or add new ones.
- save or publish your course.
To better visualize how categories can enhance your courses, check out this table highlighting some category examples:
| Category Name | Description |
|---|---|
| Web Development | Learn to build stunning websites from scratch. |
| Graphic Design | Master the art of visual dialogue. |
| Business Management | Gain skills to lead and manage effectively. |
don’t forget to preview your changes! Check how the courses appear under each category on your site. This helps ensure that everything is organized and that users can easily find what they’re looking for.Happy course creating!
Utilizing Tags and Attributes for Better Organization
When it comes to organizing your courses in the Eduma theme, leveraging tags and attributes is essential for maximizing both user experience and site management. Proper use of these elements can make your courses more discoverable and easier to navigate for your audience.
Tags act as keywords that categorize your content. By assigning relevant tags to your courses, you can help users find related materials quickly. Here’s how to effectively utilize tags:
- Be specific: Use tags that accurately reflect the course content, such as “Graphic Design,” “Web Development,” or “Marketing fundamentals.”
- Limit the number: Too many tags can confuse users. Aim for 5-10 relevant tags per course.
- Think like your audience: Use terms and phrases that your target learners are likely to search for.
Attributes, on the other hand, provide additional context and functionality to your course listings. Here are a few attributes to consider:
- Course Level: Indicate whether the course is for beginners,intermediate,or advanced learners. This helps set expectations right from the start.
- Duration: Include course length to inform users about the time commitment required.
- Location: If applicable, indicate whether the course is online or in-person.
| Attribute | Description |
|---|---|
| Course Level | Beginner, Intermediate, Advanced |
| Duration | 1 Hour, 3 Weeks, Self-Paced |
| Location | Online, In-Person, Hybrid |
By combining tags and attributes, you not only enhance the discoverability of your courses but also create a structured environment that is intuitive for users. This approach encourages potential learners to explore more of your offerings, leading to increased engagement and enrollment rates.
Incorporating these strategies into your Eduma theme setup isn’t just about aesthetics; it’s about creating a streamlined, user-friendly experience. When users can easily identify and access the courses they’re interested in, they are more likely to return and recommend your platform to others.

Enhancing User Experience with Category Descriptions
When creating a course category in the Eduma theme, incorporating engaging category descriptions can significantly improve user experience. These descriptions serve as a roadmap for users, guiding them through the available courses while also setting the right expectations. A well-crafted description can entice potential learners, making them feel more connected to the content.
To create effective category descriptions, consider the following strategies:
- Highlight Key Features: Mention what makes the category unique. Whether it’s the teaching style, the expertise of instructors, or the practical applications of the courses, make sure to emphasize these points.
- Use Clear Language: Avoid jargon and complex terms. Use simple, straightforward language that resonates with your target audience. Clarity is key in retaining users’ attention.
- Incorporate Keywords: For SEO purposes, integrate relevant keywords naturally into your descriptions. This not only helps your courses rank better in search engines but also ensures that users find exactly what they are looking for.
Additionally, consider formatting options to enhance readability. As an example, using bullet points or short paragraphs can make the text more digestible. You might want to outline the benefits of enrolling in the courses or list the skills that learners will acquire. This approach not only informs but also motivates potential students.
| Benefits of Course Categories | impact on Users |
|---|---|
| Organized Content | Easy navigation, leading to higher engagement |
| Clear expectations | Users know what to expect, reducing bounce rates |
| Enhanced Learning Pathways | guides users to relevant courses, increasing satisfaction |
Moreover, incorporating testimonials or success stories within your category descriptions can add a personal touch. Sharing experiences from past students who have benefited from the courses not only builds credibility but also inspires potential learners to take the plunge. A few impactful quotes or short paragraphs can go a long way in establishing trust.
Lastly, don’t forget to regularly update your category descriptions.As you add new courses or receive feedback,make adjustments to keep the content fresh and relevant. An evolving description reflects a dynamic learning environment, showing users that you are committed to providing the best educational experience possible.

Tips for Promoting Your Course Categories Effectively
To effectively promote your course categories, it’s essential to create a buzz around them. Start by leveraging your existing audience. Email newsletters can be a powerful tool for this. Segment your audience based on their interests and provide tailored content that highlights the unique benefits of each course category. Personalization is key; peopel are more likely to engage when they see relevant content that resonates with their needs.
Next, utilize social media platforms to your advantage. Share engaging posts that showcase your course categories. Use eye-catching visuals and compelling captions to draw in your audience.Consider the following strategies:
- Run contests or giveaways related to your course categories.
- Create short video teasers that illustrate what each category offers.
- Engage with user-generated content by encouraging students to share their experiences.
Additionally, incorporate SEO strategies into your promotional efforts.Optimize your course category pages with relevant keywords to improve visibility in search engines. This can significantly increase organic traffic. For instance, use keywords that your target audience is likely to search for, and include them in your title tags, meta descriptions, and throughout the content on your category pages.
Do not underestimate the power of collaborations. Partner with influencers or experts in your field who can promote your course categories to their audiences. This not only expands your reach but also adds credibility to your offerings. Consider creating a simple collaboration framework:
| Influencer/Partner | Course Category | Proposed Collaboration |
|---|---|---|
| Jane Doe | Digital Marketing | Live Webinar |
| John smith | Graphic Design | Blog Feature |
don’t forget to track your efforts. Use analytics tools to monitor which promotional strategies yield the best results. A/B testing can be particularly helpful here. Test different emails, social media posts, or landing page designs to see what resonates most with your audience.This way, you can refine your approach over time, ensuring that your promotional efforts are as effective as possible.
Troubleshooting Common Issues When Creating Categories
Creating categories for your courses in the Eduma theme can sometimes lead to unexpected hiccups.If you find yourself facing issues, don’t worry! Here are some common pitfalls and simple solutions that can help you get back on track.
- Category Visibility: If your categories aren’t appearing on the front end, ensure that they are set to “Public” in the category settings. Sometimes, a category can be accidentally marked as “Private,” preventing users from accessing it.
- Permalinks Settings: After creating or modifying categories, it’s crucial to refresh your permalinks. Go to Settings > Permalinks and click “Save Changes” to flush the rewrite rules. This can resolve issues with broken links or misdirected pages.
- Theme Compatibility: Not all themes handle categories the same way. If you’re using custom templates, ensure they support category displays. Check your theme documentation or reach out to support if you suspect compatibility issues.
Another common issue arises from the use of plugins. some plugins, especially those related to SEO or caching, can interfere with category creation or display. Try the following:
- Deactivate any plugins that you suspect might be causing conflicts.
- Clear your cache after making changes to your categories to see the updates reflected on your site.
If you’re still having trouble, consider checking your user permissions. Sometimes, restrictions can inhibit your ability to create or modify categories:
| User Role | Permissions |
|---|---|
| Administrator | full access to create and manage categories |
| Editor | Can manage categories but may have limited visibility |
| Author | Can create but not manage categories |
Lastly, ensure that you’re using the latest version of the Eduma theme. Developers often release updates that fix bugs and enhance functionality. Regularly updating your theme can prevent a host of issues down the line.

Final Thoughts on Streamlining Course Management in Eduma
Streamlining course management in the Eduma theme can significantly enhance your educational platform’s efficiency and user experience. By organizing your courses into distinct categories, you not only make it easier for learners to navigate but also create a more structured and coherent learning environment. Here are some key considerations to keep in mind:
- Enhanced User Experience: Categorized courses allow learners to quickly find what they are interested in, reducing frustration and increasing engagement.
- Improved SEO: When courses are organized into categories, search engines can better index your content, possibly leading to higher visibility and traffic.
- Better Management: For course administrators, categorizing courses simplifies the management process, making it easier to update, add, or remove courses as needed.
Implementing course categories in Eduma is not just about aesthetics; it’s about functionality. The theme’s built-in features facilitate easy integration of categories into your course listings. You can use the following steps to streamline the process:
- Access the dashboard and navigate to the Courses section.
- Click on Add New to create your course categories.
- utilize the Category settings on the sidebar to define and organize your course topics.
Furthermore, it’s essential to maintain flexibility in your category structure. As your course offerings grow, so should your categories. Consider these tips for adaptability:
- Regularly Review Categories: Periodically assess your course categories to ensure they align with current offerings and learner needs.
- Use Descriptive Titles: Choose clear and descriptive category titles to enhance clarity for users.
- Engage with Feedback: Listen to student feedback regarding course organization and adjust categories accordingly.
To visualize the impact of well-organized course categories, consider the following table showcasing potential categories and their descriptions:
| category Name | Description |
|---|---|
| Programming | Courses focused on coding languages and software development. |
| Design | Creative courses in graphic design, UX/UI, and multimedia. |
| Business | Courses covering entrepreneurship, management, and marketing strategies. |
| Personal Development | Self-improvement courses aimed at enhancing personal and professional skills. |
by effectively categorizing your courses, you can create a more intuitive learning platform that resonates with your audience. Remember, the goal is not just to provide information but to foster an engaging and supportive educational journey for your students.Prioritize clarity and structure, and watch as your course management becomes significantly more efficient.
frequently Asked Questions (FAQ)
Certainly! Here’s a Q&A section for your article on creating courses categories in the Eduma theme:
Q&A: How to Create Courses Category in eduma Theme
Q: Why should I categorize my courses in the Eduma theme?
A: Categorizing your courses is essential for both organization and user experience. It helps learners easily navigate your offerings, find what they’re interested in, and improves your website’s overall usability. Plus, a well-structured course category can lead to higher enrollment rates!
Q: Is it intricate to create course categories in Eduma?
A: Not at all! Eduma’s intuitive interface makes it super simple to create and manage course categories.Whether you’re a tech novice or a seasoned pro, you’ll find the process straightforward and user-friendly.
Q: What are the steps to create a course category?
A: Great question! you’ll generally follow these steps:
- Log into your WordPress Dashboard.
- Navigate to the ‘Courses’ section.
- Select ‘Categories’ from the dropdown menu.
- Add a new category by filling in the name and description.
- Don’t forget to hit ‘Add New Category’!
And voilà, you’ve created a category!
Q: Can I customize my course categories?
A: Absolutely! Eduma allows you to customize categories with unique descriptions, images, and even banners. This not only enhances your site’s aesthetic but also provides your audience with a clearer understanding of what each category offers.
Q: How can I promote my course categories effectively?
A: To promote your course categories, consider using engaging visuals, compelling descriptions, and featured courses. You can also leverage social media, newsletters, and even blog posts to drive traffic to specific categories. The more you highlight the value of each category, the more likely potential learners will explore them!
Q: Do I need technical skills to manage course categories?
A: Nope! You don’t need to be a tech genius to manage course categories in Eduma. The theme is designed for ease of use, so even if you’re a beginner, you’ll find it simple to create and edit categories without any coding knowledge.
Q: What if I need more help or tutorials?
A: If you ever find yourself needing extra guidance, the eduma documentation and support forums are excellent resources! Plus, there are plenty of online tutorials and communities where you can ask questions and share tips with other Eduma users.
Feel free to adjust any of the Q&A to better fit your article’s style!
To Wrap It Up
And there you have it! Creating a courses category in the Eduma theme is not just a straightforward process; it’s a powerful way to enhance the learning experience on your website. By organizing your courses effectively, you’re not only making it easier for your users to navigate but also showcasing your content in a way that truly shines.
Remember, a well-structured course category can lead to increased engagement, higher enrollment rates, and ultimately, greater success for your educational platform. So why wait? Dive into your Eduma theme today and start categorizing those courses!
If you found this guide helpful, feel free to share it with fellow educators and course creators. Together, we can empower more learners around the globe. Happy teaching, and good luck with your course categories!