

In today’s fast-paced digital world, ensuring your website is not only fast but also secure is more crucial than ever—especially if you’re running a WordPress site. Enter Cloudflare, a powerful tool that not only boosts your website’s performance but also shields it from potential threats. Whether you’re a seasoned developer or just starting your blogging journey, setting up Cloudflare might seem daunting, but it’s easier than you think! In this step-by-step tutorial for 2025, we’ll guide you through the process, breaking it down into simple, manageable steps.by the end of this article, you’ll have your WordPress site optimized and protected, giving you peace of mind and your visitors a seamless experience. So, let’s dive in and turn your site into a speed demon while keeping those pesky hackers at bay!
Understanding the Benefits of Cloudflare for Your WordPress Site
When it comes to optimizing your WordPress site, integrating cloudflare can make a world of difference.Not only does Cloudflare enhance your site’s performance, but it also bolsters security, making it a must-have for website owners who wont to provide a seamless user experience.
One of the standout features of Cloudflare is it’s content delivery network (CDN) capabilities. By caching your website’s static content across multiple servers worldwide, Cloudflare ensures that your visitors load your site faster, regardless of their geographic location. This speed boost can lead to lower bounce rates and higher user satisfaction, which are crucial for maintaining a accomplished online presence.
In addition to improved speed, Cloudflare provides robust DDoS protection, shielding your site from malicious attacks that could bring it down. This feature is essential for e-commerce sites and blogs alike, as downtime can result in lost revenue and diminished trust among your audience. With Cloudflare,you can rest easy knowing your site is better protected against such threats.
Another meaningful advantage is the SSL encryption that Cloudflare offers. SSL certificates are critical for securing sensitive information and improving your site’s SEO rankings. With Cloudflare’s free SSL option, you can ensure that your WordPress site is safe while also gaining the added benefit of improved visibility in search engine results.
For site administrators, Cloudflare comes with advanced analytics tools that allow you to monitor your website’s performance in real-time. You can track metrics such as page load times,visitor data,and security threats,enabling you to make informed decisions about your site’s future. These insights are invaluable for ongoing optimization and can help you fine-tune your strategies for maximum impact.
| Cloudflare Benefit | Description |
|---|---|
| Faster Load Times | Global CDN for optimized content delivery. |
| DDoS Protection | defends against distributed denial-of-service attacks. |
| SSL Encryption | Free SSL for secure data transmission. |
| Analytics Tools | Real-time performance and security monitoring. |
Ultimately, leveraging Cloudflare for your WordPress site not only enhances performance and security but also frees up your time to focus on content creation and audience engagement. With its user-friendly interface and powerful features, Cloudflare is an investment that pays off in both performance and peace of mind.
Creating Your Cloudflare account Made Easy
Setting up your Cloudflare account is the first step towards enhancing your WordPress site’s performance and security. The process is straightforward and can be completed in just a few minutes. Here’s how to get started:
Begin by visiting Cloudflare’s website. Once there, you will see a prominent button that says “Sign Up.” Click on it to initiate the registration process.
Next, you’ll be prompted to enter your email address and create a password. Make sure to choose a strong password to enhance your account’s security. After filling in these details, click on the “Create Account” button. This action sends you an email to verify your registration. Open your inbox and locate the verification email from Cloudflare.Click on the link provided in that email to activate your account.
Once your account is activated, log in to the Cloudflare dashboard. You’ll be greeted by a user-friendly interface. Here, the “Add a Site” option will be prominently displayed. Enter the domain name of your WordPress site and click “Add Site.” Cloudflare will then scan your existing DNS records, which may take a few moments.
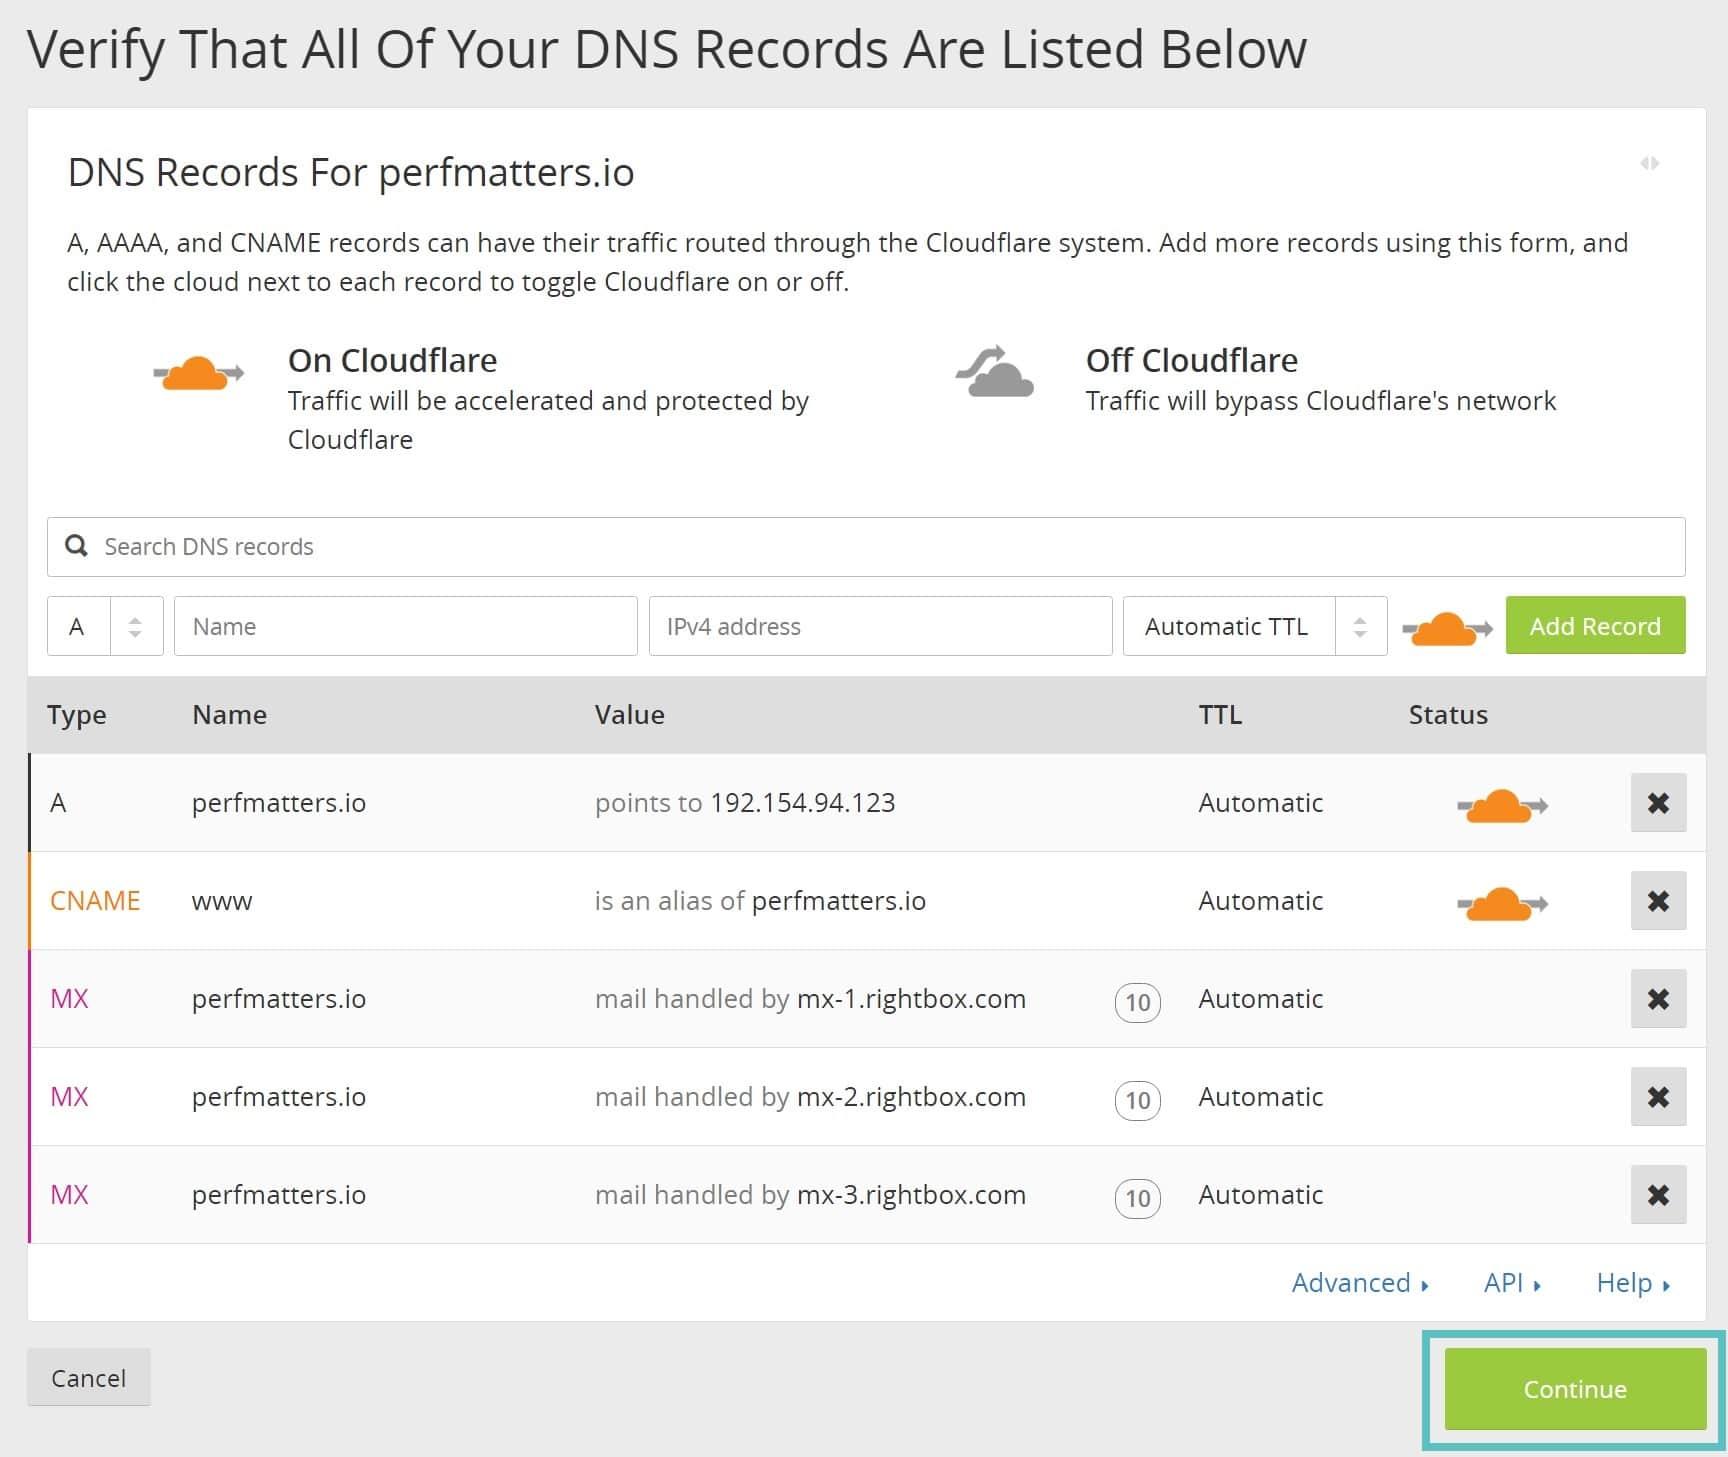
After the scan is complete,you will see a list of DNS records. Confirm that all entries are correct. If any records are missing or incorrect, you can manually add or edit them right here. This step is crucial as accurate DNS records ensure that your website functions properly after the Cloudflare integration.
Following the DNS configuration, choose a suitable cloudflare plan. For most WordPress users, the free plan offers plenty of features, including basic DDoS protection and performance boosts. Select the plan that best fits your needs and proceed by clicking “Confirm Plan.”
you’ll receive instructions on how to update your nameservers. Log in to your domain registrar’s website and replace your current nameservers with the ones provided by Cloudflare. This change is essential for routing traffic through Cloudflare’s network.
Once you’ve updated your nameservers, return to the Cloudflare dashboard and click on “Done, Check Nameservers.” it may take a few hours for the changes to propagate, but don’t worry—Cloudflare will notify you when your site is successfully connected.

Linking Cloudflare to Your Domain: A Simple Guide
Linking Cloudflare to your domain is a straightforward process that can significantly enhance your website’s performance and security. Here’s how to do it step-by-step:
Step 1: Create a cloudflare Account
First things first, if you haven’t already, head over to Cloudflare and sign up for a free account. This is an essential step to access Cloudflare’s services. Once you’ve created your account, you’ll be prompted to add your website.
Step 2: Add Your Website
Enter your domain name in the provided field and click “Add Site.” Cloudflare will scan your current DNS records, which is crucial as it helps replicate your existing configurations.
step 3: Review DNS Records
After the scan, you’ll see a list of DNS records. Ensure that all your existing records are correct.If you have custom configurations, make sure to add them here. Here’s a rapid overview of common DNS records:
| Record Type | Purpose |
|---|---|
| A | Points your domain to an IP address |
| CNAME | Aliases one domain to another |
| MX | Directs email to mail servers |
Step 4: Choose a plan
cloudflare offers various plans, including a free tier, which is perfect for most WordPress users. select the plan that suits your needs and continue to the next step.
Step 5: Update Nameservers
Cloudflare will provide you with two nameservers. You need to update your domain registrar’s nameservers to point to Cloudflare. This is done in your domain registrar’s control panel. Here’s how:
- Log in to your domain registrar’s account.
- Find the section for managing DNS or nameservers.
- Replace the existing nameservers with the ones provided by Cloudflare.
Step 6: Wait for DNS Propagation
Once you’ve updated the nameservers, it may take a few hours for the changes to propagate.You can check the status using tools like What’s My DNS to ensure everything is pointing correctly.
Step 7: configure Cloudflare Settings
After the DNS changes are live, log back into your Cloudflare account to configure security and performance settings. Here’s what you should consider:
- SSL Settings: Ensure SSL is enabled for secure connections.
- Cache Settings: Configure caching options to improve load times.
- Firewall rules: Set rules to protect against malicious traffic.
By following these steps, you’ll seamlessly link Cloudflare to your domain, enhancing both the speed and security of your WordPress website.
Configuring DNS Settings for Optimal Performance
When it comes to enhancing your WordPress site’s performance, fine-tuning your DNS settings through Cloudflare can make a significant difference.Cloudflare acts as a content delivery network (CDN) and a DNS provider, which allows you to not only speed up your website but also improve its security. Here’s how you can configure your DNS settings effectively.
first, ensure you have added your domain to Cloudflare and changed your nameservers as instructed during the setup process. Once that’s done, head over to the DNS management panel within your Cloudflare dashboard. Here, you can adjust the DNS records that are crucial for your site’s performance.
Consider the following DNS records you may want to configure:
- A Record: This points your domain to your server’s IP address. Ensure it is correctly set to avoid downtime.
- CNAME Record: Use this for any subdomains you want to direct to your main domain or external services.
- MX Records: If you’re using email services, make sure your MX records are correctly configured to ensure email deliverability.
- TXT Records: These are essential for verifying your domain and setting up SPF records for improved email security.
After setting up the basic DNS records, you might want to enable Cloudflare’s Proxy feature, which routes your traffic through Cloudflare’s network. This can help with caching, reducing latency, and providing additional security. You can easily toggle the proxy status in the DNS records section.
In addition to standard DNS settings, cloudflare offers several advanced features that can optimize your DNS performance:
| Feature | Description |
|---|---|
| DNSSEC | Enhances security by ensuring DNS responses are authentic. |
| Always Online | Serves a cached version of your site if your server goes down. |
| Automatic HTTPS Rewrites | Helps secure connections by automatically rewriting URLs to HTTPS. |
| Rocket Loader | Improves loading times by optimizing JavaScript delivery. |
once you’ve configured everything, it’s crucial to test your DNS settings. Use tools like What’s My DNS to check propagation and verify that your records are resolving correctly worldwide. Regularly monitoring your DNS performance can help you make adjustments as necessary, ensuring your WordPress site remains fast and reliable.
Exploring Cloudflares Security Features for WordPress
Exploring Cloudflare’s Security Features for WordPress
When it comes to securing your WordPress site, Cloudflare offers a robust suite of features designed to protect your site from various threats. One of the standout features is its Web Submission Firewall (WAF), which acts as a barrier between your site and potential attackers. This firewall filters out malicious traffic and blocks threats before they even reach your server, ensuring that your WordPress site remains safe and operational.
In addition to the WAF, Cloudflare has a powerful DDoS protection system that can absorb and mitigate large-scale attacks. this is especially crucial for WordPress sites, which can often be the target of such attacks. With Cloudflare, you can have peace of mind knowing that your site can withstand traffic surges caused by DDoS attempts.
Another major benefit of using Cloudflare is its SSL/TLS encryption. This feature secures data transmission between your users and your site, making it nearly impractical for attackers to intercept sensitive information like user credentials or payment details. Activating this feature is a breeze, and it significantly enhances your site’s credibility and trustworthiness.
Moreover, Cloudflare provides Bot Management tools that help in identifying and blocking malicious bots while allowing legitimate traffic through. This can lead to improved site performance and user experience, as your resources will not be wasted on potential threats.
For users looking to optimize their site further, Cloudflare offers Rate Limiting to control the number of requests users can make to your site within a specific timeframe. This feature prevents abuse and limits the impact of potential attacks, ensuring that your WordPress site remains swift and responsive.
Key Security features at a Glance
| Feature | Description |
|---|---|
| Web Application Firewall | Protects your site from common vulnerabilities and attacks. |
| DDoS Protection | Mitigates large-scale DDoS attacks, keeping your site online. |
| SSL/TLS Encryption | Secures data transmission and enhances user trust. |
| Bot Management | Blocks malicious bots while allowing legitimate traffic. |
| Rate Limiting | Controls requests to prevent abuse and ensure performance. |
By integrating Cloudflare into your WordPress site, you not only enhance your security posture but also improve site performance and user experience. With these essential features, you can focus on creating content and engaging with your audience, knowing that your site is well-protected. Don’t wait—take advantage of Cloudflare’s security tools today and give your WordPress site the protection it deserves!
Setting Up Page Rules to Enhance Your Site’s Functionality
When it comes to optimizing your WordPress site with Cloudflare, one of the most powerful tools at your disposal is the ability to set up Page Rules. These rules allow you to customize how Cloudflare interacts with your site, providing a tailored experience that can significantly enhance performance and functionality.
Page Rules can be used to:
- Redirect URLs: Easily redirect visitors from one URL to another without the need for complex server-side configurations.
- Cache Level Adjustments: Set specific caching behaviors for different parts of your site, ensuring that dynamic content updates seamlessly while static files remain cached for speed.
- Disable security Features: Temporarily turn off features such as SSL or firewall settings for specific pages, which can be invaluable during site maintenance or troubleshooting.
- Enable Always Online: Ensure your site remains accessible even during outages by serving a cached version of your page.
Setting up these rules is straightforward. Here’s how to do it:
- Log in to your Cloudflare account and select the domain you want to manage.
- navigate to the Page Rules tab in the dashboard.
- Click on Create Page Rule and enter the URL pattern you want to apply the rule to. Such as,
example.com/blog/*for all blog pages. - Choose the settings you want to apply, such as Cache Level or Forwarding URL.
- Save your changes!
To help visualize the impact of your Page Rules, consider the following table that outlines some common use cases and their benefits:
| Use Case | benefit |
|---|---|
| Redirecting old URLs | Preserves SEO value and improves user experience. |
| Setting specific cache rules | Optimizes load times for users while ensuring content freshness. |
| Customizing security settings | Enhances security without affecting user access during updates. |
By utilizing Page Rules effectively, you not only enhance user experience but also take control of how your site interacts with both your visitors and search engines. The versatility these rules provide can be a game-changer for your website’s performance and overall functionality.
Leveraging Caching Options to Speed Up Your Website
Caching is a game-changer when it comes to optimizing your website’s performance. by storing a static version of your site,you can significantly reduce load times,which not only enhances user experience but also positively impacts your SEO rankings. With Cloudflare, you can easily implement caching strategies to ensure that your WordPress site loads faster than ever. here’s how to leverage Cloudflare’s caching options effectively.
First off, understand the different caching levels offered by Cloudflare:
- No Caching: this option disables all caching, which isn’t ideal for performance.
- Standard Caching: This is the default setting and caches static content, such as images, CSS, and JavaScript.
- Cache Everything: This option caches all content including HTML, which can further speed up your site.
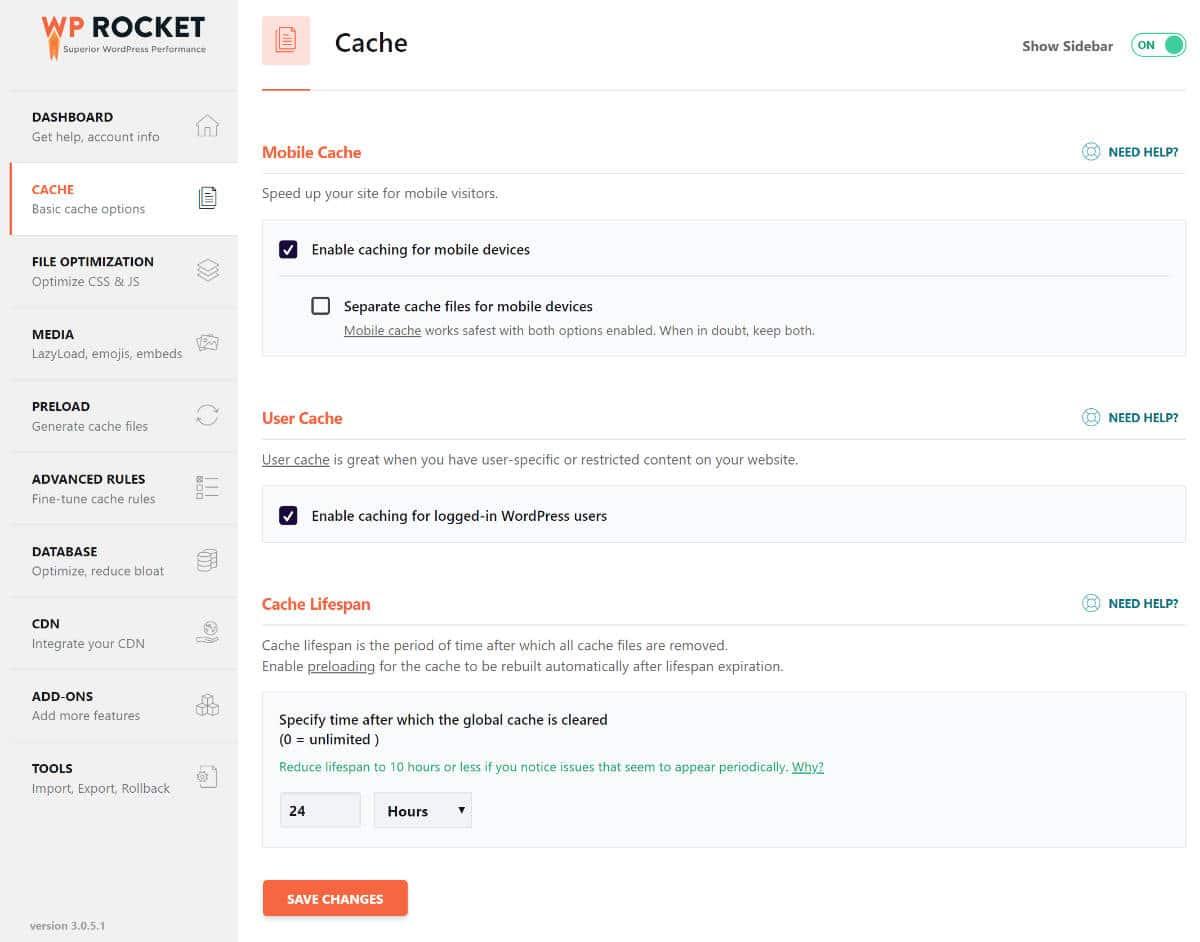
To get started,log in to your Cloudflare account and navigate to the Caching tab. From there, you can select your preferred caching level. If you opt for “Cache Everything,” be sure to set up Page Rules to avoid caching dynamic content like user-specific pages or checkout processes, which can lead to unexpected behavior.
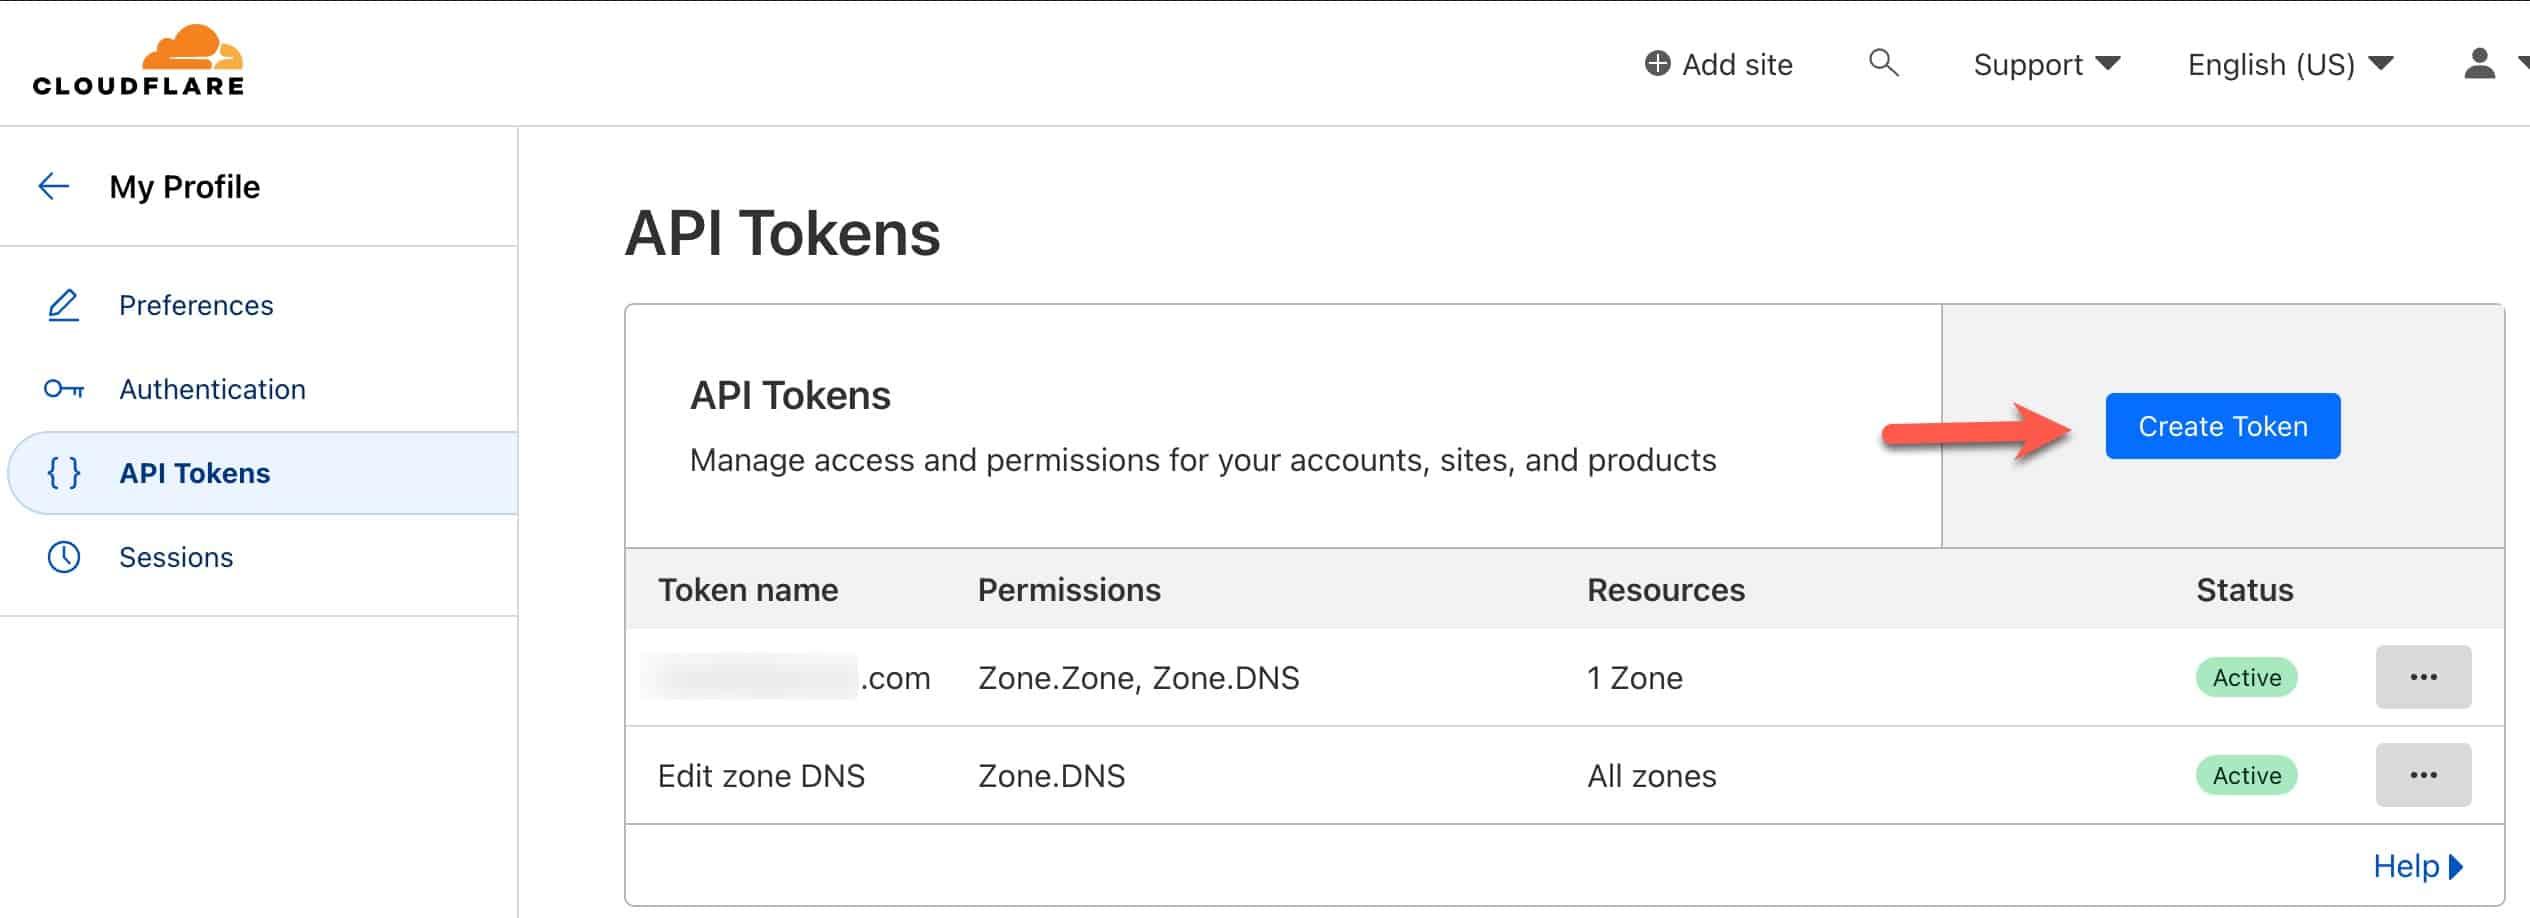
Another powerful feature to utilize is the Automatic Cache Purge. Whenever you update your content or make changes to your site, you want to ensure that visitors see the latest version. Configure Cloudflare to automatically purge the cache whenever you publish new posts or update existing ones. This can usually be done through the Cloudflare API or by using plugins that integrate with Cloudflare.
Also, consider enabling Browser cache TTL settings.This defines how long browsers should cache content before checking back with your server. Adjusting this setting can further enhance load times for repeat visitors, as their browsers won’t have to fetch the same files over and over.
| Cache Level | Description |
|---|---|
| No Caching | Disables all caching. Least effective. |
| Standard Caching | Caches static assets; best for most sites. |
| Cache Everything | Caches all content, including HTML. |
utilizing Cloudflare’s caching options can dramatically improve your WordPress site’s performance. By carefully selecting your caching level,setting up automatic purges,and configuring browser cache settings,you can ensure that your visitors experience lightning-fast load times. This not only improves user satisfaction but can also lead to higher search engine rankings, ultimately driving more traffic to your site.
Activating SSL for Secure Connections Without a Hitch
Enabling SSL on your WordPress site using cloudflare is a crucial step for enhancing security and boosting visitor trust. Fortunately, the process is straightforward and can be completed in just a few steps. Let’s dive into how you can activate SSL without any hassle.
First and foremost, ensure that you have a Cloudflare account set up for your WordPress site. Once you’re logged in, follow these steps:
- Navigate to the SSL/TLS tab on the Cloudflare dashboard.
- Select the desired SSL option from the dropdown. You typically want to choose Full (Strict) for maximum security.
- make sure the Always Use HTTPS toggle is enabled to redirect all traffic to a secure connection.
- Consider setting up Automatic HTTPS Rewrites to help ensure that all your assets load over HTTPS.
Once you’ve made these adjustments, it’s time to check your wordpress configuration.Ensure your site URL is set to use HTTPS. You can do this by going to Settings > general in your WordPress dashboard and updating the WordPress Address (URL) and Site Address (URL) fields:
| Setting | current Value | Updated Value |
|---|---|---|
| WordPress Address (URL) | http://yourdomain.com | https://yourdomain.com |
| Site Address (URL) | http://yourdomain.com | https://yourdomain.com |
additionally, it’s wise to install a plugin that helps manage SSL settings and redirects. Popular options include Really Simple SSL and WP Force SSL. these plugins simplify the process further by automatically detecting your SSL certificate and making necessary adjustments to your site.
After implementing these changes, test your website to ensure everything is functioning correctly. Use tools like Why No Padlock? to check for any mixed content issues. This tool can help identify resources that may still be loading over HTTP, which could compromise your site’s security.
With these steps, you can confidently activate SSL on your WordPress site with Cloudflare, ensuring that your visitors connect securely and enjoy a seamless browsing experience. The added layer of security not only protects your data but also improves your site’s credibility.So go ahead, make the switch to SSL and enjoy the peace of mind that comes with it!
Harnessing the Power of Cloudflare Analytics for Insights
Once you’ve successfully set up Cloudflare for your WordPress site, you’re equipped with a powerful tool for understanding your web traffic through cloudflare Analytics. This feature can provide you with invaluable insights that help you make informed decisions about your site’s performance and user engagement. Here’s how to leverage these analytics effectively.
Cloudflare Analytics offers a thorough overview of your website’s traffic patterns. You can track metrics such as:
- Total requests: Know how many requests your site receives and identify peak traffic times.
- Bandwidth usage: Monitor how much data your site is using, which can definitely help in optimizing performance and costs.
- Unique visitors: Understand how many different users are accessing your site, giving you a clearer picture of your audience.
- Security threats: Get insights into potential threats, such as DDoS attacks or malicious bot traffic.
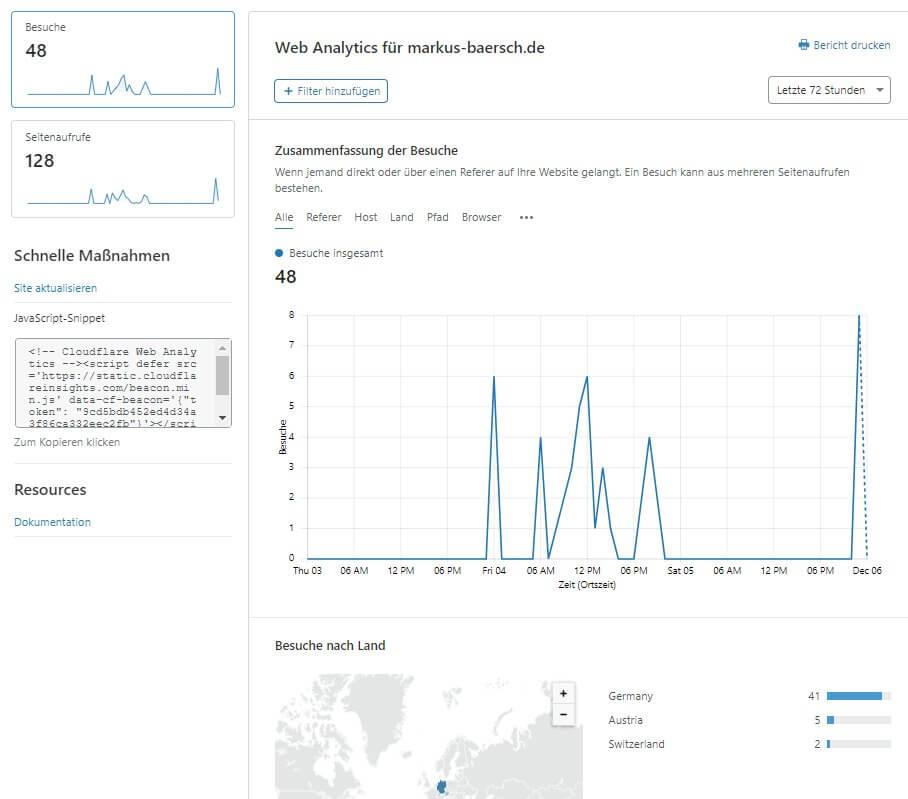
to access these insights, simply log into your Cloudflare dashboard and navigate to the Analytics section. Here, you’ll find visually engaging graphs and data tables that summarize your website’s performance over various time frames.
One of the standout features of Cloudflare Analytics is its ability to segment data. You can filter traffic by:
- Geolocation: See where your visitors are coming from, helping you tailor content to specific regions.
- Traffic type: Differentiate between organic, referral, and direct traffic, allowing you to refine your marketing strategies.
Additionally, consider implementing A/B testing based on the insights gathered. For example, if you notice that certain pages receive more traffic, experiment with different layouts or content strategies to optimize conversions on those pages.
Lastly, regularly reviewing your analytics not only helps in making data-driven decisions but also ensures that your Cloudflare settings align with your site’s evolving needs. Frequent analysis of trends and performance metrics can uncover new opportunities for growth and engagement, setting you on the path toward sustained success.
troubleshooting Common Issues During Setup
Setting up cloudflare for your WordPress site can greatly enhance its performance and security, but you may encounter some common issues along the way. Here are solutions to help you troubleshoot these problems effectively.
1. DNS resolution Issues
Sometimes, your domain might not point correctly to Cloudflare’s servers.If you notice that your site is still loading from your original host:
- Double-check your DNS settings in the Cloudflare dashboard.
- Ensure that your domain’s nameservers are updated at your domain registrar.
- Wait for the DNS changes to propagate, which can take up to 48 hours.
2. Mixed Content Warnings
After enabling SSL on Cloudflare, you may see mixed content warnings. This happens when your site tries to load resources over HTTP instead of HTTPS:
- Use a plugin like Really Simple SSL to help fix mixed content issues.
- Manually update URLs in your content to use HTTPS.
- Check your theme and plugin settings for hard-coded URLs.
3. Caching Conflicts
If your changes aren’t appearing on the front end, caching could be the culprit:
- Clear your Cloudflare cache from the dashboard.
- Clear your WordPress cache if you’re using a caching plugin.
- Disable any caching plugins temporarily to check if they are causing conflicts.
| Issue | Solution |
|---|---|
| DNS Resolution Issues | Check DNS settings and nameservers. |
| Mixed Content Warnings | Use SSL plugins and update URLs. |
| Caching Conflicts | Clear Cloudflare and WordPress caches. |
4. Firewall Blocking
Sometimes, Cloudflare’s firewall settings can mistakenly block legitimate visitors. If users report access issues:
- Review your firewall rules in the Cloudflare dashboard.
- Temporarily disable the firewall to determine if it’s causing the problem.
- Whitelist any ips that are being incorrectly blocked.
By following these troubleshooting steps, you can address common setup issues and ensure your WordPress site runs smoothly with Cloudflare. Remember, patience is key when resolving technical problems, and utilizing community forums can be a helpful resource as well.
Final Touches: Testing and Optimizing Your Configuration
after configuring Cloudflare for your WordPress site, it’s time to ensure everything runs smoothly and efficiently. Testing and optimizing your setup can significantly enhance your website’s performance, security, and user experience. Here are some essential steps to take:
- Check DNS Propagation: Use tools like What’s My DNS to verify that your DNS changes have propagated correctly. This ensures that visitors are directed to your site via Cloudflare’s network.
- Test Site Speed: utilize services like GTmetrix or Pingdom to analyze your site’s speed. Compare the results before and after implementing Cloudflare to gauge improvements.
- Assess Security Settings: Conduct a security audit by checking your site’s firewall settings and ensuring the security features you enabled on Cloudflare are functioning as expected.
Once you’ve confirmed that everything is running correctly, consider diving into the finer details of optimization:
| Optimization Area | Recommendation |
|---|---|
| Cache Level | set to “Standard” for optimal caching without affecting dynamic content. |
| Minification | Enable HTML, CSS, and JavaScript minification to reduce file sizes. |
| Rocket Loader | Consider activating Rocket Loader to improve loading times for JavaScript-heavy pages. |
don’t forget to monitor your site’s performance regularly.Check the Cloudflare analytics dashboard to track your bandwidth savings and how many threats have been mitigated. This insight can definitely help you make informed decisions about further configurations.
remember to engage with your audience. Solicit feedback from users about the site’s speed and functionality. Their experiences can provide invaluable insights into potential areas for further optimization.

Celebrating Your Success: Enjoying a Faster, Safer WordPress Site
After following the steps to set up Cloudflare for your WordPress site, it’s time to celebrate your achievements! Not only have you enhanced your website’s speed, but you’ve also fortified its security against various online threats. A faster site means better user experience, improved SEO rankings, and ultimately, higher conversion rates. Let’s break down what these enhancements mean for you:
- Performance Boost: With Cloudflare’s CDN, your site loads faster from any geographical location. This means your visitors won’t have to wait, reducing bounce rates and keeping them engaged.
- Improved Security: Cloudflare acts as a shield against DDoS attacks and malicious bots. Your website will have an extra layer of protection, giving you peace of mind.
- Global Reach: By leveraging Cloudflare’s network, your content is delivered from the closest data center, ensuring that users around the world enjoy a smooth experience.
Let’s take a moment to look at the performance metrics before and after integrating Cloudflare. Understanding these numbers can definitely help you appreciate the improvements you’ve made:
| Metric | Before cloudflare | After Cloudflare |
|---|---|---|
| Page Load Time | 5.2 seconds | 2.3 seconds |
| Server Response Time | 1.1 seconds | 0.2 seconds |
| Uptime Percentage | 98.5% | 99.9% |
These numbers tell a compelling story. A significant drop in page load time means happier visitors,and a higher uptime percentage means your site is more reliable than ever. as you reflect on your success, consider how you can further leverage these new capabilities:
- Monitor performance: Use analytics to keep track of your site’s performance. Cloudflare provides tools that can definitely help you monitor traffic and identify potential issues early.
- Optimize Content: Take advantage of Cloudflare’s optimization features such as image compression and script minification to enhance speed even further.
- Engage with Users: with a faster site,consider implementing new features like live chat or more interactive content to keep your visitors actively engaged.
Your hard work has paid off,and now you can focus on what really matters: growing your online presence and connecting with your audience. By adopting Cloudflare, you’ve laid a strong foundation for your WordPress site’s future success.
Frequently Asked Questions (FAQ)
Q&A: How to Set Up Cloudflare for WordPress (Step-by-Step Tutorial for 2025)
Q: Why should I use Cloudflare for my WordPress site?
A: Great question! Cloudflare offers a fantastic way to enhance your WordPress site’s performance and security. With features like a Content Delivery Network (CDN) to speed up loading times, DDoS protection to safeguard your site from attacks, and SSL support for secure data transmission, Cloudflare can make a significant difference. Plus, the setup process is straightforward, especially with our step-by-step guide for 2025!
Q: Is the setup process for Cloudflare intricate?
A: Not at all! We’ve broken it down into simple steps in our tutorial. Even if you’re not tech-savvy, you’ll find it easy to follow. Just think of it as a few clicks and some basic configurations, and you’ll be well on your way to a faster, safer WordPress site!
Q: Do I need to have any prior experience with web hosting or CDN services?
A: Nope! Our tutorial is designed for everyone, from beginners to seasoned webmasters. We walk you through every step, explaining the technical terms along the way. You don’t need to be an expert to make your site faster and more secure!
Q: Will using cloudflare affect my website’s SEO?
A: Absolutely, and in a positive way! A faster site means better user experience, which is a crucial SEO factor. Additionally,Cloudflare’s features can help improve your site’s uptime and security,both of which are beneficial for your search engine rankings.Trust us, your visitors (and Google) will thank you for it!
Q: What if I encounter issues during the setup?
A: No worries! Our tutorial includes troubleshooting tips to help you handle common issues. Plus, Cloudflare has a robust support community and documentation, so if you get stuck, help is just a click away. We’re confident you’ll manage just fine!
Q: How much does it cost to use Cloudflare with my WordPress site?
A: Cloudflare offers a free plan that provides essential features, which is perfect for most small to medium-sized WordPress sites. If you need advanced features, they have paid plans that are reasonably priced. In most cases,you’ll find it’s a valuable investment for your site’s performance and security.
Q: Can I use Cloudflare with any hosting provider?
A: Yes, you can! Cloudflare works seamlessly with most hosting providers. The process might vary slightly depending on your host, but our tutorial covers the essential steps to integrate Cloudflare with your WordPress site, no matter where it’s hosted.
Q: Will setting up Cloudflare slow down my site initially?
A: Not at all! In fact, most users experience a boost in speed after setup.Once Cloudflare caches your content, your site loads faster for visitors around the globe. The initial configuration might take a few minutes, but the long-term benefits far outweigh any temporary changes.
Q: What’s the first step I need to take to get started?
A: To kick things off, you’ll need to create a Cloudflare account, which you can do in just a few minutes. From there, our guide will lead you through the rest of the process, step by step. Just grab a cup of coffee, and let’s get started!
Q: Can I customize settings in Cloudflare after I set it up?
A: Absolutely! Cloudflare is highly customizable. Once you’ve completed the initial setup, you can explore various settings, like firewall rules, caching preferences, and performance optimizations. Our tutorial will give you a solid foundation, and then you can tweak things as you learn what works best for your site.
Ready to supercharge your WordPress site with Cloudflare? Dive into our tutorial and start reaping the benefits today!
The Conclusion
And there you have it! You’re now equipped with all the knowledge you need to set up Cloudflare for your WordPress site in 2025. By following these steps, you’re not just enhancing your site’s security and performance; you’re also providing your visitors with a faster, safer, and more enjoyable browsing experience.
remember, in today’s digital landscape, every second counts. ensuring your website is optimized can make all the difference in retaining visitors and boosting conversions. So, don’t just stop here—keep experimenting with Cloudflare’s features to find what works best for your site.
If you have any questions or run into any hiccups along the way, feel free to drop a comment or reach out. We’re all in this together, and I’m here to help you succeed. Happy optimizing, and here’s to a brighter, more efficient WordPress journey ahead!