
Introduction:
Hey there, fellow WordPress enthusiast! If you’ve stumbled upon the dreaded 401 error while navigating your website, you’re not alone—and don’t worry, we’re here to help you conquer it. The 401 error, often described as an “unauthorized” access message, can feel like a brick wall when all you wont to do is dive into your content or update your site. But fear not! In this step-by-step guide, we’ll break down the mystery of the 401 error and walk you through simple, effective solutions to get your site back on track. Whether you’re a seasoned developer or just starting out, we’ve got you covered with clear instructions and helpful tips. So,let’s roll up our sleeves and tackle this pesky problem together!
Understanding the WordPress 401 Error and Its Causes
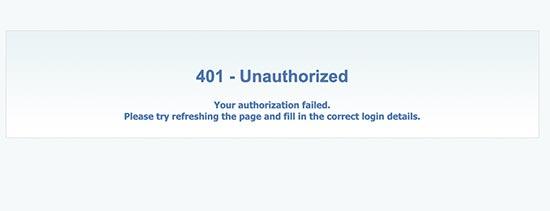
The WordPress 401 error is an authentication issue that occurs when the server determines that the user is not authorized to access a specific resource or page. This error typically presents itself as a “401 Unauthorized” message, effectively blocking access until the correct credentials are provided. Understanding the causes of this error is crucial for both site administrators and users trying to navigate content. Here’s a breakdown of the common culprits behind this frustrating issue.
Incorrect Credentials
One of the most prevalent reasons for encountering a 401 error is due to incorrect login credentials. If you’re trying to access a secured area of your WordPress site, make sure that you are using the correct username and password. Sometimes, a simple typographical error can led to this frustrating message.
Configuration Issues
Misconfigurations in your .htaccess file or wordpress settings can lead to access denial. The .htaccess file is crucial for managing redirects, URL rewrites, and other server configurations. A corrupted or improperly modified .htaccess file may trigger a 401 error. you can check this by temporarily renaming the file to see if the error persists.
Plugin Conflicts
Plugins can enhance your WordPress site, but they can also introduce conflict. Some security plugins may inadvertently block access to certain pages. If you suspect a plugin is the issue, try deactivating all plugins and reactivating them one by one to identify the culprit.
Server and Hosting Issues
Server-side problems can also contribute to the 401 error. Issues with your hosting provider, such as misconfigured server settings or restrictive access controls, might prevent users from accessing specific resources. Reach out to your hosting support team to check if they are experiencing any issues.
Expired Authentication Tokens
If you’re using an API or a third-party service, expired authentication tokens can result in a 401 error. This often happens if a session times out or if your credentials need to be refreshed. Regularly updating your tokens ensures uninterrupted access.
In case you are still facing difficulties identifying the root cause after exploring these common issues,consider using the following troubleshooting table:
| issue | Solution |
|---|---|
| Incorrect Credentials | Double-check your username and password. |
| Misconfigured .htaccess | Rename the file and check for access. |
| Plugin Conflict | Deactivate all plugins, reactivate one by one. |
| Server issues | Contact your hosting provider for assistance. |
| Expired Tokens | Refresh your authentication tokens regularly. |
By understanding these causes, you can take the necessary steps to diagnose and fix the 401 error, ensuring smoother access to your WordPress site for you and your users.The next section will guide you through actionable steps to resolve this issue effectively.
Common Scenarios That Lead to a 401 Error in WordPress
When navigating your WordPress site,encountering a 401 error can be frustrating. This HTTP status code usually means that access to the requested resource is unauthorized. Let’s explore some common scenarios that can trigger this pesky error.
One major culprit behind a 401 error in WordPress is incorrect login credentials. If you or your users are trying to access password-protected areas of your site with the wrong username or password, you’ll hit a 401 roadblock. It’s essential to ensure that your login details are accurate and up-to-date.
Another scenario involves plugin conflicts. Sometimes, security plugins or third-party tools designed to enhance your site’s security settings can inadvertently block legitimate access. This frequently enough happens after a plugin update or installation. To troubleshoot this, try deactivating recently added plugins and see if that resolves the issue.
Your server settings can also be a factor. If your .htaccess file is misconfigured,it can lead to the 401 error. This file controls various aspects of your site’s operation, including access permissions. If you suspect this is the issue, you can restore the default .htaccess file by renaming the current one and allowing WordPress to generate a new file through the settings.
Additionally, incorrect permissions assigned to your files and directories can trigger this error. WordPress typically requires specific permissions for folders and files to function correctly. Here’s a speedy reference table for optimal permissions:
| Type | Recommended Permission |
|---|---|
| Folders | 755 |
| Files | 644 |
| wp-config.php | 600 |
Sometimes, a caching issue can also be at play. If your site is utilizing caching mechanisms, stale cache data might trigger a 401 error. To resolve this, clear your site’s cache and, if you’re using a CDN, ensure you purge the cache there too.
Lastly, if your site has recently migrated to a new host or domain, there might be issues with URL rewriting or misconfigured settings that can cause access problems. Make sure your permalinks are set correctly and consider running a compatibility check with your new hosting surroundings.
Quick Checks to Diagnose your 401 Error
When you encounter a 401 error on your WordPress site, it can be frustrating. Though, there are some quick checks you can perform to diagnose the issue effectively.
First, ensure that your login credentials are correct. Sometimes, a simple typo can lead to access issues. Double-check the following:
- Username: Verify that your username is typed accurately.
- Password: Make sure there are no extra spaces or incorrect characters.
- Browser Autofill: Disable autofill temporarily to avoid incorrect logins.
If your login credentials are correct, proceed to check your .htaccess file. This file can sometimes cause issues with authentication. Follow these steps:
- Access your site via FTP: Use an FTP client to connect to your server.
- Locate the .htaccess file: This file is usually in the root directory of your WordPress installation.
- Backup and edit: Make a copy of the file for backup, then check for unusual redirects or authentication settings.
- Reset: You can temporarily rename the file to see if the issue resolves, then recreate it if necessary.
Another vital aspect to consider is your site’s plugins and themes. Sometimes,a recently updated or newly installed plugin can conflict with your authentication process.Here’s how to check:
- Disable plugins: Deactivate all plugins and try to log in again.
- Switch themes: Change to a default WordPress theme like Twenty Twenty-One to rule out theme-related issues.
If you’re still encountering the 401 error, it’s time to check your server settings. Review the following:
| Server Setting | Description |
|---|---|
| permissions | Ensure that your files and folders have the correct permissions (typically 755 for folders and 644 for files). |
| Firewall settings | Check if any firewall rules are blocking access to your website. |
| IP restrictions | Look for any IP blacklisting in your server settings that coudl prevent access. |
By performing these quick checks, you can frequently enough pinpoint the cause of the 401 error and take appropriate action to resolve it. Remember,a little troubleshooting goes a long way in maintaining a seamless user experience on your WordPress site.
Clearing Browser Cache: A simple First Step
when encountering a 401 error on your WordPress site, the first troubleshooting step you should consider is clearing your browser cache. It’s a straightforward process that can often resolve access issues with minimal effort. Over time, browsers store cached versions of your pages, which may include outdated or corrupted files. By clearing this cache, you can ensure that your browser fetches the latest version of your WordPress site, potentially eliminating the error.
Here’s how to clear your browser cache on popular web browsers:
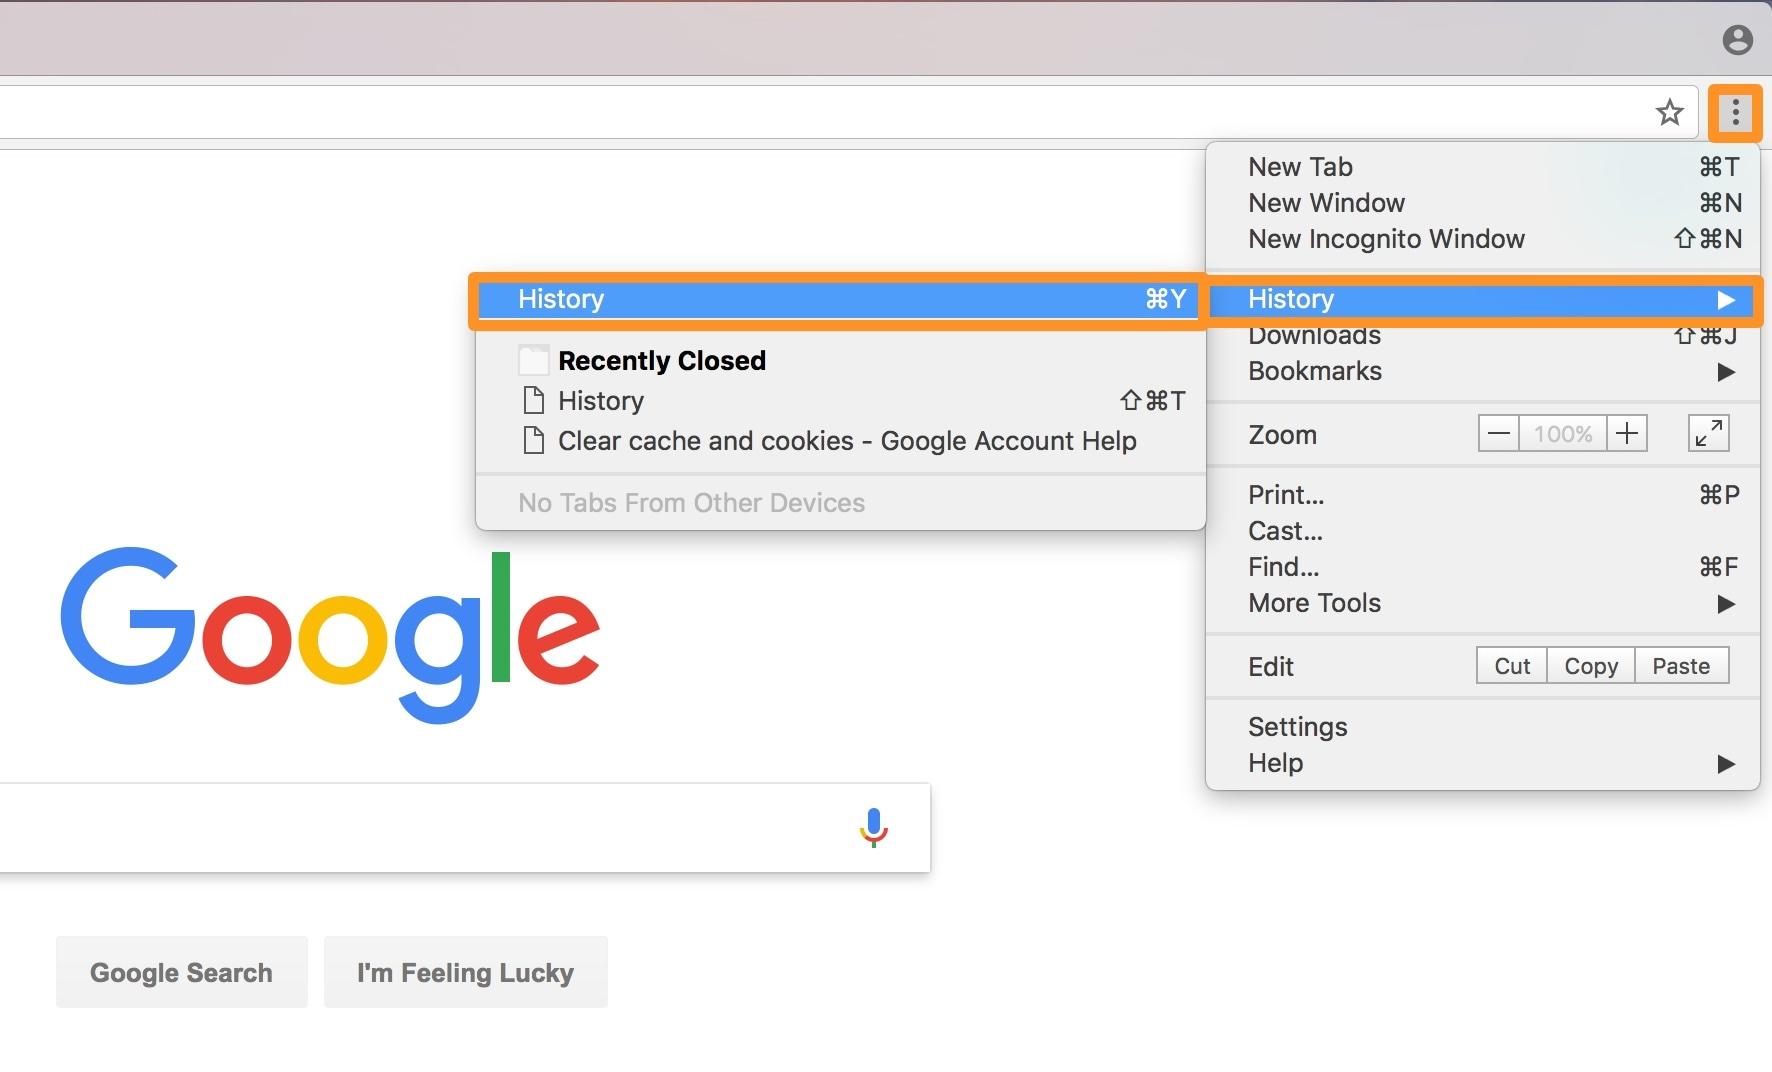
- Google Chrome:
- Click on the three dots in the upper right corner.
- Go to More Tools > Clear browsing data.
- choose a time range, select Cached images and files, and click Clear data.
- Firefox:
- click on the three horizontal lines in the upper right corner.
- Select options > Privacy & Security.
- Scroll to Cookies and Site Data and click Clear Data.
- Safari:
- Go to Safari > Preferences.
- Select the Advanced tab and enable the Show Develop menu in menu bar option.
- From the menu bar, click on Develop > Empty Caches.
After clearing your browser cache, try to access your WordPress site again. If the error persists, it may be time to explore other potential causes, such as plugin conflicts or user permission settings. However, clearing the cache is often a quick fix that can save you time and frustration.
If you’re working on a shared computer or have multiple users accessing the same site, it’s an excellent idea to remind everyone to clear their caches periodically. This can definitely help prevent repeated access issues and ensure that all users are viewing the most current version of your WordPress site.
Remember, keeping your cache clean is not just about solving problems—it’s also about enhancing your browsing experience. A refreshed cache means faster load times and a smoother overall experience when navigating your website.
How to Reset Your Password and Why It matters
Resetting your password is a crucial step in maintaining the security of your WordPress site,especially if you encounter a 401 error,which indicates unauthorized access. A compromised account can lead to serious consequences, including data loss or site hijacking. here’s how to reset it effectively:
- Access the Login Page: Start by navigating to your WordPress login page.
- Click on “Lost Your Password?”: This option is usually found under the login fields.Click it to initiate the password reset process.
- Enter Your Username or Email: Provide either your username or the email address associated with your account.
- Check Your Email: A password reset link will be sent to your registered email. If you don’t see it, check your spam folder.
- follow the Link: Click the link in the email to be directed to the password reset page.
- Choose a Strong Password: Create a new password that is unique and difficult to guess. Consider using a password manager to help generate and store strong passwords.
- Login with Your New Password: Once your password is reset, go back to the login page and sign in with your new credentials.
It’s essential to understand why resetting your password matters.A strong, unique password is your first line of defense against unauthorized access. Regular updates to your password can help mitigate risks, especially if you suspect that your account has been compromised. Additionally, using a combination of uppercase and lowercase letters, numbers, and symbols increases your password’s strength substantially.
Here’s a quick comparison of password strength:
| Password Type | Strength Level |
|---|---|
| Simple (e.g., “password”) | Weak |
| Moderate (e.g., “Password123”) | Average |
| Complex (e.g., “P@55w0rd!123”) | Strong |
regularly updating your password not only protects your own content but also safeguards your users’ details. Remember, a secure WordPress site starts with you. So, take the time to reset your password and keep your site secure from potential threats!
Checking User Permissions: What You Need to know
When encountering a 401 error in WordPress, one of the primary culprits could be related to user permissions. In a WordPress environment, user roles define what actions users can perform.If a user lacks the appropriate permissions, they may find themselves greeted with a frustrating error. Understanding how to check and manage these permissions can be crucial in resolving access issues.
Here are some key points to consider when assessing user permissions:
- Role Definitions: WordPress has predefined roles such as Administrator,Editor,Author,Contributor,and Subscriber. Each role comes with its own set of capabilities. Ensure that users have the correct role assigned based on their intended access levels.
- Custom Roles: If you’ve created custom roles using plugins or custom code, double-check their capabilities. It’s possible that the custom roles may not have the permissions needed to access certain areas of your site.
- Plugin Conflicts: Sometimes, conflicts with plugins can alter user permissions unexpectedly. Deactivate any recently added or updated plugins to see if the issue resolves itself.
To view and modify user roles and permissions, follow these steps:
- Navigate to the Users section in your wordpress dashboard.
- Locate the user in question and click on their username to edit their profile.
- Check the Role dropdown menu and ensure the correct role is assigned.
- Save changes and ask the user to try accessing the site again.
For a more comprehensive view of user permissions,consider utilizing a plugin that manages user roles and capabilities more effectively. Here’s a simple comparison of popular plugins:
| Plugin Name | Key Features |
|---|---|
| User Role Editor | Modify roles and capabilities, user role management. |
| Members | Role management with front-end user role editing. |
| Capability Manager Enhanced | Manage roles and capabilities, clone roles. |
By understanding and appropriately managing user permissions,you can effectively troubleshoot and resolve the 401 error. A little attention to detail in user roles can save you and your users from unneeded frustrations and ensure a smoother experience on your WordPress site.
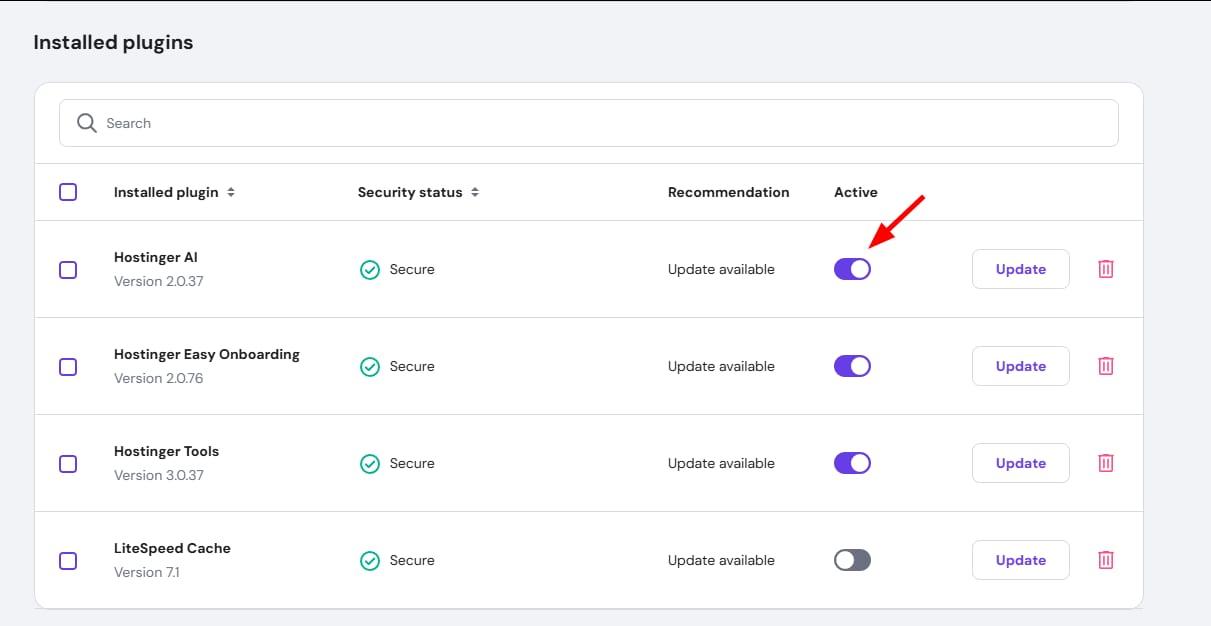
disabling Plugins to Identify the Culprit
encountering a 401 error can be frustrating, especially when you’re eager to access your WordPress site. One common culprit behind this issue is incompatible or malfunctioning plugins. Disabling these plugins may help you identify the one causing the problem. Here’s how you can do that effectively:
- Access Your Dashboard: If you can still log in to your wordpress admin area, head over to the Plugins section.
- Deactivate All Plugins: This can be done quickly by selecting all plugins and choosing the “Deactivate” option from the bulk actions drop-down menu.
- Check Your Site: After deactivating all plugins, try reloading your site. If the 401 error disappears, one of your plugins was likely the cause.
Next, you’ll want to find the offending plugin. This process is akin to detective work:
- Activate Plugins One by One: Reactivate each plugin individually,checking your site after each activation. It’s tedious but effective.
- Monitor for Errors: If the 401 error returns after activating a specific plugin, you’ve found your culprit.
- Seek Alternatives or Updates: Once identified, check if there’s an update available for the problematic plugin, or consider replacing it with a more reliable alternative.
For those unable to access the admin area, you’ll need to take a different approach:
- Use FTP or File Manager: connect to your website’s server via FTP or your hosting provider’s file manager.
- Navigate to the Plugins Folder: Go to
/wp-content/plugins/and rename the folder of each plugin, which will deactivate it. - Check Your Site: After renaming the folders, attempt to access your site again.
By systematically disabling and re-enabling plugins, you can pinpoint the exact source of the 401 error. remember, maintaining your plugins is crucial for site performance and security, so keep them updated and remove any that you no longer use.
Reviewing Your .htaccess File for Errors
When troubleshooting a 401 error in WordPress, one potential culprit can be your .htaccess file. This file frequently enough contains critically important directives that control how your server handles requests, and any misconfigurations can lead to access issues. So, let’s dive into how you can review and rectify errors in this crucial file.
First, it’s essential to locate your .htaccess file. Typically, this file is situated in the root directory of your WordPress installation. you can access it via FTP or through your hosting control panel. Look for a file named .htaccess. If you don’t see it, make sure your FTP client is set to show hidden files.
Once you have the .htaccess file open, you should check for common errors such as:
- Incorrect rewrite rules
- Missing or conflicting directives
- Unintended syntax errors
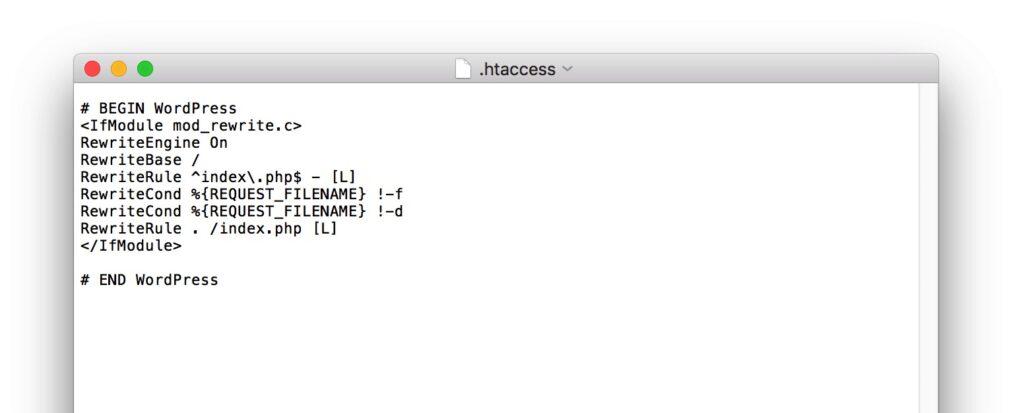
If you find that your .htaccess file is overly complex or cluttered, it may be worth resetting it to the default WordPress configuration. Here’s a simple default structure you can use:
| Default .htaccess Structure |
|---|
| # BEGIN WordPress |
RewriteEngine On |
RewriteBase / |
RewriteRule ^index.php$ - [L] |
RewriteCond %{REQUEST_FILENAME} !-f |
RewriteCond %{REQUEST_FILENAME} !-d |
RewriteRule . /index.php [L] |
| # END WordPress |
After making changes, be sure to save the .htaccess file and re-upload it if necessary. Test your website once more to see if the 401 error has been resolved. If the issue persists, it might very well be time to check for plugin conflicts or server settings, but addressing your .htaccess file is a critical first step in troubleshooting.
a well-configured .htaccess file is vital for your WordPress site’s functionality. Regularly reviewing this file can prevent access issues and enhance your site’s security. So don’t overlook this small but powerful file in your WordPress management routine!
The Role of Security Plugins in Causing 401 Errors
when dealing with 401 errors on your WordPress site, it’s essential to consider the impact security plugins may have on your site’s access controls. These plugins are designed to protect your website from unauthorized access, which often involves strict rules that can inadvertently block legitimate users, leading to frustrating error messages.
Security plugins typically employ a variety of methods to bolster website protection, such as:
- IP Blacklisting: Blocking specific IP addresses that are deemed suspicious.
- Login Attempt Monitoring: Limiting login attempts to thwart brute-force attacks.
- Two-Factor Authentication: Adding an extra layer of security that can sometimes lead to confusion.
- Restricting Access to Sensitive Areas: Modifying access to wp-admin or login pages based on predefined conditions.
While these security measures are beneficial, they can lead to unintentional access issues. Such as, if you frequently change your IP address or access your site from multiple locations, a security plugin may mistakenly flag you as a threat. This can result in a 401 error, which signifies that authentication is required but denied.
To mitigate these issues, it’s crucial to regularly review and adjust your security plugin settings. Here’s a quick checklist to help you avoid 401 errors:
| Action | Description |
|---|---|
| Whitelist IPs | Add trusted IPs to allow access without restrictions. |
| Update Rules | Ensure that your security settings are up to date with the latest best practices. |
| Monitor Logs | Regularly check access logs to identify any patterns of false positives. |
| Test Access | Periodically test site access from different devices and locations. |
Another common scenario is when two-factor authentication (2FA) is in place. If you’re unable to provide the second form of authentication, you may find yourself stuck with a 401 error. In such cases, ensure that you have backup codes or alternative methods to gain access.
while security plugins play a critical role in safeguarding your WordPress site,they can also lead to access issues if not managed properly. by staying proactive and adjusting settings as necessary, you can minimize the risk of encountering annoying 401 errors and maintain a secure, user-friendly website.

Reinstalling Core WordPress Files: A Safe Approach
If you’re facing a 401 error on your WordPress site, one potential solution is to reinstall core WordPress files. This process can definitely help fix corrupted files that might potentially be causing issues, and it’s a straightforward approach that doesn’t require extensive technical knowledge. Here’s how to do it safely and effectively.
Before diving into the reinstallation, back up your website to ensure you have a restore point in case something goes wrong. you can use plugins like UpdraftPlus or BackWPup for this task. Once your backup is secured, follow these steps:
- Download the latest version of WordPress: Visit the official WordPress website and download the most recent version of the software.
- Extract the files: Unzip the downloaded file to a folder on your computer. You’ll see several files and folders, including wp-admin, wp-includes, and wp-content.
- Upload the files: Using an FTP client (like FileZilla), connect to your web server.Upload the wp-admin and wp-includes folders from the new version to your server, overwriting the existing ones. Be cautious not to overwrite the wp-content folder, as this contains your themes, plugins, and uploads.
- check file permissions: Ensure that your file permissions are set correctly. Typically,folders should be set to 755 and files to 644.
After uploading the files, clear your browser cache and check your website. If the 401 error persists,you might want to check for issues with plugins or themes that could be causing conflicts. Sometimes, a faulty plugin can lead to these kinds of errors.
To help you troubleshoot, here’s a quick reference table for common plugins and their potential impact on site performance:
| Plugin Name | Common Issues | Recommended Action |
|---|---|---|
| Yoast SEO | Conflicts with other SEO plugins | Deactivate and test |
| woocommerce | Login redirect issues | Check user permissions |
| WP Super Cache | Cache may serve old pages | Clear cache and disable |
In most cases, reinstalling core WordPress files will resolve the 401 error. If you’ve followed these steps and still encounter issues, consider reaching out to your hosting provider for additional support. They can provide insights specific to your server configuration, ensuring you get back on track swiftly.

When to Seek Help from Your Hosting Provider
Understanding when to reach out to your hosting provider can save you a lot of time and frustration while troubleshooting a 401 error on your WordPress site. Here are some scenarios when you should consider contacting them:
- Frequent Errors: If you encounter the 401 error repeatedly despite trying different solutions,it’s time to ask for help. Persistent issues may indicate a deeper server configuration problem that only your hosting provider can resolve.
- Server-Side Problems: When you suspect that the error may not be related to WordPress but rather to your server settings, such as file permissions or.htaccess misconfigurations, it’s best to consult your hosting provider.
- unexplained downtime: If your site goes down unexpectedly or you cannot access essential functions,your hosting provider can check for server outages or issues affecting your site.
- increased Traffic Issues: If you’ve experienced a sudden spike in traffic and your site is struggling to handle it, your hosting provider can definitely help assess whether your current hosting plan can accommodate the load.
- Security Concerns: If you suspect that your site has been compromised or hacked, your hosting provider can assist in running security scans and implementing necessary measures to secure your site.
When you contact your hosting provider, it’s beneficial to provide them with as much information as possible. This includes:
- The specific error message you are receiving.
- Any recent changes made to your website or hosting settings.
- Steps you have already taken to troubleshoot the issue.
Here’s a quick reference table to help you determine if it’s time to reach out:
| Issue | Action |
|---|---|
| Repeated 401 Errors | Contact Hosting Provider |
| Server misconfigurations | Contact Hosting Provider |
| Website Downtime | Contact Hosting Provider |
| Security Issues | Contact Hosting Provider |
Taking the time to reach out for professional help can lead to a quicker resolution and get your WordPress site back up and running smoothly. Remember, your hosting provider is there to support you, so don’t hesitate to ask for assistance when needed!
Preventing Future 401 Errors: Best Practices to Follow
to ensure that you don’t encounter 401 errors in the future, you can implement a few best practices that will keep your WordPress site running smoothly and securely. Here are some effective strategies:
- Regularly Update Plugins and Themes: Outdated plugins and themes can lead to compatibility issues, including 401 errors. Make it a habit to check for updates regularly and apply them promptly.
- Optimize User Roles and Permissions: Review user roles and permissions frequently.Ensure that each user has the appropriate access levels to prevent unauthorized access that can trigger errors.
- Secure Your Login Page: protect your WordPress login page with additional security measures, such as two-factor authentication (2FA) and CAPTCHA, to prevent brute force attacks.
- Utilize a Security Plugin: Consider using a reputable security plugin that scans your site for vulnerabilities, monitors login attempts, and implements security protocols to minimize risks.
- Backup Your Site Regularly: Regular backups are crucial. In case of an error or a security breach, you can quickly restore your site to its previous state without losing valuable data.
Moreover, maintaining a well-structured database can also prevent 401 errors.Here’s a quick reference table that highlights essential database maintenance tasks:
| Task | Frequency | Importance |
|---|---|---|
| Optimize Database | Monthly | Improves performance |
| Remove Spam Comments | weekly | Reduces database size |
| Check for Broken Links | Monthly | enhances user experience |
Lastly, keep an eye on server settings and error logs. Understanding the logs can definitely help you catch issues early before they escalate into 401 errors. Enabling error logging on your server allows you to track unauthorized access attempts and other anomalies.
Frequently Asked Questions (FAQ)
sure! Here’s a conversational Q&A for an article titled “WordPress 401 Error: How to Fix It (Step-by-step Guide)”:
Q1: What exactly is a WordPress 401 error?
A1: Great question! A 401 error indicates that the request you made to access a resource requires authentication, but it wasn’t provided or wasn’t correct. In simpler terms, it’s like trying to enter a club without the right ID—you’re denied access. This can happen for different reasons, and we’ll help you unravel them.
Q2: What are the common reasons for encountering a 401 error on my WordPress site?
A2: There are a few culprits that might be triggering that pesky 401 error. some of the most common reasons include incorrect login credentials, permission issues, plugin conflicts, or even issues with your .htaccess file.It’s a bit like a puzzle, but don’t worry—we’re here to help you piece it together!
Q3: How can I start troubleshooting the 401 error?
A3: Begin with these straightforward steps:
- Check Your Login Credentials: Make sure you’re using the correct username and password. Sounds basic, but it’s an easy one to overlook!
- Disable Plugins: If you have recently added or updated a plugin, it could be causing the conflict. Temporarily deactivate all your plugins to see if that resolves the issue.
- Review Your.htaccess File: This file controls how your site behaves. Sometimes, it can become corrupted and cause the 401 error. We’ll provide a step-by-step guide on how to safely check and edit this file.
- Clear Your Browser Cache: Sometimes, your browser might be holding onto outdated data. Clearing the cache can definitely help refresh your access.
Q4: What if the basic troubleshooting steps don’t work?
A4: If those initial steps don’t do the trick, don’t lose hope! We have more advanced solutions lined up for you. This can include checking your user roles and permissions in wordpress, restoring your site from a backup, or even contacting your hosting provider for assistance. They’re usually pretty helpful when it comes to server-related issues!
Q5: Is there a way to prevent the 401 error from happening again?
A5: Absolutely! To prevent future hiccups, consider these tips:
- Regularly Update Plugins & Themes: Keeping everything up to date can prevent conflicts and issues.
- Use Strong Passwords: This might seem minor, but using secure passwords can save you from unauthorized access issues.
- Backup Your Site Regularly: This ensures that if something does go wrong, you can easily revert to a previous working version of your site.
Q6: Can I fix the 401 error without technical knowledge?
A6: Yes, you can! Our step-by-step guide is designed to be user-friendly, so whether you’re a tech whiz or just getting started, you’ll find it easy to follow along.And if you ever feel stuck, don’t hesitate to reach out for help—there’s a fantastic community out there ready to support you!
Q7: Why is it important to resolve the 401 error quickly?
A7: Think of your website as your digital storefront. A 401 error can block visitors from accessing your content, which can hurt your reputation and traffic.By addressing the issue promptly, you not only keep your audience satisfied but also maintain your site’s credibility and search engine rankings. So, let’s get that sorted out!
Feel free to customize or expand on any of these questions and answers to better fit your article’s style and your audience’s needs!
Future Outlook
And there you have it! Navigating the world of WordPress can sometimes feel like a wild ride, especially when you encounter pesky issues like the 401 error.But with the step-by-step solutions we’ve covered,you’re now equipped to tackle this hiccup head-on.
Remember, troubleshooting doesn’t have to be daunting. Whether it’s checking your credentials, tweaking your plugins, or adjusting your theme settings, every step brings you closer to a seamless WordPress experience. And don’t forget, the WordPress community is a treasure trove of knowledge, so you’re not alone in this journey.
If you found this guide helpful,why not bookmark it for future reference? And hey,if you have any lingering questions or run into other issues down the line,feel free to drop a comment or reach out. We’re all in this together!
Now,go ahead and get back to creating amazing content. Your readers are waiting, and you’ve got this!