
Are you ready to supercharge your WordPress site? If you’re a beginner looking to enhance your website’s functionality, you’re in the right place! Installing a WordPress plugin is one of the simplest and most effective ways to add new features, improve user experience, and optimize your site for success. But don’t worry if the thought of diving into code or complex setups seems daunting—this guide is tailored just for you! We’ll walk through the process step by step, breaking it down into easy-to-follow instructions. By the end, you’ll not only feel confident installing plugins but also have the tools to customize your site like a pro. So, grab a cup of coffee, and let’s get started on transforming your WordPress experience!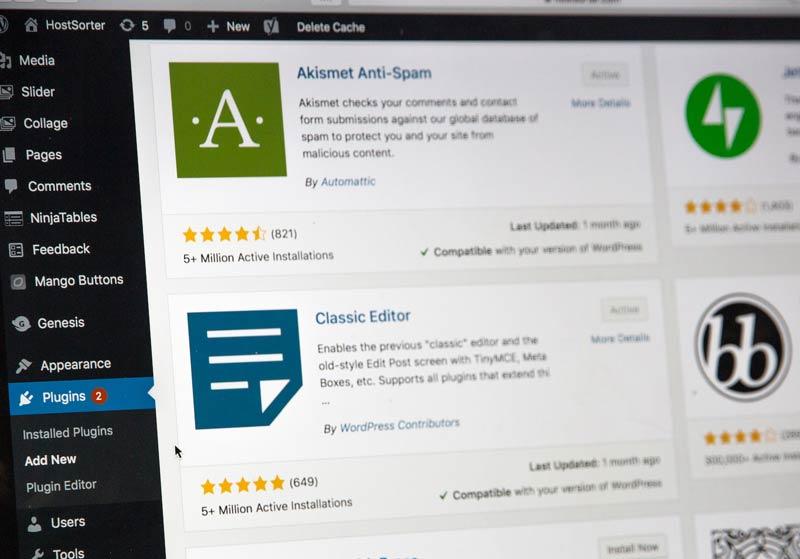
Understanding WordPress Plugins and Their Importance
WordPress plugins are essential tools that extend the functionality of your website. Imagine your site as a blank canvas; plugins are the vibrant colors and brushes that help you create a masterpiece.Whether you want to enhance your site’s performance, improve SEO, add social media sharing capabilities, or create e-commerce functionality, there’s a plugin for that!
Here are some reasons why plugins are crucial for your WordPress site:
- Customization: With thousands of plugins available, you can tailor your website to fit your specific needs without having to code.
- Functionality: Plugins enable you to add features like contact forms, galleries, or shopping carts, transforming your site into a multifaceted platform.
- SEO Optimization: Manny plugins are designed to help optimize your site for search engines, making it easier for potential visitors to find you.
- Security: By using security-focused plugins, you can definitely help protect your site from various online threats and vulnerabilities.
When considering which plugins to install, it’s important to remember that not all plugins are created equal.Some can slow down your website or create conflicts with other plugins. To help you make informed decisions, here’s a swift comparison of some popular plugins:
| Plugin Name | Primary Function | free/Paid |
|---|---|---|
| Yoast SEO | SEO Optimization | Free & Paid |
| WooCommerce | E-commerce Solutions | Free & Paid |
| Wordfence | Website Security | Free & Paid |
| Contact Form 7 | Form Creation | Free |
Incorporating plugins into your WordPress site not only enhances your website’s capabilities but also significantly improves user experience. The right plugins can definitely help retain visitors, increase engagement, and ultimately drive conversions. Think of plugins as the building blocks of your online presence, allowing you to create a site that is not only functional but also visually appealing and user-amiable.
Choosing the Right Plugin for Your Needs
When it comes to enhancing your WordPress site,selecting the right plugin can make all the difference. with thousands of options available, it’s essential to consider what you actually need versus what’s just appealing. here are some key factors to help you make an informed decision:
- functionality: Identify the specific features you require. Are you looking for SEO optimization, social media integration, or perhaps a contact form? Knowing the core functionality you need will narrow down your choices.
- Compatibility: Ensure that the plugin is compatible with your WordPress version and other existing plugins.A conflict can lead to performance issues or even site crashes.
- Reviews and Ratings: Take time to read user reviews. A plugin with a high rating and positive feedback is highly likely to be reliable. Pay attention to comments about updates and support responsiveness.
- Developer Support: Opt for plugins from reputable developers who regularly update their products. An active support team can be a lifesaver if you encounter issues.
- Performance Impact: Some plugins can slow down your website. Look for plugins that are lightweight and have a positive reputation regarding performance. You can use performance testing tools to evaluate this.
To give you a clearer picture, here’s a comparison table of popular plugins based on these key factors:
| Plugin Name | Main Feature | rating | Last Updated |
|---|---|---|---|
| Yoast SEO | SEO Optimization | 4.9/5 | 1 month ago |
| WooCommerce | E-commerce | 4.7/5 | 2 weeks ago |
| Contact Form 7 | Forms | 4.5/5 | 3 months ago |
| Elementor | Page Builder | 4.8/5 | 2 days ago |
Moreover, don’t forget to consider the cost associated with premium plugins. While free options are plentiful, sometimes investing in a paid plugin can save you time and provide you with better features and support. assess your budget and determine if the benefits justify the expense.
lastly, always test the plugins on a staging site before deploying them on your live site. This practice allows you to evaluate their performance and ensure they integrate seamlessly with your existing setup without risking your site’s functionality.

How to Access the WordPress Plugin Directory
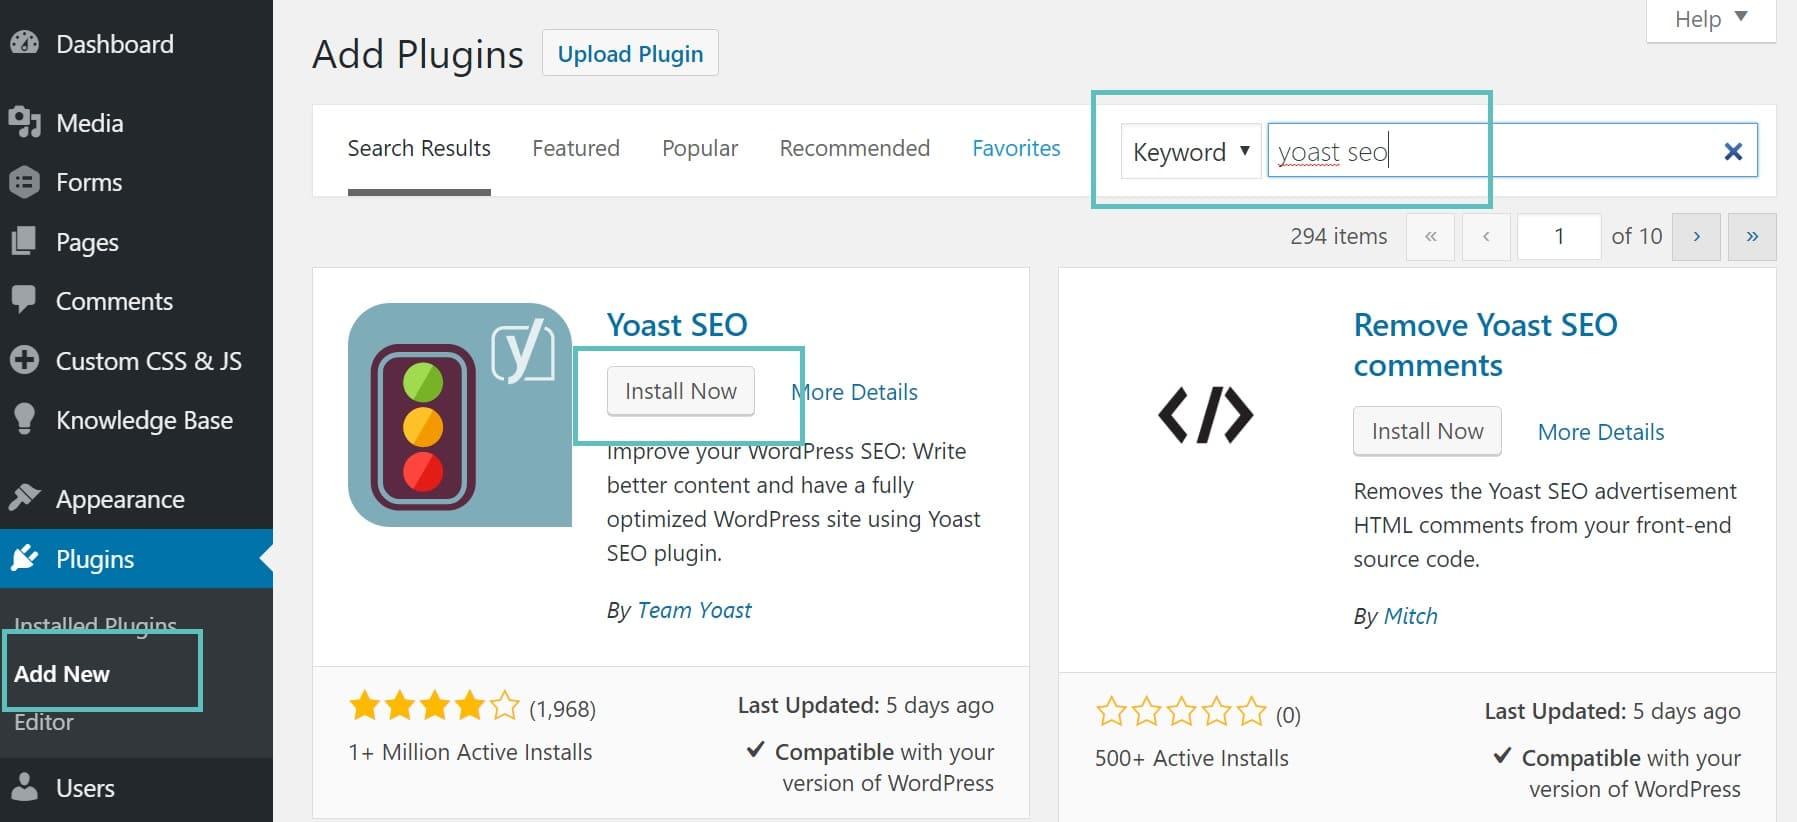
Accessing the WordPress Plugin Directory is a breeze, and it opens up a world of possibilities to enhance your website’s functionality. To get started, follow these simple steps:
- Log into your WordPress dashboard: Start by navigating to
yourwebsite.com/wp-adminand entering your credentials. - Locate the Plugins menu: Once logged in, look for the “Plugins” option on the left sidebar of your dashboard.
- Select “Add New”: Clicking this will direct you to a page where you can browse and search for plugins.
On the Add Plugins page, you’ll see a variety of featured, popular, and recommended plugins. You can explore these to discover tools that fit your needs. Additionally,the search bar at the top allows you to quickly find specific plugins by name or functionality.
Each plugin listed provides essential information,including:
| Plugin Name | Rating | Active Installations |
|---|---|---|
| Yoast SEO | 5 Stars | 5+ million |
| WooCommerce | 4.5 Stars | 5+ Million |
| Elementor | 5 Stars | 5+ Million |
The ratings give you an idea of the plugin’s quality, while the number of active installations can indicate its popularity and reliability. Pay attention to the last updated date as well,as this tells you how frequently the developers maintain the plugin.
Once you find a plugin that you want to install, simply click the “Install Now” button. After installation, the button will change to “Activate.” Don’t forget to activate the plugin to enable its features on your site. Many plugins may also require additional setup or configuration after activation, so be sure to follow any provided instructions.
Step-by-Step Guide to Installing Your First Plugin
Installing your first plugin on WordPress might seem daunting,but it’s a straightforward process that can enhance your site significantly. Here’s a simple guide to help you navigate the installation process with ease.
First, you need to access your WordPress dashboard. Log in with your admin credentials and look for the Plugins section in the left-hand menu. Once you are there,click on Add New. This will take you to a page where you can explore thousands of plugins available for your site.
To find a specific plugin, utilize the search bar located at the top right corner. Type in the name or a keyword related to the functionality you are looking for. You can also browse through the featured, popular, or recommended plugins listed on the page.
once you identify the plugin you want to install, simply click on the Install now button next to it. WordPress will automatically download and install the plugin for you. After the installation is complete, the button will change to Activate. Click on it to enable the plugin on your site.
Some plugins may require additional setup. To configure these settings, navigate back to the Plugins menu and look for the newly activated plugin. Frequently enough, there will be a settings link available right below the plugin name. Click on it to access the configuration options.
| Plugin Name | Purpose | Configuration Required |
|---|---|---|
| yoast SEO | SEO Optimization | Yes |
| WooCommerce | E-commerce Functionality | Yes |
| Contact Form 7 | Form Creation | no |
After you’ve set up your plugin, it’s a good idea to test it out on your site. Visit your website and ensure that the plugin is functioning as expected. If you encounter any issues, many plugin developers offer support forums or documentation to assist you.
Now that you’ve installed your first plugin, remember that there are countless plugins available to extend your site’s functionality. Don’t hesitate to experiment and find what works best for you!
Activating and Configuring Your New Plugin
Once you’ve successfully installed your new plugin, it’s time to activate and configure it to harness its full potential. Activating a plugin is a straightforward task, but understanding how to configure it properly can significantly enhance your website’s functionality.
To activate your plugin, follow these simple steps:
- Navigate to the Plugins section in your WordPress dashboard.
- Find the plugin you just installed in the list.
- Click the Activate link directly below the plugin’s name.
Once activated, many plugins will add their settings options either under the Settings menu or as a new menu item in your dashboard. if you want to customize how the plugin works, you’ll need to dive into these settings.
Here are some common configuration steps you might encounter:
- API Key/Input Fields: Some plugins require you to enter an API key or fill out specific fields to function correctly.
- Customization Options: Many plugins allow you to customize their appearance or functionality—explore these settings for a personalized experience.
- Integration Settings: If your plugin interacts with other services (like email marketing or social media), ensure these integrations are set up properly.
It’s always an excellent idea to refer to the plugin’s documentation for specific configuration steps. Here’s a quick comparison table that highlights the types of plugins you might encounter and their typical configuration requirements:
| Plugin type | Common Configurations |
|---|---|
| SEO Plugins | Keyword settings, sitemap generation, social sharing options |
| E-commerce Plugins | Payment gateways, shipping options, product settings |
| Security plugins | Firewall settings, login protection, backup options |
After adjusting the settings to your liking, don’t forget to click the Save Changes button! This step ensures that all your configurations are stored and implemented. Testing the plugin’s functionality afterward is crucial—visit the front end of your website and see how the plugin behaves. Make any further adjustments as needed.
Remember, each plugin is unique, and your experience may vary. don’t hesitate to explore forums or support pages if you encounter any issues. with the right configuration, your new plugin can become a powerful tool in your wordpress arsenal!
Troubleshooting Common Plugin Installation Issues
Installing a WordPress plugin should be a straightforward process,but sometimes you may run into issues. Here are some common problems you might face during installation and how to resolve them.
- Plugin Compatibility: Always check if the plugin is compatible with your version of WordPress. an outdated plugin can cause errors. Look for the compatibility information on the plugin’s page in the WordPress repository.
- Insufficient Permissions: if you encounter a message about insufficient permissions, ensure that your user role has the capability to install plugins. if you’re not the site admin, you may need to ask for elevated access.
- Memory Limit Exceeded: A common issue is hitting the memory limit of your hosting environment. If you see an error message indicating this, consider increasing your PHP memory limit. This can frequently enough be done by editing your wp-config.php file.
- Upload Size Limit: Sometimes, the plugin file is too large to upload. If you run into this issue, you can either increase the maximum upload size in your server settings or upload the plugin via FTP.
If you’re using the WordPress admin area to install plugins, sometimes the installation process may just hang. In such cases, consider the following solutions:
- Clear Your Browser Cache: A simple cache clearing can resolve loading issues. Try refreshing your browser or switching to a different one to see if that does the trick.
- Check Server Logs: Your server logs can provide valuable insight into any errors during the installation process. Look for any specific error messages that could point you toward a solution.
- Disable All Plugins: Temporarily deactivate all plugins and try installing the new one again.Sometimes, conflicts between plugins can prevent new installations.
If you continue experiencing issues, here’s a quick reference table summarizing potential problems and their solutions:
| problem | solution |
|---|---|
| Plugin Compatibility | Check plugin version against WordPress version |
| Insufficient Permissions | Contact site admin for access |
| Memory Limit Exceeded | Increase PHP memory limit |
| Upload Size Limit | Increase upload size in server settings |
By following these troubleshooting steps, you should be able to navigate common plugin installation hurdles with ease. Remember, patience is key when dealing with tech issues. Don’t hesitate to seek help from WordPress forums or plugin support if problems persist!
Keeping Your plugins Updated for Optimal Performance
When it comes to maintaining a well-functioning WordPress site, keeping your plugins updated plays a crucial role. Regularly updating your plugins not only enhances performance but also boosts security and compatibility with the latest WordPress version.Outdated plugins can lead to slow loading times, broken features, and even vulnerabilities that malicious users might exploit.Thus, making it a habit to check for updates can save you from potential headaches down the line.
Here are some compelling reasons to keep your plugins up to date:
- Enhanced Security: Developers frequently release updates to patch security vulnerabilities. Running outdated plugins can leave your site exposed to attacks.
- Improved Performance: Updates often include optimizations that enhance speed and efficiency,ensuring your site runs smoothly.
- New Features: Many updates introduce new functionalities that can improve user experience, offering more tools to help you achieve your website goals.
- Bug Fixes: Updates typically address known bugs, reducing the chances of encountering annoying issues that might disrupt your site’s operation.
To manage your plugin updates effectively, consider the following best practices:
- Set a Regular Schedule: Make it a routine to check for updates weekly or bi-weekly. this keeps your site fresh without overwhelming you.
- Backup Your Site: Always create a backup before updating plugins. This step ensures you can restore your site if anything goes wrong during the update process.
- Test Updates: If possible, use a staging site to test updates before applying them to your live site. This approach minimizes the risk of conflicts or issues.
Here’s a simple table to visualize the importance of plugin updates:
| Update Type | Benefits |
|---|---|
| Security | Patches vulnerabilities and protects your site. |
| Performance | Improves load times and overall site speed. |
| Features | Gives access to the latest tools and functionalities. |
| Bug Fixes | Addresses issues that could hinder user experience. |
Lastly, dialog is key. Stay connected with plugin developers through their support channels or forums to stay informed about upcoming updates or potential issues. By keeping your plugins updated, you’ll not only maintain optimal performance but also foster a secure and enjoyable experience for your visitors.
Best Practices for Using Multiple Plugins Safely
When it comes to enhancing your WordPress site, plugins are undoubtedly your best friends. Though, using multiple plugins can sometimes lead to conflicts and performance issues if not managed correctly. To ensure a smooth experience, consider the following best practices:
- Choose Quality Over Quantity: Opt for well-coded plugins from reputable developers. Fewer high-quality plugins are preferable to many poorly designed ones.
- Regular Updates: Always keep your plugins updated. Developers frequently release updates to patch vulnerabilities, add features, or enhance performance.
- Check Compatibility: Before installing a new plugin,verify that it’s compatible with your current WordPress version and other active plugins to avoid conflicts.
Another important aspect to consider is testing your plugins before deploying them on your live site. This can save you from potential headaches down the line. Here’s how you can do this effectively:
- Use a Staging Environment: Set up a staging site where you can install and test plugins without affecting your live website.
- Monitor Site Performance: After adding a new plugin, pay attention to your site’s loading speed and performance. Tools like GTmetrix or Google PageSpeed Insights can definitely help identify any issues.
It’s also wise to periodically audit your plugins. Over time, you might find that some plugins are no longer necessary or that you have duplicates performing the same function. Consider the following steps:
- Remove Unused Plugins: Deactivate and delete any plugins that you don’t use to reduce security risks and improve performance.
- Evaluate Plugin Functionality: Look for plugins that offer similar features and combine them if possible. Reducing the number of plugins can streamline your site.
always back up your site before making significant changes, such as adding or removing plugins. You never know when a change might cause an unexpected issue, and having a backup ensures you can quickly revert if needed.
| Best Practices | Description |
|---|---|
| Quality Plugins | Prioritize well-reviewed and regularly updated plugins. |
| Regular Updates | Keep all plugins updated to mitigate security risks. |
| Staging Sites | Test new plugins in a safe environment before going live. |
| Backup Regularly | Always have a recent backup to restore from in case of issues. |
Exploring Popular Must-Have Plugins for Beginners
Popular Must-Have Plugins for Beginners
When you first dive into the world of WordPress, the plethora of plugins available can be overwhelming. However,there are a few essential plugins that can significantly enhance your site’s functionality without complicating your experience.Here are some must-have plugins you should consider:
- Yoast SEO: This plugin will help you optimize your content for search engines, making it easier for people to find your site. Its user-friendly interface guides you through keyword optimization, readability checks, and more.
- Jetpack: A powerhouse of features,Jetpack provides security,performance boosts,and enhanced site management tools.With options for site stats, social sharing, and automated backups, it’s a comprehensive toolkit.
- Contact Form 7: Create and manage multiple contact forms with ease. this plugin allows you to customize your forms and supports spam filtering, making it perfect for gathering inquiries without hassle.
- WooCommerce: If you’re planning to set up an online store, WooCommerce is the go-to plugin. It offers everything you need for selling products, from inventory management to payment gateways.
- Elementor: Want to build beatiful pages without coding? Elementor is a drag-and-drop page builder that gives you creative freedom, allowing you to design stunning layouts effortlessly.
While these plugins are excellent starting points, it’s critically important to choose based on your specific needs. Here’s a quick comparison table to help you determine which might be the best fit for you:
| Plugin | Primary Function | Best For |
|---|---|---|
| Yoast SEO | SEO Optimization | Bloggers & Content Creators |
| Jetpack | Site Management & Security | All Websites |
| Contact Form 7 | Contact Forms | Service Providers |
| WooCommerce | eCommerce | online Stores |
| Elementor | page Building | Designers & Marketers |
Installing these plugins is a straightforward process. Simply navigate to your WordPress dashboard, click on “Plugins,” then “Add New,” and search for the plugin you want. Once you find it, click “Install Now” and then “Activate.” Your site will be equipped with robust tools that can help you grow and thrive online.
Remember, the key to a successful website is not just about adding a multitude of plugins but selecting the right ones that serve your unique goals.So, take the time to explore these options, test them out, and watch as your site transforms into a powerful online presence.

Tips for Uninstalling Plugins Without a Hitch
Uninstalling plugins from your WordPress site may seem straightforward, but a few tips can help ensure the process goes smoothly. Here’s how to do it without any hiccups:
- Backup Your Site: Before making any changes,always back up your WordPress site. This ensures you can restore it if anything goes wrong during the uninstall process.
- Deactivate First: Rather than jumping straight to deletion, deactivate the plugin first. This step allows you to see if your site behaves differently without the plugin before fully removing it.
- Check for Dependencies: Some plugins depend on others.Be mindful of this when uninstalling; check if the plugin you’re removing is linked to any essential functionality on your site.
- Review Settings: Before uninstalling, take a moment to document or review the settings of the plugin. You might need to replicate these settings if you decide to use a different plugin later.
- Remove Data: After uninstalling, check if the plugin leaves behind any data or settings in your WordPress database. If you’re sure you won’t need them, consider cleaning those up too.
if you’re worried about the ramifications of uninstalling a plugin, consider creating a staging site. This replica of your live site allows you to test any changes safely without impacting your users:
| Action | Purpose |
|---|---|
| Backup | Preserve your site’s current state |
| deactivate Plugin | Check for issues without full removal |
| Inspect Site | Identify if any features are affected |
| Clean Up | Remove any leftover data from the plugin |
Lastly, keep your site’s performance in mind. Regularly reviewing and uninstalling unnecessary plugins can help maintain speed and efficiency. A leaner site typically offers a better user experience,so take the time to assess which plugins you truly need!

Enhancing Your Website’s Functionality with Plugins
Plugins are the secret sauce that can elevate a basic WordPress site into a powerful, feature-rich platform. They allow you to customize your site without needing to write a single line of code. Whether you’re looking to improve SEO, enhance security, or add a contact form, there’s a plugin to help you achieve your goals.
Here are some reasons why you should consider using plugins:
- Increased Functionality: Add elegant features like e-commerce capabilities, social media buttons, and analytics tools.
- User Experience Enhancements: Improve navigation and engagement with plugins designed for performance optimization.
- Time-Saving Solutions: Automate repetitive tasks and streamline your workflow with tools that handle everything from backups to updates.
Installing a plugin is a straightforward process. Simply navigate to your WordPress dashboard, click on ‘Plugins,’ and then ‘Add New.’ You can search for plugins by keyword or browse through featured, popular, or recommended options. Once you find the one you want, just hit ‘Install Now’ and then ’activate’ to start using it immediately.
| Plugin Name | Functionality | Rating |
|---|---|---|
| Yoast SEO | SEO Optimization | 5 Stars |
| WooCommerce | E-commerce Solutions | 4.9 Stars |
| Wordfence | security Enhancements | 4.8 Stars |
| Contact Form 7 | Form Creation | 4.7 Stars |
After activation, most plugins will add a new menu item to your dashboard or settings page, allowing you to customize their features. This is the time to dive into the settings and configure them according to your needs. Don’t hesitate to consult the documentation or support forums if you encounter any challenges; the community is there to help!
Remember to keep your plugins updated. Regular updates not only improve functionality but also enhance security. Outdated plugins can become vulnerable, so check for updates often and ensure your site’s security remains intact. With this powerful tool at your disposal, you can transform your website into a unique reflection of your brand and a seamless experience for your visitors.
Final Thoughts on Mastering WordPress Plugins
Mastering WordPress plugins is not just about installing and activating them; it’s about understanding how these powerful tools can elevate your website’s functionality and user experience. as you explore the vast ocean of plugins, you’ll quickly realise that the right ones can significantly enhance your site’s capabilities, whether it’s for SEO, security, or performance optimization.
One of the first steps in mastering plugins is learning how to select the right ones for your needs. With thousands available, consider these tips:
- Research Ratings and Reviews: Dive into user feedback to gauge a plugin’s reliability.
- Check Update History: Ensure the plugin is regularly updated to maintain compatibility with the latest WordPress version.
- Explore Support Options: Look for plugins with comprehensive support and documentation.
Once you’ve chosen your plugins, it’s essential to manage them effectively. Here are a few best practices:
- Limit the Number of Plugins: Too many can slow down your site. Aim for a lean selection that serves your core needs.
- Regularly Review and Update: Keep your plugins updated to benefit from new features and security fixes.
- Deactivate Unused Plugins: If a plugin isn’t enhancing your site, consider disabling or deleting it altogether.
For those curious about the impact of plugins on performance, consider this table that showcases common plugins and their potential effect on loading speed:
| Plugin Type | Effect on Speed |
|---|---|
| SEO Plugins | Minimal impact |
| Security Plugins | Low to moderate |
| Performance Optimization | Can improve speed |
| Social Sharing | Variable |
Lastly, don’t forget to experiment! WordPress plugins offer countless possibilities to customize and enhance your site.test new plugins in a staging environment before pushing them live, and don’t hesitate to uninstall those that don’t meet your expectations. By taking these steps, you’ll gain confidence in your ability to master WordPress plugins and create a site that stands out from the crowd.
Frequently Asked Questions (FAQ)
Q&A: How to Install a WordPress Plugin (Beginner’s Guide)
Q1: What exactly is a WordPress plugin?
A1: Great question! A WordPress plugin is like an app for your website. It adds extra features and functionality, so you can customize your site without needing to know any code! Whether you want to add a contact form, improve your site’s SEO, or even create an online store, there’s a plugin for that.
Q2: Why should I use plugins on my WordPress site?
A2: Plugins can significantly enhance your website’s capabilities. They save you time and effort while allowing you to tailor your site to meet your specific needs. Plus, with thousands of plugins available, you can easily find solutions for virtually any function you want to add!
Q3: Are plugins safe to use?
A3: Absolutely! While most plugins are safe and come from reputable developers, it’s essential to choose wisely. Always look for plugins that have good reviews, regular updates, and a solid number of active installations. This way, you can ensure you’re using a reliable and secure plugin.
Q4: How do I install a WordPress plugin?
A4: Installing a WordPress plugin is super easy! Just follow these steps:
- Log in to your WordPress admin dashboard.
- Go to the “Plugins” section and click “Add New.”
- Use the search bar to find the plugin you want. You can also upload a plugin if you’ve downloaded it from another source.
- Once you find it,click “Install now” and then activate the plugin.Voila! You’re all set!
Q5: Can I install multiple plugins at once?
A5: Yes, you can! Just check the boxes next to the plugins you want to install and select “Bulk Actions” > “Install” from the dropdown menu. It’s a time-saver for sure, especially if you have a list of plugins you want to add!
Q6: What happens if a plugin doesn’t work properly?
A6: If a plugin causes issues, don’t panic! You can deactivate or delete it easily. Just go back to the “Plugins” section in your dashboard, find the problematic plugin, and click “Deactivate” or “Delete.” This should restore your site to its previous state. If you’re experiencing ongoing issues, it might be worth researching alternatives.
Q7: How do I keep my plugins updated?
A7: keeping your plugins updated is crucial for security and performance. WordPress will often notify you when updates are available. Just head to the “Plugins” section, and you’ll see which ones need updating. Simply click “Update Now” for each one, and you’re good to go!
Q8: What’s the best practice for using plugins without slowing down my site?
A8: It’s smart to be cautious! To keep your site running smoothly, only install the plugins you truly need. Regularly review and remove any plugins you no longer use. Also, make sure to choose well-coded plugins that don’t bloat your site. performance is key!
Q9: Can I uninstall a plugin if I change my mind?
A9: Definitely! If you decide that a plugin isn’t right for you, simply go back to the “Plugins” section, deactivate it, and then click “delete.” It’s as easy as that, and you won’t have any lingering issues.
Q10: Any final tips for beginners?
A10: Sure! Start with a few essential plugins to avoid overwhelming yourself. Familiarize yourself with how they work,and don’t hesitate to seek help from the WordPress community if you have questions. plugins can transform your website,so enjoy the process and get creative!
Final Thoughts
And there you have it! Installing a WordPress plugin is easier than you might have thought,right? By following these simple steps,you’re well on your way to enhancing your website’s functionality and user experience. Remember, the right plugins can make all the difference in how your site performs, from improving speed to enhancing security and everything in between.
Now that you’re equipped with the knowledge to navigate the plugin world,don’t hesitate to explore and experiment. After all, each plugin offers unique features that can help you tailor your site to fit your needs perfectly. Just keep an eye on compatibility and reviews!
If you found this guide helpful,why not share it with fellow beginners? And if you have any questions or run into any hiccups during your plugin adventure,drop a comment below. Happy plugin hunting, and here’s to making your WordPress site even more amazing!