
How to Remove Image Links in WordPress: A Simple guide
Hey there, fellow WordPress user! If you’ve ever found yourself frustrated with image links that seem to complicate your website more than they help, you’re not alone.Picture this: you upload a stunning image to your blog, but when someone clicks on it, they’re whisked away to a larger version or an entirely different page. not exactly the user experience you want, right?
Removing those pesky image links can enhance your site’s aesthetics and improve navigation, making it easier for your visitors to focus on your content. Whether you’re looking to streamline your design or simply want to keep readers engaged with your text, knowing how to remove image links is a valuable skill in your WordPress toolkit.
In this article,we’ll walk you through the steps to easily ditch those image links,ensuring that your visuals serve their intended purpose without any distractions. So grab your favorite beverage, settle in, and let’s dive into a simpler, cleaner way to manage images on your WordPress site!
Understanding the Importance of Removing Image Links in wordpress
When managing a WordPress site, the aesthetic and functionality of your images play a crucial role in providing a seamless user experience.One common issue that arises is the presence of image links that can lead visitors to unintended destinations or result in a cluttered visual appearance. Understanding the importance of removing these links is essential for both user engagement and SEO.
Improving User Experience is paramount in retaining your audience. When images are linked directly to other pages or external sites, it may create confusion for users who expect an image to be simply a visual element rather than a navigation tool. By removing these links, you can create a more straightforward and enjoyable browsing experience, allowing users to engage with your content without distractions.
Moreover, eliminating image links can also enhance your site’s SEO performance. Search engines prioritize user experience, and a clean layout can result in longer visit durations and lower bounce rates. When visitors don’t click away from your site unintentionally due to misleading image links, it sends positive signals to search engines, perhaps boosting your rankings.
Another important aspect to consider is page loading speed. While images are necessary for visual appeal, linked images can sometimes slow down loading times, especially if they link to larger files or external sites. By ensuring images are not unnecessarily linked, you can streamline your content, leading to quicker load times and improved performance metrics.
To simplify the process of removing image links,consider the following tips:
- Inspect images in your media library and check for any unwanted links.
- Utilize plugins that specifically address image link issues, making management easier.
- Regularly review your posts to ensure all images serve their intended purpose without links.
In some cases, you might want to keep certain linked images for promotional purposes. Here’s a quick reference table to help you decide:
| Image Type | Keep Link? | Reason |
|---|---|---|
| Product Images | Yes | Drives sales directly |
| Stock Photos | No | No additional value |
| Infographics | No | Focus on information sharing |
Ultimately, the decision to remove image links in wordpress should be guided by your site’s goals and audience preferences. A clean, navigable, and enjoyable user experience will not onyl benefit your site’s aesthetic but also its overall performance and success.
Common Scenarios Where You Need to Remove Image Links
Removing image links from your wordpress site can be essential for a variety of reasons. Here are some common scenarios where this action becomes necessary:
- Website Redesigns: When giving your site a fresh look, you may want to remove outdated image links that no longer fit your new design aesthetic.
- Content Updates: If you’re updating old posts, it’s an excellent idea to clean up any broken or irrelevant image links that detract from your content’s credibility.
- SEO Optimization: Images with links that lead to irrelevant or spammy sites can negatively impact your SEO. Removing these links can help improve your search rankings.
- Performance Improvements: Excessive image links can slow down your site. By removing unnecessary ones, you can enhance your site’s loading speed and overall performance.
Consider the following table for a clearer perspective on when to remove image links:
| Scenario | Reason |
|---|---|
| website Redesign | Outdated aesthetics |
| Content Update | Broken or irrelevant links |
| SEO Optimization | Negative impact on rankings |
| Performance Improvement | Site loading speed |
Another scenario to consider is during content migration. when transferring content from one platform to another,it’s crucial to ensure that all links,especially image links,are functional.If you find that certain images are no longer relevant to the context of your new content, removing them can create a cleaner and more cohesive experience for your visitors.
Lastly, if you’re running an online store or a portfolio site, you may need to remove image links to keep your offerings fresh. Regularly updating your visuals and removing old links not only keeps your inventory current but also enhances user experience by guiding customers towards your latest products or projects.
Step-by-Step Guide to Removing Image Links in the Media Library
Removing image links from your Media Library in WordPress is a straightforward task, but it requires careful attention to detail to ensure that you don’t unintentionally remove valuable assets. Here’s how to do it step-by-step:
- Log into your WordPress Dashboard: Access your admin panel using your credentials.
- Navigate to the Media Library: Click on the ‘Media’ tab on the left sidebar to open your Media Library. You will see all the images and files you’ve uploaded.
- select the Image: Browse through your media items, or use the search bar to find the specific image link you want to remove.
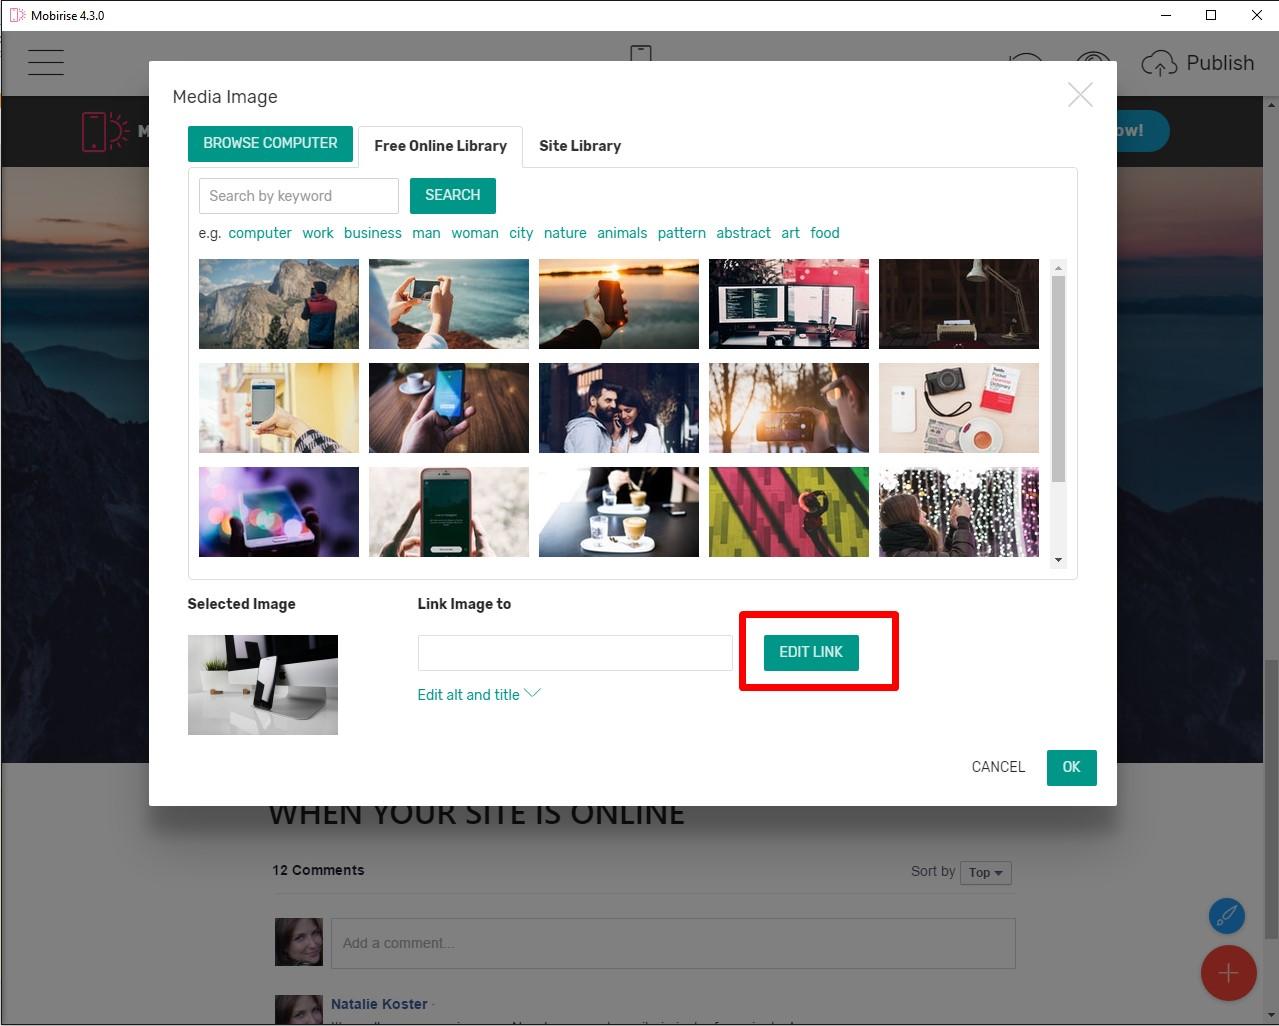
- Open the attachment Details: Click on the image thumbnail to open its details. Here you can see all the information related to the image, including the file URL.
Once you have the image open,it’s time to remove the link:
- Locate the URL: In the attachment details,you will see a ’File URL’ box. This is the link you want to remove.
- Edit the Link: If you want to change the link to something else,simply replace the existing URL with the new one.However, if you’re looking to remove the link entirely, follow the next step.
- Clear the URL: Simply delete the URL from the ‘File URL’ field and save your changes. This action will unlink the image from any references across your site.
If you prefer a visual guide, consider creating a checklist or collecting screenshots of each step. This can definitely help you or others to follow the process more easily in the future. Additionally, in case you want to undo the removal of the link, always ensure that you have a backup of your media files. To illustrate:
| Step | Action |
|---|---|
| 1 | Log into WordPress |
| 2 | Go to Media Library |
| 3 | Select and Edit Image |
| 4 | Remove or Edit Link |
don’t forget to save your changes once you’re done! You may also want to check your pages or posts where the image is used to ensure everything displays as expected. Taking these steps will help keep your Media Library organized and your website running smoothly.
Using Plugins to Simplify Image Link Removal
Managing image links in WordPress can be a tedious task, especially if you’re dealing with a large volume of content. Fortunately, there are several plugins specifically designed to facilitate the removal of unwanted image links, allowing you to streamline the process and focus on creating great content. With just a few clicks, you can simplify your workflow and enhance your site’s appearance.
Here are some popular plugins that can definitely help you efficiently remove image links:
- Disable Right Click For WP: This plugin not only helps in disabling image links but also protects your images from being downloaded without permission.
- Image Widget: This plugin allows you to use images in your widgets without any links, significantly simplifying image management.
- no Image Link: A straightforward solution that removes all links from images throughout your site with a single setting adjustment.
When selecting a plugin, consider the following factors:
| Plugin | features | Ease of Use |
|---|---|---|
| Disable Right Click For WP | Disables right-click, protects images | Easy |
| Image Widget | Link-free image widget support | Vrey Easy |
| No Image link | Global link removal | Simple |
Once you choose a plugin, installation is straightforward. Simply navigate to the Plugins section of your WordPress dashboard, search for the plugin you want, and click “Install Now.” After activation, you’ll often find a settings page where you can customize your preferences to suit your needs.
By utilizing these plugins, you’ll not only save time but also enhance user experience on your site.When visitors don’t encounter unnecessary links on your images, it encourages them to engage more with your content. simplifying image link removal through plugins is a strategic decision that can lead to a cleaner and more professional-looking website.

the Manual Method: How to Remove Links from Images in Posts
Removing links from images in your WordPress posts is a straightforward process that can enhance user experience. Whether you want to eliminate unwanted distractions or streamline your content, following these manual steps will put you in control of your images.
First, navigate to the WordPress Dashboard. From here, go to the Posts section and open the post that contains the image you want to edit. once your post is open in the editor, locate the image in question. Click on the image to reveal its settings.
Next, you will see an Edit option appear above the image. Click on this option to access the image details. Look for the Link To setting. by default, this might be set to link to the media file or attachment page. To remove the link entirely, select the No Link option.
After making this selection, it’s crucial to double-check your changes. Make sure the image no longer has a link attached by saving your post and previewing it. This ensures that your image appears seamlessly without any clickable properties. Remember, a clear image can often speak louder than one cluttered with links.
If you have multiple images across various posts, you can expedite the process by utilizing the bulk Edit feature. Here’s a quick guide:
- Select multiple posts from the Posts dashboard.
- Click on Bulk Actions and choose Edit.
- In the bulk edit settings, look for the option to remove links from images.
- Apply the changes and update your posts simultaneously.
Lastly, if you ever need to revisit your images, simply repeat these steps. Keeping your content fresh and user-friendly not only attracts more visitors but also enhances their overall experience on your site. By taking control of your image links, you’re paving the way for a cleaner, more inviting page.
Checking for Broken Links After Removal
Once you’ve successfully removed image links from your WordPress site, it’s crucial to ensure that no broken links remain. Broken links can negatively impact user experience and search engine rankings, so taking the time to check for them is well worth it. Here’s how to efficiently identify and rectify any issues:
- Use a broken Link Checker Plugin: Install a reliable plugin like Broken Link Checker to automate the process. This tool will scan your entire site and notify you of any dead links.
- Manual Checking: For smaller sites, manually clicking through your posts and pages can be effective. Look for links that lead to 404 error pages or display a “not found” message.
- Google Search Console: Utilize the Coverage report in google Search Console. It will highlight any crawl errors, including broken links, helping you to address them promptly.
Additionally, when you find broken links, it’s important to assess the best course of action. Here are some options to consider:
| action | Description |
|---|---|
| Update the Link | If the content has moved, replace the broken link with a new, relevant URL. |
| Remove the Link | If there’s no choice, simply delete the link to enhance user experience. |
| Redirect the Link | For an effective SEO strategy, set up a 301 redirect to guide users to a related page. |
After making changes,revisit your site and run a final check to ensure that all links function smoothly. This not only improves the quality of your content but also enhances your site’s credibility.
Remember, maintaining a healthy link structure is an ongoing task. Regularly monitoring your site will help you catch broken links early, providing a better experience for your visitors and keeping your SEO efforts on track.
Best Practices for Image Management in WordPress
Managing images effectively in WordPress can significantly enhance your website’s performance and user experience. One common task that many users face is removing image links that may no longer serve a purpose. Whether you’re cleaning up your media library or optimizing your content, knowing how to efficiently remove these links is crucial.
To start, consider these simple steps to remove image links:
- Edit the Image in the Post: Navigate to the post or page where the image is located. Click on the image and choose the edit option. From there, you can clear the link from the ‘Image Details’ section.
- Use Block Editor Features: If you’re using the Gutenberg block editor, select the image block and look for the link settings in the right sidebar. Simply remove the hyperlink from there.
- Bulk Edit in Media Library: For multiple images, head to the Media Library. You can select multiple images and edit them in bulk to remove links, saving you time.
Another method to effectively manage image links is to utilize plugins designed for media management. Here are a few popular options:
| Plugin Name | Purpose |
|---|---|
| Media Cleaner | Identifies unused images and links, allowing for a more streamlined media library. |
| Asset CleanUp | Helps you remove unnecessary links and scripts associated with images on your site. |
| Image Attributes Fixer | Automatically fixes or removes links from images across your website. |
don’t forget the importance of regularly reviewing your media library.Keeping track of images that are linked can definitely help you maintain a clean and efficient site. Periodically, you should:
- Audit Your Media Library: Check for images that are no longer in use and remove them to free up space.
- Optimize Image Sizes: ensure images are appropriately sized to improve loading times.
- Utilize Descriptive Alt Text: This not only aids SEO but also enhances accessibility for users.
By following these practices, you’ll not only remove unnecessary image links but also improve the overall health of your WordPress site. A well-managed media library can lead to better performance and a more enjoyable experience for your visitors.

Preventing Future Image links from Being created
to ensure that future image links are not created in your WordPress site, its essential to adjust some settings and practices within your media management workflow. Here are a few strategies to consider:
- Use the Media Settings: Navigate to
Settings>Mediain your WordPress dashboard. Here, you can manage the default sizes for images you upload. Limiting the dimensions can help prevent excessive image links, notably if you’re using them primarily for display purposes. - Disable Automatic Links: By default, WordPress may automatically create links for images in your posts. To tackle this, you could use a code snippet in your theme’s
functions.phpfile to prevent WordPress from making images clickable. This way,your images will remain as static elements within your content. - Optimize Image Usage: consider using plugins designed to optimize image handling.Plugins like smush and ShortPixel not only compress images but can also help in managing how images are linked. They often provide options to prevent automatic linking as part of their features.
- Review your Theme’s Settings: Your WordPress theme may have unique settings for handling images. Check the theme options in the customizer or theme panel to see if there are settings that control image linking behavior. you might find options to modify how images appear and whether they should link to the media file.
Additionally, consider your content creation workflow. If you consistently insert images manually,you have more control over how they are configured:
- manually Insert Images: Instead of using the default media buttons,try using the
Texteditor to manually insert images with the desiredimgtag attributes. This allows you to specify exactly how the images should behave. - Educate Contributors: If multiple authors contribute to your site, ensure they are educated on how to upload and link images correctly. Provide guidelines on best practices for image usage,including when and how to link images.
Lastly, if you find that you need to adjust existing images’ linking behavior, don’t hesitate to use bulk actions.For instance, plugins that allow bulk image editing can be a lifesaver in removing links from previously uploaded images—saving you time and effort without compromising your site’s integrity.
Alternatives to Linking Images: Enhancing User Experience
When it comes to improving user experience on your WordPress site, moving away from conventional image links can be a game changer. Instead of using images as mere links,consider these alternative approaches to engage your visitors:
- Image Galleries: Instead of linking individual images,create a gallery.This allows users to view multiple images in one place, enhancing visual storytelling without overwhelming them with links.
- Lightbox Effects: Implement lightbox functionality to open images in an overlay on the same page. This keeps users focused on content without taking them away from their current view.
- clickable Image Maps: Use image maps to make specific areas of an image clickable, which can lead to different sections of your site or external resources, offering a unique navigation experience.
- Infographics: Combine text and images to create infographics that provide information visually. This type of content is frequently enough more engaging and shareable,reducing the need for separate links.
Another great option is to utilize images as background elements.By setting images as backgrounds for sections of your content, you can create a visually appealing layout that keeps users engaged without the distraction of clickable links. This method can be particularly effective for headers or section dividers.
Additionally, consider incorporating hover effects on images. When users hover over an image, you can display additional information or a call to action. This provides an interactive experience that encourages user engagement without relying on standard links.
| Image Usage | Benefits |
|---|---|
| Image Galleries | Showcases multiple images, enhancing engagement. |
| Lightbox Effects | Maintains site focus while providing a full view. |
| Image Maps | Offers intuitive navigation without clutter. |
| Infographics | Combines visuals and text for effective communication. |
By exploring these alternatives, you can create a more visually engaging and user-friendly experience on your WordPress site. Remember, the goal is to keep your users engaged while providing them with easy access to information without the hassle of navigating away from the content they came to enjoy.
troubleshooting Common Issues When Removing Image Links
When you’re tackling the task of removing image links in WordPress, you might encounter a few hiccups along the way. These common issues can be frustrating, but don’t worry—there are effective solutions to help you through the process.
Broken Image Links: If you find that some of your images aren’t displaying properly after removing links, it could be due to broken links in your media library. Here’s how to troubleshoot:
- Check your media library for any missing or deleted images.
- Use an image optimization plugin to scan and fix broken links.
- Manually replace broken URLs with updated ones or remove them altogether.
Unexpected Layout Changes: Another common issue is unplanned layout shifts after removing image links, especially if those images were critical to the design. Here’s what to do:
- Inspect your theme’s CSS to see if the removed images were controlling certain styles.
- Consider adding alternative images or using placeholder graphics to maintain layout integrity.
- Test your changes across different devices to ensure a consistent user experience.
SEO Impact: removing image links can also affect your SEO ranking if not handled properly. To mitigate any adverse effects:
- Redirect removed image URLs to relevant content using 301 redirects.
- Update your sitemap to reflect the changes and submit it to search engines.
- Ensure that your alt tags and image descriptions are still relevant or updated.
If you’re facing issues with plugin conflicts, especially when using multiple plugins for image management, consider these steps:
- Deactivate all plugins and reactivate them one by one to identify the problematic plugin.
- Look for plugin updates or alternatives that are better optimized for your version of WordPress.
if you’re still having trouble, create a backup of your site before trying any drastic measures. This way, you can always revert back to a previous state if necessary. remember, patience and persistence are crucial when navigating these common issues!
Wrapping Up: Keeping Your WordPress site Clean and Efficient
Once you’ve tackled the removal of unwanted image links, it’s important to maintain a clean and efficient WordPress site. A streamlined website not only enhances user experience but also contributes to better SEO rankings. Here are some practical steps you can follow:
- Regular Audits: Conduct periodic checks to identify any outdated or broken links, images, or plugins.Tools like the Broken Link Checker can help automate this process.
- Optimize Images: Ensure all images are properly sized and optimized. Large files can slow down your site. Use plugins like Smush to compress images without losing quality.
- Use a Content Delivery Network (CDN): Implementing a CDN can increase the speed at which your images load,improving your site’s performance and user satisfaction.
- Limit Plugins: while plugins add functionality, having too many can lead to clutter and increased load times. Regularly evaluate which plugins are essential and remove the rest.
another key consideration is your site’s overall design and layout. A cluttered design can detract from the user experience. Here are some tips to keep your site looking sharp:
- Consistent theme: Stick with a cohesive theme that aligns with your brand identity. This not only looks professional but also keeps visitors engaged.
- Whitespace is Your Friend: Don’t be afraid of empty space! Proper use of whitespace can make your content more digestible and your site more attractive.
- Navigation: Simplify your navigation menu. A clean and intuitive menu helps visitors find what they are looking for quickly, reducing bounce rates.
Lastly, regularly updating your WordPress version, themes, and plugins is crucial for security and performance. Outdated components can lead to vulnerabilities and slow loading times. Set a reminder to check for updates at least once a month.
By integrating these practices into your website management routine, you’ll not only ensure that your site remains clean and efficient but also create a better experience for your visitors. A well-maintained WordPress site is a powerful tool for attracting and retaining an audience, ultimately leading to greater success.
Frequently Asked Questions (FAQ)
Sure! Here’s a conversational and persuasive Q&A style article on ”How to Remove Image Links in WordPress”:
Q&A: How to Remove Image Links in WordPress
Q: Why should I remove image links in my WordPress site?
A: Great question! There are a few reasons you might want to consider. First, image links can sometimes lead to broken or irrelevant pages, which can frustrate your visitors. Additionally, removing unnecessary links can improve your site’s performance and SEO. Plus, it just looks cleaner!
Q: Is it difficult to remove image links?
A: not at all! In fact, it’s quite straightforward. Whether you’re a WordPress newbie or have been around the block a few times, you’ll find the process easy to follow. Trust me, a little bit of time spent cleaning up your links can yield a much better user experience.
Q: What are the steps to remove image links?
A: Here’s a simple step-by-step guide:
- log in to your WordPress Dashboard.
Start by heading to your site’s admin area.
- Go to the Media Library.
Click on ‘Media’ on the left sidebar. Here, you’ll find all your uploaded images.
- Select the Image.
Click on the image that you want to edit. A details page will pop up.
- Edit or Remove the Link.
In the attachment details, locate the ‘Link To’ option. You can change it to ‘None’ if you want to remove the link entirely. If you want to set a different link, you can do that here too.
- Update.
Don’t forget to click on the ‘Update’ button to save your changes!
Q: What if I have many images to edit?
A: No problem! For bulk editing, you can use a plugin like “Remove Image Links” or similar. These plugins allow you to quickly remove links from multiple images at once. It saves you time and effort, so you can spend more time creating great content!
Q: are there any risks involved in removing image links?
A: Generally, there aren’t any major risks. However, if you’re linking to images that are important for your content, make sure to consider how removing those links might impact your readers’ experience. Always keep your audience in mind!
Q: How will removing image links improve my site?
A: By removing unnecessary links, you’ll create a smoother browsing experience for your visitors. It enhances site performance and can even boost your SEO rankings since search engines favor user-friendly websites. It’s a win-win!
Q: Any final tips for managing images in WordPress?
A: Absolutely! Always name your images descriptively and use alt text for accessibility and SEO.And regularly check for broken links to keep your site in tip-top shape. Your readers (and Google) will thank you!
By following these simple steps,you’ll not only enhance the functionality of your website but also create a more enjoyable experience for your visitors. So, why wait? Get started on removing those image links today and watch your site thrive!
The Way Forward
As we wrap up our deep dive into removing image links in WordPress, we hope you now feel empowered to take control of your website’s visual elements. Whether you’re aiming for a cleaner look or simply want to improve your site’s user experience, mastering this little trick can make a big difference.
Remember, it’s not just about aesthetics; it’s about creating a seamless navigation experience for your visitors. By following the steps we outlined, you’re not only enhancing your site’s design but also its functionality. So go ahead, put your newfound skills to practice and watch your website transform!
If you found this guide helpful, don’t hesitate to share it with fellow WordPress users. And if you have any questions or need further assistance, feel free to drop a comment below—we’re here to help! Happy blogging!